There is more to life with TurboRenault.co.uk

Register a free account today to become a member! Once signed in, you'll be able to participate on this site by adding your own topics and posts, as well as connect with other members through your own private inbox!

Alpine A610 Turbo - Megasquirt Conversion

Oh all ye of little faith! I'll have it running soon!
Got to get the fiancee to pass her manual driving test yet. She failed it in Jan... Retest booked for May.
 
Quick update time as I didn't get much time over the weekend.

I have ordered a 36-1 toothed wheel, but it hasn't come yet. I did, however, finish off the wiring for the injectors. I had a bit of a false start, but simplified things and now have a scheme I'm basically happy with. Two banks of injectors. They all work! Nice!

The faulty coil lead is now working. I've tried everything to make it stop working, but it now just works. I'll keep an eye on it. Perhaps I didn't push it home properly, or one of the pins in the plug wasn't pushed down all the way, and a couple of insertions of the plug have pushed it home.

I needed to buy a 35mm socket for the crank pulley. Only problem is now I need to remove the exhaust to get a breaker bar on it! I also marked a TDC marker on the pulley and one of the sump bolts. I'll use it to set 0 degrees at TDC and then hopefully be able to change the timing from there.

Andrew
 
Batch for now... However, I'm a bit stuck. I am aiming to weld the trigger wheel to the front of the crank pulley. I tried for hours to get it off, but I simply couldn't undo the crankshaft pulley nut. I used an impact driver, but no luck. So I'm going to try welding it on in situ. Getting it perfectly centred is a fiddly and difficult job.
There's an extra pulley on the front of the crankshaft pulley that the trigger wheel would go "round". I wondered about cutting the trigger wheel in half and welding it back together again around the pulley. It looks like it would fit perfectly... But I'm just not sure which way to go.
It's not easy and I'm once again wondering about just using the OE sensor and cam sensor.
 
All right! After a lot of faffing, I have fitted a 36-1 trigger wheel!!!!
I'm not going to show a photo because I am very embarrassed about my welding (will clean it up later). However, in brief, I:
  1. Found that I really, really struggled to undo the crankshaft nut. Tried all the suggestions above and on the RAOC forum. No dice...
  2. So, eventually, I bought an air impact wrench from Machine Mart: Clarke X-Pro CAT131 ½" Twin Hammer Air Impact Wrench - Machine Mart - Machine Mart
  3. It has a maximum torque of 680Nm! I had to also upgrade my compressor's air hose to 10mm, with high-flow connectors. Total cost around £100, but much cheaper than getting someone else to do it...
  4. Anyway, with that impact wrench, a couple of seconds had the crankshaft nut undone. Oh how I wish I'd bought the impact wrench in the first instance!
I then welded a 36-1 trigger wheel to the front of the crankshaft pulley. This was trick as aligning it (as perfectly as I could) took a lot of faffing with some digital callipers. I eventually got it to within about 0.1mm in all directions. I used small, powerful magnets to hold the trigger wheel in place while I welded it on. I preheated it in my oven (don't tell the misses)! And used my welder to weld the wheel in place. Unfortunately I didn't have any gas so I used the flux-cored wire. It's not pretty, but I (almost) got it right. Sadly, despite my best efforts, the wheel wasn't perfectly centred - it was perfect in one plane, but about 0.5mm out each side in the other, which would leave to (in my opinion) too large a gap - i.e. 0.5mm gap at its closest would lead to 1mm at its furthest from the wheel. And I'm a perfectionist....

So, I took it to a local engineering shop, who turned it down for me a very little on their lathe. He confirmed that it was "only" about 0.5mm out.

Interestingly enough, my magnets lost their magnetism after my welding. I wonder why? Maybe they gave up in disgust?

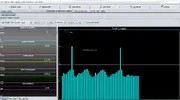
So... a rough bracket made up and now I get this:
Tooth logger.webp
Looking good, no? I count the right number of teeth! The speed drop at the end was as I released the key to stop turning the engine over. Phew. One step closer to running!

Andrew
 
Interestingly enough, my magnets lost their magnetism after my welding.

When heated above 80°C magnets start to lose their magnetic properties, it's caller the Curie temperature. The effect will be permanent if exposed for x time or heated at a much higher temperature, like, for example, close proximity to welding :D Conversely, if you cool a magnet it will get stronger, though not in equal proportion to the heat effect...the increase is comparatively slight. It's all to do with how the atoms align between the poles to foster magnetism, IIRC, and when you heat it up they start moving more sporadically and it all gets messed up and the magnetism is lost.
 
Interesting on the magnets! I heated the whole assembly to 180 degrees in my oven, so that would have done it.

BTDC? I went for 50 degrees based on the megasquirt research I did. Apparently it doesn't matter as I can offset any angle. 50 degrees was recommended due to the suggestion that cranking speed is most stable at that point in the cycle for a V6. I will confirm it with my timing light and adjust the offset accordingly.
 
Right! Update time...
So, last weekend I spent a lot of time putting everything back together - refilling the coolant (it was preeetty manky), refitting vacuum hoses, etc., etc...
Then came the moment to try firing her up, after figuring out the firing order for the wasted spark coils, etc..
I set a cranking advance of 12 degrees, and set the advance to be fixed. Batch fire, 2 squirts per cycle, after calculating the required fuel and therefore the pulse width.
Oh and due to a small miscalculation (I was tired and I got confused), the first tooth is at 115 degrees BTDC. Again, doesn't matter for the Megasquirt.
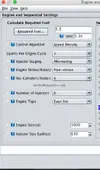
Screenshot at Apr 06 19-40-07.webp
However, cranking it, I could hear it start to fire, but it would eventually just backfire and die, never to run again. So... I went back to the drawing board and looked over all the settings. I didn't realise I needed to calculate an initial fuel map, so I did that:
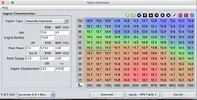
Screenshot at Apr 06 19-43-18.webp
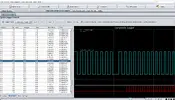
Ah - that looks better! But it still didn't explain the backfiring and the no start. I then looked at the tooth viewer and saw some sync losses, which seemed to correspond with the engine catching and firing. The strange thing was that the tooth waveform looked perfect, so why would it be a sync loss? I was at a loss... Noise due to injectors firing? Shouldn't be as I used screened cable and routed the crank sensor wiring round the other side of the engine to the injector wiring. I swapped to another earth point for the ECU, but that made no difference:
Screenshot at Apr 04 15-25-57.webp
My first thought was that it was a spurious cam sensor signal, but no. Definitely sync loss. I couldn't understand it as everything checked out! I'd also checked the cranking timing with a timing light and it was spot on. Test mode checked out ok with all injectors and all sparks firing.
I knew I was running a very, very old version of the firmware, so I grabbed the latest and uploaded it (clutching at straws).
Then tried again. Even worse this time! No spark. What on earth was going on?
But, no sync loss.
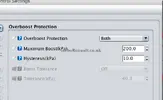
Eventually, I figured out that during cranking, both spark and fuel were being cut. I meticulously went through all the settings, wondering what would cause them to be cut. Eventually, I happened on the overboost protection! I'd set it at 100kpa - now maybe that was a carryover from the previous firmware. Not sure.
Screenshot at Apr 06 19-58-18.webp
But then I realised that it was 100kPa absolute! Not 100kPa boost pressure. I blame the software - it's confusing. Boost should mean boost, not absolute MAP sensor reading. Atmospheric pressure is about 100kPa, so I'd inadvertently activated the overboost protection function to kick in at atmospheric pressure.

I set it to 200kPa, then tried again. This time, I got spark and an engine that was trying to fire. I gave it a bit of gas, then ... splutter, vroooom!
It's allliiive! I can't believe it! Wow!

Video here:

https://goo.gl/photos/i1rULYEwWiRKN22s5

Running very nicely indeed, but I think it's a bit rich initially, then going richer as it warms up.

I now need to tune it, and put a load of things back together properly. I was so fed up with what seemed like interminable wiring, faffing around, etc., that I needed proof that it was all going to work, so I just threw it all together just enough to run. I'm so excited that it's finally running - what a great moment! Just ran out of time this week to do anything more than turn it back off again to revisit another day.

I am going with the original idle valve (sorry, @DaveL485) - still need to build the circuit.
Then I need to build the circuits for the boost solenoid and evap solenoid.

Then loads of tidying of errant wiring, fitting the exhaust, refitting the expansion bottle properly, along with all the myriad of brackets, etc.. I need to connect up all the vacuum/boost pipes properly - for now, I just plugged them with bolts, so they weren't vacuum leaks. The A610 has a complex set of connections to the MAP sensor, boost solenoid, evap solenoid, etc., etc.. Originally, each hose was fitted with coloured bands and there are coloured bushes on all the connections. But... they are called "foolproofing bushes" in the manual. I couldn't figure them out, and I like to think of myself as a reasonably intelligent guy. They didn't seem to properly correspond, so I just plumbed them in from scratch. More like foolish bushes in my opinion! I renewed all the hoses I could see as they were all looking a bit ropey. I left the ones for the evap solenoid as I'll renew those when I'm ready to do that part of the refit.

But... phew. It runs. Phew. I'll say it again.... phew.
 
Mate, having seen this 2 or 3 times in various states in your garage, I am positively over the moon for you.

I'll have the 21 back on the road soon, I'll pop down for a bag of chips.
 
Thanks @la21t and @DaveL485 and @andybond!
Now comes the fun of tuning it! I'll do some basic stuff and then get it off to a rolling road. I have found one local to me. I know Scoff would be the best to go to but he's very far away from me, so would probably prefer to go local rather than all the way ooop North.
If anyone can recommend a rolling road in Kent, I'd be happy to hear from them.
The place I was planning on taking it to was kap tuning:
Home
I've made initial enquires - appears they have done quite a lot of Megasquirt tunes.
Andrew
 
Scoff is a ballache away isnt he? I need to spend 3 months getting myself prepped for the long slog up. At least you've got a product/ecu that people have heard of/used before.....I dont know anyone whos heard of Adaptronic apart from Scoff, Dave and me :ag:

Ive got a few mates with some more exotic stuff and when I tell them I run Adaptronic, they ask 'is that something you made up or made in your garage'.

Let me know how you fare with KAP, if you speak to them ask if theyve heard of Adaptronic haha
 
Back
Top