There is more to life with TurboRenault.co.uk
You are using an out of date browser. It may not display this or other websites correctly.
You should upgrade or use an alternative browser.
You should upgrade or use an alternative browser.
The 1957 Dope Dauphine
- Thread starter Adey
- Start date
Turbell
Well-Known Member
Yep, should have , you've got the early set up so will be same as a 4cv, I'll get parts books out later and take a pic.
Kit should be a pair of bearings, a brass stepped bush that presses into pump body and a sprung seal that goes on impeller shaft, perhaps some felt washers to keep grease in, although newer kits may come with sealed bearings, it all needs pulling together when you come to assemble it, so you'll need bits of tube etc, don't put both bearings in body and try smacking it together.....impeller is on splines and you can end up with it moving if you catch it hitting it/pressing it, resulting in the impeller fouling the pump body.......it's not easy to get it back down splines.
Repair the outlet if needed with chemical metal, and put some blue hylomar on before hoses, orientate the jubilee clips with the screw on the flatter part of the oval outlet, hylomar on all the gaskets/faces......they can be annoyingly leaky, and don't overtighten the M6 fixings, they strip/snap.....a world of pain
Turbell
Well-Known Member
If you go Cleon/Sierra route remember you're gonna need some mounts on the chassis legs, Daup has rear engine crossmember with mounts either side, an 1108 with have mounts on block, whole rear end inc suspension relies on engine/gearbox mounts......giving quite a bit of passive rear steering, especially if mounts are worn, fine on slower roads .......wind it up and Whhhooah.....you'll be sawing away on steering wheel keeping it in one lane.
Turbell
Well-Known Member
Yep, 4CV, 670-5 Gordini engine on a 318 4 speed box, but one piece gearbox casting, after this they went split case all syncro, you'll be after split case R8/10 box, last of 1300 R10 is highest gearing/strongest bar 8G boxes, you'll know boxes from Steve Swanns 8 Gord workshop archived on here?
Also it's got modified/strengthen gearbox cross for flat topped boxes, so it'll take a split in future if i go that way, which I'll have to if planned 904cc build ever happens.
Trailing arms make a massive difference, I'm only pointing them out because you can utilise a similar design if you go 1108cc, because it would throw the rear engine mount cross spare, other designs use an inline arrangement that binds through the arc of the suspension travel, mine copies a better design but moves the pick up from the swing axle tube to the back plate and the other end as near as poss to the point where the trunion bearing axis is.
I'll never show an RS Audi up I know, beyond playing about with other rear engined Renault set ups you'd just build a space frame and mid mount something lary, but I'm just after developing the car to keep it something like a 4cv but with added zip, that I can use reasonably easily on distances.
If you move towards the Daupine Proto angle on the car, what you put in, you're more likely to recoup, it's an investment that'll entertain you and being LHD it can always go back into Europe
Last edited:
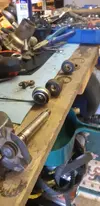
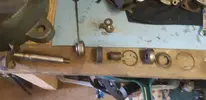
Pump stripped down, removed and lay out in the way It was removed. The nose bearing seems to be very worn out. The bearings were placed at either end of the main tube, I'm assuming this was correct? Also there was no grease in there, though being sealed bearings should it need it? It all looks like it really relies on one sprug carbon seal up against copper/bronze bushing to provide a water tight seal? Not got the new bits here yet so just trying to get everything ready to build back up.


Turbell
Well-Known Member
No, doesn't look like it, all kits I've used are NOS, if bush is badly scored it might matter, otherwise it'll be OK I'd have thought, if it is scored might be an option to face it up?
If you haven't got access to a lathe you could try a piece of 120grit on a glass plate, just lap it flat a bit
Some manuals show putting the pump in a lathe with the bush in and facing it up, but getting a datum in relation to the bush face and bearing wouldn't be easy .
I've got an Argentinan pump on mine, same as Frenchies flog for 200 euro ( I bought direct for about 50 quid) and its shite, terrible casting, dribbles if car sits for months, run it and its fine unless it then sits again.
Build it, torque it up, cross your fingers.
I made a blank plate and pressure tested last pump I built, blocked outlets put a valve in and put it in a bucket with 20psi in pump....
Ive used similar types of carbon seals in the past for thicker fluids and powders but never seen one so small used to hold back something so thin. Ill give it a light rub and make sure its not too damaged and give it a go when the bits are here, cheers again 
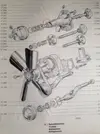
just to confirm the bearing circle ends up against the back of the bronze bushing? and the next bearing sits against the Circlip. Im not sure if the spacer tube was the length of the gap left between the 2?

just to confirm the bearing circle ends up against the back of the bronze bushing? and the next bearing sits against the Circlip. Im not sure if the spacer tube was the length of the gap left between the 2?
Turbell
Well-Known Member
Yes, impeller on shaft, sprung seal, bronze bush seated on pump body, shaft passed through bush, think there's a snap ring....first bearing seated up tight to body,large circlip, tube,outer bearing, final washer/end seal, circlip, woodruff key, pulley, plain washer, spring washer, nut and torqued up....can't remember how tight...10nm?
If they were plain bearings it's packed with grease and there's felt washers either side, nipple on pump at top to regrease
If they were plain bearings it's packed with grease and there's felt washers either side, nipple on pump at top to regrease
Turbell
Well-Known Member
Just to clarify the two large circlips are either side of the outer bearing....had to build one in my head for a moment.....had brain lag as to what stopped outer bearing dropping any further, so tube would be distance between two bearings wouldn't it?
Also you may have a locking tab washer instead o for spring
Also you may have a locking tab washer instead o for spring
all great info, cheer me dears. Hopefully the pump bits will be here early next week so i can carry on with it.
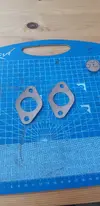
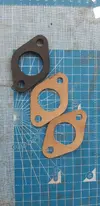
When i removed the carb to see if the bigger one would fit i actually found the base of my carb to be very warped, also the auto choke looked like it was assembled incorrectly. Ive faced off the carb base with same sandpaper and then some finer wet and dry along with some new gaskets and refitted. Car started after a few rotations with the choke flicked to the on position better than ever. I will definitely knock up a manual arm for the choke at some point and run a cable to the dash or floor between the seats. Also gave the fan a quick lick of paint, might give a few more parts a light coating whilst waiting on deliveries.

When i removed the carb to see if the bigger one would fit i actually found the base of my carb to be very warped, also the auto choke looked like it was assembled incorrectly. Ive faced off the carb base with same sandpaper and then some finer wet and dry along with some new gaskets and refitted. Car started after a few rotations with the choke flicked to the on position better than ever. I will definitely knock up a manual arm for the choke at some point and run a cable to the dash or floor between the seats. Also gave the fan a quick lick of paint, might give a few more parts a light coating whilst waiting on deliveries.


Similar threads
- Featured
- Replies
- 82
- Views
- 2K
- Replies
- 8
- Views
- 191

