There is more to life with TurboRenault.co.uk

Register a free account today to become a member! Once signed in, you'll be able to participate on this site by adding your own topics and posts, as well as connect with other members through your own private inbox!

Clio Restoring a 172 Cup track slag..

Wow, time sure does fly in @conor land!! 😁

Great updates sir!! And really making some progress. Top tip for you, many people weld on a bit of Square Tubing to actually jack the car up on, rather than that edge of the seams to save the chaps from Kwik-(Knackeritup)Fit undoing all your hard work the next time they approach with a Trolley-jack.

Plug wiring looks ok to me.

Not a purple car, fan personally, but like your thinking..! 👍👍

keep the updates coming!

Thanks Steve. Jury still somewhat out on the approach for the sills.

Was thinking some angle iron, but I think box might be best. I think a bit of box would offer a lot more.. i'll see if I can scrounge some!
20210821_134455.webp
 
A quick update guys..

I have spent the last few days doing a stock take of various bits and bobs that need doing along with tidying up my work space. Which a felt a lot like moving stuff from one side of the space to another LMAO..

At the weekend I setup a strong batch of citric acid to start dipping some of the running gear. I decided to give this a lash to see how it went, as an alternative to paying somebody to blast them all. You can decide for yourself.. but I think I just saved myself some mega bucks.

So the hubs need another session in the drink and I have been doing the subframe in parts as it's too bi to fully submerge. For the middle section i'll just grind with wire wheel and treat with Bilt Hamber Hydrate 80 before painting. Be grand.


Check out the before and after on the subframe..

20210821_113743.jpg
20210823_185343.jpg


Look at the line which was the level of the acid...

20210823_185348.jpg


Cleaned, dried and primed with Zinc 182.

20210823_191851.jpg
20210823_191901.jpg
 
Wow thats a raft of progress, well done. Looks like you are following tried and tested methods used by many, including myself. Bilt Hamber Hydrate 80 is good stuff! :)
 
Wow thats a raft of progress, well done. Looks like you are following tried and tested methods used by many, including myself. Bilt Hamber Hydrate 80 is good stuff! :)

Thanks Dave.

Yea, I use BHH80 on anything with any specs of rust I can't remove prior to prime/paint.

I'm thinking for the rest of the running gear I might just fire on some hammerite and no zinc primer.
 
So... It's been a minute since my last update, which I apologise for!

Now that the welding repair has been done for the most part. The next logical step is prep for paint and do the actual painting... while that may make sense, I have taken a step back from that in order to get a lot of other stuff in order.

* Tidy up/paint the engine / associated bits
* Tidy up and paint the running gear - i.e. subframes, brake calipers etc.
* Tackle a little bit of rust that was in the rear cabin.. (more on that later..)

Before/After engine cleanup..

This came out well.. I have the timing tool kit on order so when that comes I can lock the cams and get the first cylinder in TDC, which will allow me to remove the belt and clean a bit more.

WhatsApp Image 2021-08-21 at 15.54.57.jpeg

20210822_142630.jpg


Here is after I did some wire wheeling on the die grinder. It came up grand. I think I am going to run some Bilt Hamber Deox Gel on this and wrap the engine in cling file before painting with an engine enamel black I bought in halfords.

20210822_142615.jpg


Was busy painting various bits of running gear. Cheap and cheerfully, i.e. Dipped in Citric Acid and Hammerite Smooth black... not sent for blasting and powder coated. Big difference in money spent, similar enough result ;)

After dipping the subframe ends (container not large enough for full dip) - I power washed off the crap, look how it all just comes straight odd..


N.B. I think this is the point in this post, where there is a bit of a chronological collision with the previous post - please forgive me :)

20210827_205336.jpg


Flap disc

20210829_151332.jpg


Best efforts grinding and cleaning up this part.. it be grand.

20210829_151329.jpg


20210904_145925.jpg

20210830_174215.jpg

20210829_150306.jpg


On these wheel hubs the rust was so bad, after blasting with the power washer, I put them back in the acid for a bit longer. All this stuff eventually came off.

20210827_181734.jpg
 
This post is sponsored by... was chuffed with the 33% extra to be honest. Meant one tin was enough.

20210829_150313.jpg


What I would do is paint one side, let dry and the following evening, flip the piece and do the other side. Some things got two coats and others just the one. It was laid on pretty thick all around, plenty of drips and runs, but who actually cares. You would see them if you went looking.

20210829_170719.jpg

20210830_165213.jpg


20210829_170723.jpg

20210905_135435.jpg

20210907_210852.jpg


Oh and.. I don't have pics, but I dipped the front discs and sprayed in VHT silver, too.. the intention being that when the car is ready and I over do it on photos.. the car will look fresh all around.
 
The painting old pretty quick and I couldn't wait to change the record..

So, before I forgot, I cut out the steering lock pin from the ignition barrel for safety. The theory is that when you are on track and you crash or something - if the electrics fail when you are trying to recover, the steering might lock up. That can no longer happen.

20210829_124407.jpg

20210829_124631.jpg

20210829_125733.jpg

20210829_125857.jpg

20210829_130045.jpg


I then stripped down the rear brake calipers.

This was before the acid..

20210905_173610.jpg


Stripped down and placed in citric acid bath, resulting in some fairly fresh looking calipers if I do say so myself.

Crikey, every time I look at these I marvel at them and think to myself how underrated and under appreciated citric acid is as a deruster/degreaser. I have a small bucket that I put the smaller parts into and decant the liquid back into the main tub after use. That bucket has a nice layer of grease/grime at the bottom, splendid stuff.

Oh and I have seal kits for all four calipers that will need doing.

20210908_202804.jpg

20210908_202807.jpg


Plugged up and ready for paint. This may not be the best job and the paint job might not have been the best but when they are de-plugged and ready for rebuilding I can tidy up the paint with an abrasive pen.

Unfortunately I don't have painted pictures, but I am sure they will feature in subsequent posts. I am using Hammerite on these too. Brakes are easy to re-do and also, I saw a picture of a car that was burned and the only still coloured was the red calipers with Hammerite, so that was good enough for me.

20210908_212607.jpg

20210907_210911.jpg
 
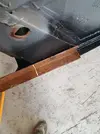
I've also been tidying up the 4 jacking points so they are ready to accept some box section. The box section will re-enforce the points as they will all see plenty of abuse, given the nature of the car. Longer sections on front of car as this is where the jacking will happen (lifts whole side of car) and can also place stands in there while still jacked.

The larger lengths are the offcuts of the smaller pieces... I think it's supposed to go the other way around :o

20210918_140748.jpg

20210918_140954.jpg


A small bit of grinding and hammer to get a nice fit here. The section will be welded in but I think I am also going to drill and add two bolts for extra security as these are critical safety features. My welding might be alright, but I don't want to bet any limbs (or worse!) on it just yet. Thoughts!?

20210919_125339.jpg


There is a dent in this section, which is the oppostite side to where I did the large rust repair and welding. I proceeded to drill a few holes with a view to pulling/pushing it out. It had been suggested to just weld in gussets etc, but this seemed like the right thing to do.

20210919_120402.jpg


Floor pan, to push the dent out with a punch. Will weld up later.

20210919_131255.jpg

It's all a bit crude, but I think it worked.
20210919_134850.jpg


See that small bit of flat bar.. I need to add that as a space for the box section, or the box will be to far inwards and leave a massive lip with the sill. Perhaps my rebuild skins/sill is too large and can be just ground back, a lot! I should probably measure up with the other side, because honestly. if the car is noticeably off balance when stood on two stands set to the same height, my OCD will never let me live it down!!! And it also just seems like shoddy workmanship, perhaps I am just too hard on myself.

20210919_143949.jpg


Bit of a rough and ready post, but you should get an idea of where I am going with this. Very keen to hear thoughts etc on this post in particular. Many thanks, Conor.

20210918_140930.jpg 20210919_135227.jpg
 
So there were also loads of tabs in the boot area that annoyed me. A couple of awkward bits that would have held the rear seats in place.. I am sure they also consume knee caps at a serious rate in track cars. It all had to go..

Few sharp edges ground down and dulled with wire wheel. I'm undecided if I am going to fill and sand these or just a dollop of seam sealer before paint. Probably the latter... I will conquer my OCD. I fear that if I went down the former path.. i'd end up with a boot area reminiscent of the Max Power era.

This is half way through the second one. It's an upside down photo, taken the right way up lol. But you can see where I cut off the bracket on the strut mount area.

20210925_150608.jpg


20210925_105603.jpg


Tabs be gone.. rough and ready but nobody will see these.

20210925_151812.jpg

20210925_151817.jpg

20210926_120620.jpg


One of the mount points for the bracket, I thought i'd be smart and semi drill the spot weld and break them with a chisel. NO!. I can now see the road here... good job I got my hands on a welder... FFS eh!?

20210925_161504.jpg


I think this shal make for a much tidier boot area and less curses in the future.

20210926_120600.jpg
 
You probably saw the rust in one of the photos above. I'm glad I went chasing it.. there was a lot more there than met the eye.

Photos should do most of the explaining here...

One could be forgiven for scrubbing with the wire wheel and thinking job was a good one...

20210925_110435.jpg


20210925_110442.jpg


I ground down the spot welds and cut up the skin in order to pull it back to get a look. Plenty of rust. FWIW - I think the cause was a leak from towards the roof - window perhaps. and it leaked inwards. In the next shot you will see where I had grind away the rust in the wheel wheel exterior to see it.. so I don't think it that way.. thoughts??

20210925_111500.jpg

20210925_111503.jpg


See.. note the rust around the holes is from the rusting fixing plate for the roll cage - it's not bled through the stone chip/sealer.

20210925_111854.jpg

20210925_112700.jpg


This could have ended badly... I must admit, I felt a bit like a dentist for the next pic...

20210925_112947.jpg

20210925_132219.jpg

20210925_135759.jpg

20210925_141922.jpg
 
Scrubbed up nicely and them some Bilt Hamer Hydrate 80 before closing back up.

20210925_141911.jpg

20210925_142631.jpg

20210925_142619.jpg

20210925_163902.jpg


All closed back up now, with the addition of a few extra 6mm holes for plug welds. Similar to a bit I did in up front, I should be able to weld this back up, flap wheel it back to normal looking, as shown below, from a previous post.

20210926_120600.jpg


20210718_142657.jpg


20210718_144508.jpg
 
Oh, i'm getting tired of typing now.

On Sunday I setup a really ghetto/makeshift blasting area, to catch the shot for recycling purposes. Very messy job, but I am successfully and catching the shot, which get's consumed at a serious rate.

I used a charcoal filter breathing mask under my welding mask, worked quite well..

20210926_141722.jpg


20210926_182325.jpg


The calipers needed to be blasted as I don't think the powder coat would have come off with the citric acid, although I could be wrong. I have new seals for these also.

20210926_141735.jpg


Will need to order Brembo stickers on eBay..

20210926_152258.jpg

20210926_141744.jpg

20210926_141741.jpg


That's it for now - I hope you enjoyed.

More to come, I'll try not to leave it as long the next time.
 
Saturday - Update, incoming!!

So this weekend I had planned on welding in the jacking point supports and a few others bits with the MIG - that was not meant to be as the factory is a bit jammed with wood at the moment that has yet to be picked up. No sweat, there are other bits I could do and i'd rather not be cribbing about something I can work around..

Took measurements of the faces for the calipers as I need to order new Brembo decals.. Hot damn though. I don't fancy paying the high postage to Ireland and the customs clearance. The clearance fee is €3.50 for small stuff. So I think i'll just wait until i'm back in the UK as they can be added so easily.

20210929_195040.jpg

20210929_195103.jpg


Dismantled the exhaust too. I want to make some mods.

By standard the Clio 172 / Cup cars had a hidden exhaust tip.. but my current setup is a Milltek one, with twin tips shown. I never liked it.. very ASBO imho as they are blatantly aftermarket. I want to mod the exhaust with a 90 degree bend so that I go back stealth.

I also want to modify the catalytic converter stage so that I can easily swap the cat in and out for track days. Currently, you can see the part that goes up to the manifold... that is mega awkward to get to. I already have a decat pipe (came with car). I want to modify these so that I have access to both ends.

As opposed to cut and weld these, one of the guys has mentioned flexi pipe. But exhaust flexi pipe sounds like something somebody might make as a temporary repair, no?

exhaust-stealth-installed.jpg

proposed-design.png


Surprisingly, I didn't need heat for any of these.. only the lambda sensors.

Need to figure out what to do with this exhaust as it's pretty tatty looking. I started blasting it but it was taking ages. I want it to look sharp for the finished job. My intention is that when the car is ready, everything looks new(ish).. so I can take a bunch of decent photos.. I don't want anything that looks like this exhaust in the photos.

20211002_111008.jpg

20211002_111823.jpg


I finally got around to removing the body strips from the car.. This was so satisfying.

20211002_154237.jpg


Then onto stripping the drivers door down. I forgot to lower the window when car was together, so I need to apply some voltage to the motor later to lower it and remove the rubber trim.

20211002_154245.jpg

20211002_154251.jpg
 
Bit of a mixed bag of photos as I forgot to take some on the first door. But here you can see a before and after of the door being stripped.

20211003_130322.jpg

20211003_125759.jpg

20211003_125905.jpg


Bonnet

20211003_140710.jpg


The hex heads on bolts for the bonnet catches were pretty worn (cheap material) so I needed to drill them out..

20211003_142349.jpg


Oooph

20211003_145709.jpg


I tried to tidy these a little while I was enlarging the slots to make fitment easier. The initial cuts where a little awkward for adding the catches.

20211003_151522.jpg

20211003_145707.jpg


I'm not sure why, but I find something very satisfying about a stripped down body panel.

20211003_151558.jpg
 
Boot lid up next..

20211003_153216.jpg


So I tapped these hinge pins out. It turns out I may not have needed to as the whole fixture can be undone by a nut on the reverse.

That said. As I am doing a colour change I want a thorough paint job. I don't want blue anywhere. While I'm not doing this to prove anything.. if the original colour bleeds through anywhere, that will be low hanging fruit for the nay sayers to say "crap paint job" kind of thing. The struggle is real lol.

20211003_154831.jpg


I saw a guy make a template for badge online.. I thought I was great. 5 minutes masking wasted as the badge is held in with pins. At least I know now. Haha!

20211003_160935.jpg


Inside, stripped.

20211003_155133.jpg


Exterior stripped. Anybody want to come and remove all this crap?? Hate that stuff. There are holes for screws there. Considering how the car will be used, I think i'll be using screws when re-assembling.

20211003_161424.jpg


Next up was the front bumper.. and it was not fun. My fingers are still in recovery after all the tabs..

It was also in a fairly rough state of repair so I imagine I might be doing a bit of plastic welding. I know I could just buy new bits for it, but they could be pricey for what they are. I'd rather buy a plastic welding kit with the money and learn a new skill. Although that said, i'm not sure you even need to buy a kit for welding, it might make it easier.

The black lip on the bottom of the bumper (with open cable ties) is 172 specific. It's bust in two places. Again, considering the use of the car I may opt to bin it and not renew. But on the other hand, it's a nice distinctive touch, and might take from the final result.

Likewise, originally, these cars had a "172 Cup" badge on each B pillar. They often fall off, and I have never had them on this car. I am likely to get a new set as they would be a nice touch. While painting the car purple does put the car out there.. I feel like these touches will "reel it back in", so the speak. What do you think?

20211003_162713.jpg


Brake cooling vents out. Ducting is a bit worse for wear so will be renewing.

20211003_163009.jpg


I damaged one of the ducts during removal. Thankfully this is just GRP so should repair easily and to a good degree.

20211003_163612.jpg


20211003_165624.jpg


And finally....

20211003_170812.jpg
 
..Oh and, for one of the pieces of trim, they were riveted in. While drilling the rivet would spin so I ended up butchering with grinder to get out.

I'm guessing I can patch these up with plastic weld and drill new holes.

20211003_165627.jpg
 
Back
Top