There is more to life with TurboRenault.co.uk
You are using an out of date browser. It may not display this or other websites correctly.
You should upgrade or use an alternative browser.
You should upgrade or use an alternative browser.
5 GT Turbo Phatty-The Return!
- Thread starter Brucieboy
- Start date
Brucieboy
Active Member
Today I stripped, cleaned, checked and rebuilt the front Koni struts which the previous owner had removed as they failed MOT for play. Turns out the main nut was loose on one and the polybush donut in the other had worn a bit so it needed the top hat adjusting with a lump hammer to put pressure back onto it.
Next I greased and rebuilt the steering rack fitting the new gaitor and track rod ends.
After that I put the subframe back together all but the anti roll bar bushes which have been dispatched but not arrived yet.
Looks good from a distance so good enough for me.
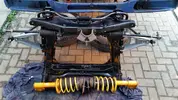
Next I greased and rebuilt the steering rack fitting the new gaitor and track rod ends.
After that I put the subframe back together all but the anti roll bar bushes which have been dispatched but not arrived yet.
Looks good from a distance so good enough for me.

DaveL485
Staff member
Hurry up and get it done then, at this rate of progress i'll deliver my 9 to you in June and expect it finished for xmasToday I stripped, cleaned, checked and rebuilt the front Koni struts which the previous owner had removed as they failed MOT for play. Turns out the main nut was loose on one and the polybush donut in the other had worn a bit so it needed the top hat adjusting with a lump hammer to put pressure back onto it.
Next I greased and rebuilt the steering rack fitting the new gaitor and track rod ends.
After that I put the subframe back together all but the anti roll bar bushes which have been dispatched but not arrived yet.
Looks good from a distance so good enough for me.
View attachment 6252
Brucieboy
Active Member
Did a few bits today. Tarted up the front hubs from this...
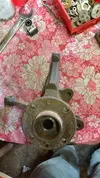
To this. ..
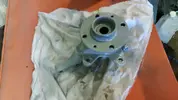
Shame the 2nd one needs a bearing as it was rough as heck when spun. New one ordered.
Next I replaced the damaged main power lead to the starter, tightened and heatshrank the oil sensor wires and extended the snapped oil pressure gauge wire.
I have ordered a nice pair of gold battery terminals with a volt meter built into the positive one to replace the knackered and rotten std ones.

To this. ..

Shame the 2nd one needs a bearing as it was rough as heck when spun. New one ordered.
Next I replaced the damaged main power lead to the starter, tightened and heatshrank the oil sensor wires and extended the snapped oil pressure gauge wire.
I have ordered a nice pair of gold battery terminals with a volt meter built into the positive one to replace the knackered and rotten std ones.
Brucieboy
Active Member
Time for a little update.
Didn't touch the car all weekend as I had the kids up so got onto it as soon as I got home tonight.
Fitted the new fuel pressure gauge onto the fuel rail. Fitted the new steering u/j. Cleaned up the exhaust manifold and downpipe. Fitted Throttle cable, clutch cable brake servo pipe and engine to bulkhead earth lead.
Next came the fitting of the new gold battery positive terminal and terminated the oil pressure switch lead.
The biggest job was to fit the new Williams radiator. This wouldn't have been so bad had i done it before putting the engine back in, so I made some easy access.
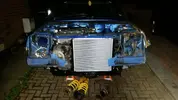
Going to make some plates up to refit the cross member and put the strength back into it but ran out of light tonight. I had to cut the mounting points off the bottom of the rad but it allowed me more room to move it right over to the passenger side. This has created a new problem as the bottom hose is now at full stretch and the circulation pump was hitting the clutch cable by the box causing it to bend sideways so pulled it up and tied it out the way for now until i revise the pipework.
Got loads of little jobs to button up this week after work and might even have it running by the weekend.
Didn't touch the car all weekend as I had the kids up so got onto it as soon as I got home tonight.
Fitted the new fuel pressure gauge onto the fuel rail. Fitted the new steering u/j. Cleaned up the exhaust manifold and downpipe. Fitted Throttle cable, clutch cable brake servo pipe and engine to bulkhead earth lead.
Next came the fitting of the new gold battery positive terminal and terminated the oil pressure switch lead.
The biggest job was to fit the new Williams radiator. This wouldn't have been so bad had i done it before putting the engine back in, so I made some easy access.

Going to make some plates up to refit the cross member and put the strength back into it but ran out of light tonight. I had to cut the mounting points off the bottom of the rad but it allowed me more room to move it right over to the passenger side. This has created a new problem as the bottom hose is now at full stretch and the circulation pump was hitting the clutch cable by the box causing it to bend sideways so pulled it up and tied it out the way for now until i revise the pipework.
Got loads of little jobs to button up this week after work and might even have it running by the weekend.

Brucieboy
Active Member
Tinkered a little bit more last night.
Big thanks to Lewis Hepburn who went out and took pictures of the plugs into the coilpack and TPS on his F7R so I didn't have to start from scratch trying to work my way through the mass of red wires the previous owner bodged into the loom. Tightened up a few connections I had left finger tight on things and now engine is ready for fluids.
Still got exhaust manifold and downpipe to put on and fuel pump wiring to sort before startup and I have to rewire the rad fan as relay had been removed and guess what? Yep wiring was bodged.
Brucieboy
Active Member
A little bit of an update as all the little jobs have been done in the engine bay and all front suspension and steering has been fitted. Exhaust is on and finally engine now runs although it is really hard to get started initially but once warm will tick over ok ish.
Once it had run up to temp and gone through a few fan cycles I shut it off as there were no leaks or anything.
Bumper, headlights, grill and bonnet went back on.
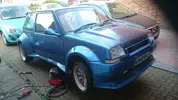
Front end all back together
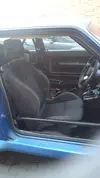
I was going to remove the seats to make it easier to get in to clean the interior and sort the wiring bodges hanging everywhere inside, instead I removed the seats, hovered the carpet and then started fitting my Clio Sport 197 seats!!!
Drivers seat dropped straight in but was too tall so I removed the sliding runners and it dropped the height nicely.
I had to trim about 2" of metal from the tunnel side of the seat so it would fit over the standard floor brace/seatmount and now it is ready to mount to the soon to be strengthened floor.
 As far as I know this will be the only 5 in the world with Clio 197 seats so I decided to go the whole hog and fit the rears as well!
It is going to take some serious modification but they will go in eventually.
Once it had run up to temp and gone through a few fan cycles I shut it off as there were no leaks or anything.
Bumper, headlights, grill and bonnet went back on.
Front end all back together

I was going to remove the seats to make it easier to get in to clean the interior and sort the wiring bodges hanging everywhere inside, instead I removed the seats, hovered the carpet and then started fitting my Clio Sport 197 seats!!!
Drivers seat dropped straight in but was too tall so I removed the sliding runners and it dropped the height nicely.
I had to trim about 2" of metal from the tunnel side of the seat so it would fit over the standard floor brace/seatmount and now it is ready to mount to the soon to be strengthened floor.
 As far as I know this will be the only 5 in the world with Clio 197 seats so I decided to go the whole hog and fit the rears as well!
It is going to take some serious modification but they will go in eventually.
Brucieboy
Active Member
I have toyed with the idea of fitting a number of rally style lights to the car and possibly wrapping it in livery of some description. It caused a bit of a stir on Facebook but here are the pics in case you have not seen them.
The 4 lamp pod is leftover from my Maxi Megane and would only require minor modification to its profile to fit the 5 bonnet.

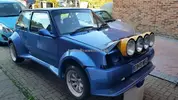 This pic was (badly) modified in Paint to see what it would look like with more lights in the bumper. I really like this look but wouldn't want it like this when I track it so might have to get another bumper as I already have a number of bonnets I could use.
If I do this modded bumper then the 3 slots in it just happen to be exactly the same size as the intercooler I will be fitting when the turbo engine goes in later this year. I might move the number plate or fit a sticker type one to the lower part of the bumper slot so there is no restriction to airflow into the intercooler or radiator.
Just remember, this is my car. It is modified to my taste whether it is to yours or not, I do not care, so please keep your opinions to the Facebook page and not on this thread. Thank you.
The 4 lamp pod is leftover from my Maxi Megane and would only require minor modification to its profile to fit the 5 bonnet.

 This pic was (badly) modified in Paint to see what it would look like with more lights in the bumper. I really like this look but wouldn't want it like this when I track it so might have to get another bumper as I already have a number of bonnets I could use.
If I do this modded bumper then the 3 slots in it just happen to be exactly the same size as the intercooler I will be fitting when the turbo engine goes in later this year. I might move the number plate or fit a sticker type one to the lower part of the bumper slot so there is no restriction to airflow into the intercooler or radiator.
Just remember, this is my car. It is modified to my taste whether it is to yours or not, I do not care, so please keep your opinions to the Facebook page and not on this thread. Thank you.

DaveL485
Staff member
LMAO....fair enough! (Love the light pod though lol)Just remember, this is my car. It is modified to my taste whether it is to yours or not, I do not care, so please keep your opinions to the Facebook page and not on this thread. Thank you.
Norwich Nick
Well-Known Member
Guessing you'd need to make any bumper you get wider to fit, how about the skeete style front bumper with the big round fog lights in? Could probably pick one up cheap enough, I couldn't give one away so chopped it up and put it in the bin.
Brucieboy
Active Member
I have access to the original moulds still so would just get another made. Mine has a lot of damage from the previous owner so would modifyGuessing you'd need to make any bumper you get wider to fit, how about the skeete style front bumper with the big round fog lights in? Could probably pick one up cheap enough, I couldn't give one away so chopped it up and put it in the bin.
mine and paint up the new one std.
DaveL485
Staff member
Thats useful! Bumper for every occasionI have access to the original moulds still
Similar threads
- Replies
- 4
- Views
- 342
- Question
5 GT Turbo
Renault 5 gt turbo radiator options
- Replies
- 13
- Views
- 183
- Question
5 GT Turbo
5 GT Turbo driveshaft thickness
- Replies
- 7
- Views
- 107
- Featured
- Replies
- 74
- Views
- 2K
