So replacing the waterpump was my punishment for today. I did make a start yesterday, by removing the nosecone, intercooler, radiator etc, and the PS and Alternator belts.
Like Dave predicted, removal of the pump was a PITA. Two bolts did remove cleanly, one of which was from the bottom hose housing. The nuts from the studs came off fine too. So, four broken bolts to deal with. Luckilly, they broke just below the heads, so left me with plenty of meat to play with.
I gave the pump a beating with a hammer to try to knock the corrosion loose, and I could feel that it was no longer tight against the block, but I just could not get it to budge.
To make life a bit easier, I managed to unscrew one of the studs by double nutting it. The other broke off, again with plenty of meat left.
Now, my technique, instead of breaking the pump up with a cold chisel, was to use a 19mm holesaw, with the pilot bit removed, to cut around the mounting bosses as deep as the sandwiched steel plate. This allowed me to wiggle the now cut through bosses one at a time with a set of grips until they were free. The pump then came off fairly complete.
I then had all of the broken studs/bolts to deal with. Two came out with just using grips on the shanks, one came out after i'd broken it about 6mm away from the block by welding a nut to it, and the others I ended up drilling and cleaning out the threads with an M7 tap.
I bought a pack of M7x45 bolts to mount the new pump. Realising though that the two studs i'd removed were actually screwed into holes entering the water circuit, and that 45mm bolts were too long for these two positions, I lopped the heads off two of them, and set them in place of the studs with liquid PTFE. I was going to use threadlock, but at least with liquid PTFE, the studs will remain removable without too much faff if needed. I had a load of M7 nuts spare from when I refurbed my OZ split rims, so used a couple of those on the studs.
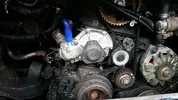
Sorry I don't have any photos of the actual process, I just wanted to get the job done. Have some after photos though. Still got to put it all back together though, but that's fairly straightforward.


