Replacing The Thermostat
Author: K1ANO
Date: 23/3/2009
Associated Forum Post URL's:
Background
It is quite common for the Vee engine temperature to take a long time to reach the mid position on the gauge. Many owners, including the author, thought this was normal, however, other owners report that the Vee engine temperature reaches the mid position within a couple of minutes.
Charlie (Monkey) confirmed that there is an issue with a rubber sealing washer in the thermostat housing which can work loose and cause engine cooling to be affected. If the washer dislodges, then coolant flows past the thermostat to the radiator at all times, meaning it can take a long time for the engine temperature to reach the mid position. On a cold winter's day, the engine temperature may never reach the mid position. Several owners have replaced the thermostat washer and thermostat, restoring the correct engine temperature running.
The above forum posts contain useful information - some of which is listed below ...
Parts
Thermostat - R 9617028380 £18
Gasket - R 9616838180 £5.15
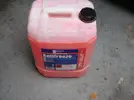
Antifreeze: Renault uses 'Ethylene Glycol RX Glaceol Type D' antifreeze which costs £23.86 for 5 litres, and you need 20 litres (if replacing all the coolant). Essentially, the same spec 'non-dealer' Ethylene Glycol antifreeze for the Renault V6 is red and costs around £45 for 20 litres. This was confirmed by two separate motor factors looking up the Vee on their catalogues. The colour dyes typically represent different specifications of antifreeze, and red means 'long life' with a lifespan of up to 5 years as opposed to the typical 2 years for blue. Red is also recommended for all aluminium engines like the Vee. There is a deal at my local motor factor where it is currently £36.
Red coolant:
Draining Coolant (if required)
As I intended to replace all of the coolant, I drained the coolant first, which helps prevent getting coolant all over the engine bay. Draining the coolant can be done by undoing the bottom radiator hose (access via passenger front wheel) and undoing the bleed points on the radiator, heater hose (both under the bonnet), and also removing the coolant filler cap. I also pressurized the system by blowing through the coolant filler hole to make sure I got as much of the old coolant out as possible.
Removal Of Thermostat Housing
Once the engine covers are removed, it is quite easy to see what needs to be done. I decided to remove all of the coolant pipes, brackets, and electrical connectors from the thermostat housing. This wasn't too bad to do with a systematic approach and the right tools. It is a good idea to make some form of note as to which bolts go where.
Front hoses removed from housing:
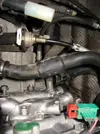
Housing with connectors and pipes removed:

Housing removed from the engine:
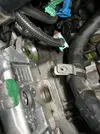
Once all of the pipes, brackets, and connectors were removed, the thermostat housing could be removed quite easily. I could immediately see that the rubber washer had become dislodged - as per Charlie's diagnosis.
Dislodged washer:
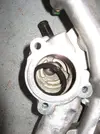
Driving the new washer home was quite hard, so I would recommend anyone to remove the housing as I did. Once fitted, the groove of the washer was lightly lubricated with some high melting point grease as was the shaft of the thermostat.
Re-fitted washer:
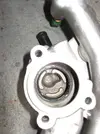
The thermostat simply slots into place, slides through the rubber washer, and locates in the housing - ready for re-fitting of the housing to the engine.
New thermostat installed:
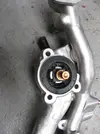
Housing being eased back into place:
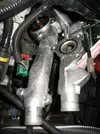
Re-assembly was quite straightforward. There is a surprising amount of room to gain good access to everything. Re-filling the coolant wasn't too bad.
Replacing Coolant
I filled with the long-life red antifreeze and took the opportunity to further bleed out any remaining green fluid until it changed to red - done via the heater bleed point under the bonnet. Once the coolant was filled, I performed the bleeding instructions from the manual and all seems fine. The engine gets to temperature as expected now
If you decide to replace all of your coolant, you will need to do the following:
NB: The above may need to be checked against the manual - but it worked for me.
Additional Notes On Coolant Draining & Refilling
There is a manual in the knowledge base which shows pictures of the cooling system and bleed points and a description of what to do - which supplements the details below...
Essentially, the bleed points are:
1. At the top of the radiator, driver side, a plug with a cross-shaped depression for a screwdriver to undo it. This bleeds the radiator and prevents an air-lock.
2. On one of the heater hoses under the bonnet tray which has a small wheel-type fitting moulded to the higher-most heater pipe. Can be undone by hand. This purges the heater circuit.
3. There may be one in the engine compartment on one of the bottom hoses, but I couldn't see one.
To drain the system (my steps):
I have found that not all fluid drains out using the above method (which may or may not be correct), so:
Before re-filling, as some old coolant will still be in the system (small volumes), and if you are bothered about this:
PM Instructions
Here are the contents of a PM Charlie provided, which also gives some further advice...
<snip>
There aren't any instructions in the manuals apart from the page on refilling the coolant which is useful. It's a case of undoing some bolts which hold on various hose clamps, then undoing all the bolts that hold on the coolant housing onto the engine. Once the bolts are removed, (I don't actually bother disconnecting any of the piping) the housing comes away (coolant goes EVERYWHERE! - but if you wanted, you could try and drain it from the front radiator I suppose). Then it is a case of removing the thermostat (the gasket will probably be sitting on the thermostat) which just pulls out, and put the new gasket in the housing with a bit of force.
Coat the thermostat shaft with something like Molykote (it's a silicone grease which is highly resistant to extreme temperatures and liquids) - plumber's grease might also do the job.
Put it all back together, putting all the bolts back in, de-gas the new coolant, and off you go.
It really looks a lot more daunting than what it actually is, but there seriously isn't a lot that can go wrong as you're simply undoing bolts, replacing a part, and putting the housing back on.
So really stock-wise, you'll need 5L of coolant (you use approx 3L doing my method of letting it go everywhere, but it's non-corrosive, that's my excuse anyway, otherwise, I think the system holds near 20L!) that's £20 for 5L (try GSF car parts for some), a thermostat, and gasket from Renault - about a fiver.
Here's a bit more detail if that helps:
On the housing, there's a big bolt (think it's a 12mm) that holds one of the coolant pipes to it via a clamp, then there's another black metal support piece that has a couple of bolts that hold the electric pipe lagging. There is also another bolt that holds another black support connected to a pipe that goes into the engine just below the middle of the housing.
I disconnect the fuel/air breather pipes (the thin black things) on the bumper side of the engine to make access easier, they just squeeze in and pull off. I also disconnect the coolant temp sensor plug and
Author: K1ANO
Date: 23/3/2009
Associated Forum Post URL's:
- Warming Up Post
- Engine Temperature Post
- Monkey Is A Genius
- Brakes & Thermostat - DONE
- Antifreeze / Coolant Replacement
- Coolant Mixture
Background
It is quite common for the Vee engine temperature to take a long time to reach the mid position on the gauge. Many owners, including the author, thought this was normal, however, other owners report that the Vee engine temperature reaches the mid position within a couple of minutes.
Charlie (Monkey) confirmed that there is an issue with a rubber sealing washer in the thermostat housing which can work loose and cause engine cooling to be affected. If the washer dislodges, then coolant flows past the thermostat to the radiator at all times, meaning it can take a long time for the engine temperature to reach the mid position. On a cold winter's day, the engine temperature may never reach the mid position. Several owners have replaced the thermostat washer and thermostat, restoring the correct engine temperature running.
The above forum posts contain useful information - some of which is listed below ...
Parts
Thermostat - R 9617028380 £18
Gasket - R 9616838180 £5.15
Antifreeze: Renault uses 'Ethylene Glycol RX Glaceol Type D' antifreeze which costs £23.86 for 5 litres, and you need 20 litres (if replacing all the coolant). Essentially, the same spec 'non-dealer' Ethylene Glycol antifreeze for the Renault V6 is red and costs around £45 for 20 litres. This was confirmed by two separate motor factors looking up the Vee on their catalogues. The colour dyes typically represent different specifications of antifreeze, and red means 'long life' with a lifespan of up to 5 years as opposed to the typical 2 years for blue. Red is also recommended for all aluminium engines like the Vee. There is a deal at my local motor factor where it is currently £36.
Red coolant:

Draining Coolant (if required)
As I intended to replace all of the coolant, I drained the coolant first, which helps prevent getting coolant all over the engine bay. Draining the coolant can be done by undoing the bottom radiator hose (access via passenger front wheel) and undoing the bleed points on the radiator, heater hose (both under the bonnet), and also removing the coolant filler cap. I also pressurized the system by blowing through the coolant filler hole to make sure I got as much of the old coolant out as possible.
Removal Of Thermostat Housing
Once the engine covers are removed, it is quite easy to see what needs to be done. I decided to remove all of the coolant pipes, brackets, and electrical connectors from the thermostat housing. This wasn't too bad to do with a systematic approach and the right tools. It is a good idea to make some form of note as to which bolts go where.
Front hoses removed from housing:

Housing with connectors and pipes removed:

Housing removed from the engine:

Once all of the pipes, brackets, and connectors were removed, the thermostat housing could be removed quite easily. I could immediately see that the rubber washer had become dislodged - as per Charlie's diagnosis.
Dislodged washer:

Driving the new washer home was quite hard, so I would recommend anyone to remove the housing as I did. Once fitted, the groove of the washer was lightly lubricated with some high melting point grease as was the shaft of the thermostat.
Re-fitted washer:

The thermostat simply slots into place, slides through the rubber washer, and locates in the housing - ready for re-fitting of the housing to the engine.
New thermostat installed:

Housing being eased back into place:

Re-assembly was quite straightforward. There is a surprising amount of room to gain good access to everything. Re-filling the coolant wasn't too bad.
Replacing Coolant
I filled with the long-life red antifreeze and took the opportunity to further bleed out any remaining green fluid until it changed to red - done via the heater bleed point under the bonnet. Once the coolant was filled, I performed the bleeding instructions from the manual and all seems fine. The engine gets to temperature as expected now
If you decide to replace all of your coolant, you will need to do the following:
- Undo the bleed points on the radiator and heater hose - both are under the bonnet tray. This will allow air to purge from the system as new coolant is added.
- Ensure the bottom hose on the radiator is attached and clamped, and that all other hose clamps are secure.
- Use a funnel and start to add coolant to the coolant expansion bottle.
- Repeatedly check the bleed points for fluid coming out (ideal if you have another person to do this). Once a steady stream of coolant is coming out of a bleed point, do it up. Do this until the system is full of coolant and both bleed points are closed.
- Start the engine and let it reach temperature, topping up the fluid as required. The manual states you should rev the engine to 2500 RPM.
- At some stage (quite a few minutes), the radiator fans will come on. This should signify the thermostat is fully open and the radiator is now cooling the coolant. At this stage, top up the fluid to the max level and put the top on the coolant reservoir.
NB: The above may need to be checked against the manual - but it worked for me.
Additional Notes On Coolant Draining & Refilling
There is a manual in the knowledge base which shows pictures of the cooling system and bleed points and a description of what to do - which supplements the details below...
Essentially, the bleed points are:
1. At the top of the radiator, driver side, a plug with a cross-shaped depression for a screwdriver to undo it. This bleeds the radiator and prevents an air-lock.
2. On one of the heater hoses under the bonnet tray which has a small wheel-type fitting moulded to the higher-most heater pipe. Can be undone by hand. This purges the heater circuit.
3. There may be one in the engine compartment on one of the bottom hoses, but I couldn't see one.
To drain the system (my steps):
- Move/lift the car to a location where fluid can be dropped or collected from underneath the car (not onto the garage floor) - ideally need to keep it level.
- Undo the filler cap in the engine compartment.
- Undo the radiator bleed point.
- Remove the bottom radiator hose and be prepared for wet sleeves.
- At some stage during draining, undo the heater hose bleed point.
I have found that not all fluid drains out using the above method (which may or may not be correct), so:
- Put the radiator bleed plug back in, the bottom radiator hose off, leaving the heater one undone.
- In the privacy of your own drive or garage, pressurize the cooling system - I pressurized it by blowing into the system and generating a constant pressure, thus managing to purge more old coolant from the system, mainly from the heater circuit but also probably from the underfloor hoses.
Before re-filling, as some old coolant will still be in the system (small volumes), and if you are bothered about this:
- Put the radiator bleed plug back in, the bottom radiator hose off, leaving the heater one undone.
- Begin to put new coolant into the system via the filler bottle in the engine compartment.
- As the system fills, old fluid will be purged from the heater system, as can be seen by old-colored coolant coming out of the heater bleed hose.
- When the color changes and you are happy, you can then proceed to filling up the system properly. Which will, of course, require you to remember to put the bottom radiator hose back on.
PM Instructions
Here are the contents of a PM Charlie provided, which also gives some further advice...
<snip>
There aren't any instructions in the manuals apart from the page on refilling the coolant which is useful. It's a case of undoing some bolts which hold on various hose clamps, then undoing all the bolts that hold on the coolant housing onto the engine. Once the bolts are removed, (I don't actually bother disconnecting any of the piping) the housing comes away (coolant goes EVERYWHERE! - but if you wanted, you could try and drain it from the front radiator I suppose). Then it is a case of removing the thermostat (the gasket will probably be sitting on the thermostat) which just pulls out, and put the new gasket in the housing with a bit of force.
Coat the thermostat shaft with something like Molykote (it's a silicone grease which is highly resistant to extreme temperatures and liquids) - plumber's grease might also do the job.
Put it all back together, putting all the bolts back in, de-gas the new coolant, and off you go.
It really looks a lot more daunting than what it actually is, but there seriously isn't a lot that can go wrong as you're simply undoing bolts, replacing a part, and putting the housing back on.
So really stock-wise, you'll need 5L of coolant (you use approx 3L doing my method of letting it go everywhere, but it's non-corrosive, that's my excuse anyway, otherwise, I think the system holds near 20L!) that's £20 for 5L (try GSF car parts for some), a thermostat, and gasket from Renault - about a fiver.
Here's a bit more detail if that helps:
On the housing, there's a big bolt (think it's a 12mm) that holds one of the coolant pipes to it via a clamp, then there's another black metal support piece that has a couple of bolts that hold the electric pipe lagging. There is also another bolt that holds another black support connected to a pipe that goes into the engine just below the middle of the housing.
I disconnect the fuel/air breather pipes (the thin black things) on the bumper side of the engine to make access easier, they just squeeze in and pull off. I also disconnect the coolant temp sensor plug and
Last edited:

