My original goal was to document as I went so I could be pointed in the right direction as I had not idea what I was getting myself into when I first started this project I just knew I wanted to build a car. It was either going to be a R5, 205 or a 180sx etc as these are the cars I've always liked. It just so happened that a 5 project came up for sale fairly locally when I decided to start a project and this turned out to be very fortunate as the car it's self being small, light and fairly simple made everything so much easier when working on the driveway, not only that, I've found that the 5 community is full of people who have a wealth of knowledge that you can only really be acquired from years of working with and driving 5's and they've helped me to understand what I'm doing on countless occasions as I've worked through this project and so I must say thanks for that it really does make a big difference and it would have been impossible for me to get this far without the people that make up the 5 community and there help and advice :ay:
At some point in the past year and a half I bought this white trophy 5 turbo mostly out of impulse as it won me over with it's ridiculous looks and it's low price tag and I eventually got it transported home from Lincolin to the North of Scotland and had it parked nose to nose with my project which helped a great deal as I had something to compare to. The original go was to restore it but it didn't exactly turn out that way.
![21067b7fefaf[1].webp](https://turborenault.co.uk/data/attachments/21/21147-b08a3aa6c30e7a716dfe33a45eb949f0.jpg?hash=1b5TujnXxD "21067b7fefaf[1].webp")
The I knew the trophy required welding but the extent of the rot wasn't clear until I got the body kit off, the floor and boot were good but the sills were really bad and I would later find out that it had 3 layers of outer sills and all sorts of filler nonsense going on. As I had the two 5's nose to nose it became clear that my first project was missing quite a few parts and in the end I decided to use the trophy and a donor car as it had some really good parts... external waste gate, side exit exhaust and a much better dash and dash loom and engine bay loom which all worked as the trophy was functional, it also had a working viper alarm system with central locking.
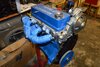
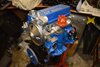
Here is a picture of the first test fit of the engine and inter cooler/radiator combo, it's a rad tech cooler/radiator combo with two fans. It's quite a tight fit and there was a lot of putting it in and taking it out and tweaking and moving the fans about in an effort to make more space between the turbo oil feed thing and the fans but I eventually got it to a point I was happy with and I will find out when it I get the engine going if there's enough room for engine movement. I also modified the oil return pipe to get it as close to the engine/gearbox as possible as in it's orignal place there's very little space for forward engine movement as it was almost touching the radiator.
![IMAG1339[1].webp](https://turborenault.co.uk/data/attachments/21/21148-032f11c1e7a253e212457efa10f7a2c7.jpg?hash=6ESNd8vPxz "IMAG1339[1].webp")
With a donor 5 and the engine lowered in the project began to move along much faster. I transferred the entire dash and engine bay loom from the trophy as well as the side exit exhaust, external waste gate and alternator.
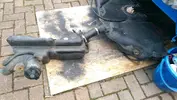
I also took the grinder to an OEM rocker cover to removed the brackets and painted it black as the custom rocker cover although usable wasn't filling me with confidence, the gasket was poor and it didn't really fit properly as it fowled against the water pump and it only had two clamping bolts. I did drill a hole for the third bolt and took the grinder to it to make it fit but I plan on getting quite a bit of HP out of this engine and I want it to be reliable and I didn't feel like I could trust this rocker cover which is a shame because I think it looks awesome.
After I was happy with the interrad I started adding the coolant pipes, I originally put the coolant bottle in the standard location and used a mixture of blue pipes form the trophy and white pipes from china, I didn't bother with the swirl pot and ran water through the carb, manifold and round the back of the turbo into the top of the water bottle, I used an old metal hoover pipe to extend the piper to the bottom of the rad and wrapped all the coolant pipes near the exhaust and turbo in heat reflective tape because I'm paranoid about heat melting stuff and I figured anything I can do to make the cooling system perform better will help make the engine more reliable.
![IMAG0084[1].webp](https://turborenault.co.uk/data/attachments/21/21149-1d2c833c03c6ce0a569e2042508ad15a.jpg?hash=GblMbhGPbF "IMAG0084[1].webp")
After buying what I think is a t28 but it might be a t25 (it said both in the description on ebay) VNT garret turbo and test fitting it with a cone filter it became clear that the expansion tank would have to go somewhere else as there wasn't enough room for the air filter I was also researching and taking advice and it seemed the best solution would be to move the tank to the scuttle area. I also didn't want to the fuel pressure regulator down at the bottom of the engine bay where I think it is on standard 5's, it's rubbish and dirty down there and to me it just seems like a bad place to put anything. I made a bracket and experimented with putting it higher up in the engine bay on the side of the strut tower top thing.
![IMAG0097[1].webp](https://turborenault.co.uk/data/attachments/21/21150-3705f687dc732f14244250e56bf46d6f.jpg?hash=9gXA9a61gw "IMAG0097[1].webp")
![IMAG0096[1].webp](https://turborenault.co.uk/data/attachments/21/21151-7771f441e405fc95ac45952c0ec80c95.jpg?hash=44IE0BsuVf "IMAG0096[1].webp")
I'm paranoid about fires :ck: so in the end I decided to scrap this idea and move it to the scuttle with the expansion tank and to run the fuel lines up the back of the brake booster, servo thing into the scuttle. I was going to put the brake fluid reservoir in the scuttle area as well just to make the engine bay as clean as possible but after much thought I decided to keep it in it's standard place, it sits well there with the standard drip lines and moving it just felt a bit to much overkill maybe later if I rebuilt the car I will move it... :bv:
After a lot of drilling and test fitting and so on... I eventually got the expansion tank and FPR where I wanted them, I sat the tank as high as possible as advised and made a bracket to hold it in place, it sits with the top being about half an inch from the bonnet so I'm pretty happy with it I also added extra layers of pipe to the coolant pipes where they go through the scuttle wall and cut fuel lines to line the edges of the holes in an effort to stop any rubbing from engine movement so hopefully the setup will work and be reliable but time will tell, that's if my engine even runs :bv:... I also ran the cables from the starter motor up through the scuttle and along to the battery and through the fire wall just to make the engine bay less busy... if that's possible on a GT turbo :bv: and I bind the the water pipes to the manifold and just went with coolant to the carb which I've been advised should be fine!
![IMAG0270[1].webp](https://turborenault.co.uk/data/attachments/21/21152-a8b28928978a364f03654f83ff6df8fc.jpg?hash=-Qly10T742 "IMAG0270[1].webp")
![IMAG0272[1].webp](https://turborenault.co.uk/data/attachments/21/21153-85ba30da3472c9116d3069d76b48f157.jpg?hash=SOCbTMUcud "IMAG0272[1].webp")
![IMAG0273[1].webp](https://turborenault.co.uk/data/attachments/21/21154-bbc1613efbfcae512ac745a3b6a1013d.jpg?hash=CxZ-I6mXFv "IMAG0273[1].webp")
I also fitted the oil catch tank and plumped it all in...
![IMAG0275[1].webp](https://turborenault.co.uk/data/attachments/21/21155-023b14dec742cecb8e36d6af80174fe0.jpg?hash=LdV6y9fl0- "IMAG0275[1].webp")

At this point most of the electrics work as far as I can tell, I need to permanently wire in the AFR, Boost and oil pressure gauges and get the dash in as well as the vacuum lines. I need to find a turbo elbow solution or have one made and find somewhere that sells V-band clamps that actually fit my turbo as eBay ones are too narrow and no use and also rubbish, I also need to work out how I'm going to mount the actuator to control the vanes and what kind of actuator to use but it's starting to get there. Now the thread is up to date with current progress I'll try and keep it up to date.
If anyone knows where I can get v band clamps for this turbo it would be muchly appreciated and any advice on VNT control also appreciated... I think I've got my head round it but not 100%, cheers.
![IMAG0160[1].webp](https://turborenault.co.uk/data/attachments/21/21157-d9021612c892333ac24f07c5c2badf31.jpg?hash=BWupKXBt5c "IMAG0160[1].webp")
I think tomorrow's job will be dash and electrics :dm:
![IMAG0086[1].webp](https://turborenault.co.uk/data/attachments/21/21158-67bead95d0a77d1073918b1b85b45a4d.jpg?hash=Dq20Z79fpz "IMAG0086[1].webp")


") )
)")