There is more to life with TurboRenault.co.uk

Register a free account today to become a member! Once signed in, you'll be able to participate on this site by adding your own topics and posts, as well as connect with other members through your own private inbox!

Steve's Land Raft

I Don't like Chequerplate, just a personal choice thing, but there you go. The young Lad who sold it to me said `Please don't cover it in Chequerplate.
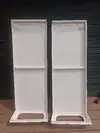
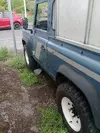
It only had sill covers and the bit at the rear end, but the sills weren't straight and looked bad. I have been impressed with the fit and finish of YRM Metal Solutions parts, so decided to get a pair of Sills from them. 3mm thick, well made and finished. Fitting was straightforward an they fit better than the originals did.
The Landy (66).webp

and the other side

The Landy (69).webp

I think that looks much better. I gave them a scuff with 180, a Drop coat of Etch, a full coat of Etch, Grey Scotchy and on with the colour. They come well finished indeed.

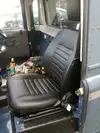
Inside I bought a Britpart seat retrim kit. Icouldn't make my mind up between Exmoor or Britpart, so decided to Go Britpart for the Passenger Seat Reasoning it is less used and if I didn't like it I hadn't bought 2....
Have to say very pleasantly surprised with it. All the other cars I have Rebuilt have been for competition, so have had their interiors removed. This was the first time I have done anything like this and I'm calling it a win..
The Landy (67).webp

The seat base looked like it had been used as a wedge or something, so I had to chap it flat and weld it back together. I really can't believe how good it looks and Feels. Will have to get another for the Drivers seat.
Unfortunately I have also had my first purchase that I feel was a mistake. I don't want a Plush interior, Landy's leak, so no carpet for me. I bought Lucari's Seatbox cover which was the closest to the original I could find. But I have ended cutting it down to match the original Wrap around, as I just could not get it to fit right at all. It may have been Me, but I don't think so. It is truly written `You can't win em all'
That's where we're at as of tonight, so the pace will return to something more normal
Thanks for reading, more soon.....
 
Project Hardtop.
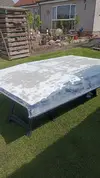
The roof had to get stripped, dodgy respray in Synth, plus Micros in original topcoat

f1ca1605-beb0-4335-afc2-4ff4e6e6c67d.webp

Not Recommended...
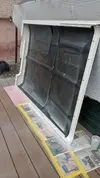
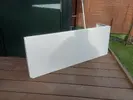
Sides were kinda the same, but at least a smaller area. The insides were scuffed and painted with tinted Bedliner paint in the Primer Gun.

The Landy (74).webp

Good enough for me.
Got the roof Etched,Primed and sealed

The Landy (77).webp

Rain stopped play.
I've now got the roof prepped and the returns painted, ready for No1 Banger hosedown

168bb65b-7f79-4d24-afce-73d70b66991f.webp

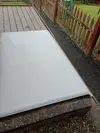
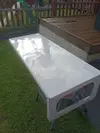
Also today took a chance and painted one of the sidepanels. My touch-up gun is at it's limit here, but I was pleasantly surprised

The Landy (78).webp

That'll do. I'm not getting too precious about this, it's an old Landy.

The Landy (81).webp

That's it. I ran out of Paint. need to get more,then see if it was a fluke or can I do it again....
Stay tuned - but don't hold your breath....
 
Project Hardtop.
The roof had to get stripped, dodgy respray in Synth, plus Micros in original topcoat

View attachment 218253

Not Recommended...
Sides were kinda the same, but at least a smaller area. The insides were scuffed and painted with tinted Bedliner paint in the Primer Gun.

View attachment 218254

Good enough for me.
Got the roof Etched,Primed and sealed

View attachment 218255

Rain stopped play.
I've now got the roof prepped and the returns painted, ready for No1 Banger hosedown

View attachment 218256

Also today took a chance and painted one of the sidepanels. My touch-up gun is at it's limit here, but I was pleasantly surprised

View attachment 218257

That'll do. I'm not getting too precious about this, it's an old Landy.

View attachment 218258

That's it. I ran out of Paint. need to get more,then see if it was a fluke or can I do it again....
Stay tuned - but don't hold your breath....
Hi Steve,
Well what a result! that is quite an impressive finish, annoyingly I usually get small flies stuck in my wet painted surfaces, we also had the windy weather down here in sunny Cardiff-upon the-Mud as well as unusual Biblical amounts of persistent rain,. I think I will knock the 58' Dauphine restoration on the head and start building a full scale copy of Noah's Ark instead.
Just heading off to B&Q to purchase some OSB boards, nails, Gorilla glue and Bitumen paint.
Best
W
 
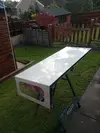
Well I did manage to repeat the feat and the second side got painted

the-landy-83-jpg.webp


All was fine I left it out until dusk and put it in the shed overnight, as the next day was sunny I put it back outside to get another heat. What happened I have no idea, but it managed to fall off the decked area and land on the top edge on the slab path 2 feet below. This has not done the top edge too many favours, but luckily the roof seal strip covers all the worst of the damage, other than some scratches in the face of the panel. You couldn't write it.....
 
As well as that I have it booked in to the welders to get the rear shock brackets replaced, as the originals are paper thin where the backplate bolts to the bracket. As the Welder and I were checking the shape of the new brackets against the axle, he pointed out that the rear lower spring pans were looking a bit dodgy. I said the replacements were available, so he suggested getting them and doing it all at once, which seemed like a good idea, so I told him I would get the new parts fitted, so he would not have to deal with rusted up bolts, but be able to strip it and weld it up no worries.
The parts arrived and set to removing the new backplates I had fitted to improve the access to the shock brackets and had a look at the spring pans. I disconnected the shocks and jacked it up on the axle, then put the chassis on stands and lowered the jack. The rear springs obligingly lowered out of the top chassis mountings and I was looking at the blobs that were the lower keeper bolts, wondering about the best plan of attack. Having the new bits on hand revealed that I really could not see the saddle that is welded to the axle, so I gave the lower part of the spring a healthy dose of the size 10 and was rewarded with the whole spring and lower pan falling to the ground. This was repeated on the other side too.
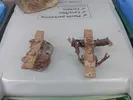
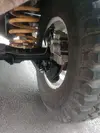
A heavy application of the chipping hammer removed the lower keeper and spring pan without having to undo anything
Thus:

the-landy-82-jpg.webp


That was what was left apart from a big pile of Brown crumble on the floor. Easy enough to clean up with the grinder and refit the new parts using gravity to hold it all together. Once it was all reassembled it ain't going anywhere and will be an easy weld up, but it was a bit of a surprise and prompted a check all over the axle with the pick hammer, looks like years of mud and wet had done for them completely. the NS anti -roll bar bracket is not clever the o/s is ok???
 
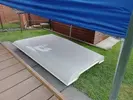
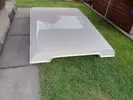
Mon 17th Jun. The Landy is at the Welders Getting it's brackets replaced, my Mate came round with Spraygun, we surveyed the clouds and decided to go for it, so the roof is finished.

the-landy-87-jpg.webp


Not bad for a Country Job..

the-landy-88-jpg.webp


Busy time ahead. paint the back axle when it comes back, refit the backplates. Remove the Dog hutch paint the cappings and we are ready to convert, new rear door should be about 10 days away, so there's the timeframe.
In other news, I have managed to get some temporary workshop space for Aug/Sept, so need to get a Bulkhead ordered. Then I'll be really sorry...
 
Sun 24th Jun. Axle finished, Doghutch gone, cappings painted and Hard top fitted.

Convertible mode this morning

the-landy-90-jpg.webp


Then later this afternoon

the-landy-91-jpg.webp


Much smarter and quieter. The new door arrived on Fri from SP packaging was excellent.
Will try to get it fitting tomorrow then prep and paint .......................
 
I trial fitted the door with top and bottom hinge only, Just to see how it filled the hole..

img_20240624_104508292_mfnr-jpg.webp


Pleasantly surprised with that, I can tell you. You may have noticed the upside down bottom hinge, which I hadn't. The Door is dry, but not yet handle-able, so it will be tomorrow now to finish it. Then on to the other 999,999.00 things to be done.
 
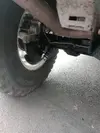
Couple of pictures of the re-bracketed axle..

the-landy-98-jpg.webp


and the other side

the-landy-99-jpg.webp


Then the paint was dry on the Door, so on it went, with the hinges the right way round (idiot)

the-landy-95-jpg.webp


It's starting to look like I envisaged it when I bought it.

the-landy-97-jpg.webp


Will the weather ever cheer up?? Will the Dauph ever get out of the garage?? Your guess would be as good as mine.
 
I decided to have a go at making the truck cab headlining fit the Hard top. Basically successful, but I do need to work out how to tidy up the rear corner.

img_20240630_191325796_mfnr-jpg.webp


Suggestions here. I used to know a great trimmer , but like so many people I know, retired now and business gone.

img_20240630_191420617_mfnr-jpg.webp


It'll come to me......
 
Back
Top