Thank you, I kinda like the fact it's not the usual run of the mill headunit. Really need to get the speakers sorted as only one works and it sounds shocking. Sash did well browsing the net to find it.Top job that !
There is more to life with TurboRenault.co.uk
You are using an out of date browser. It may not display this or other websites correctly.
You should upgrade or use an alternative browser.
You should upgrade or use an alternative browser.
Megane Ricardo's Budget Track 225
- Thread starter Ricardo
- Start date
That's looking a bit PMT 'Ghetto couture' at the moment. Basically it'll do for this weekend. I need to order an OE silicon replacement hose between the turbo and airbox. I've also sorted a replacement lid so the outlet points straight out. Then I can get a decent silicone 90 on it. I need to make a permanent steady bracket for it too so for now it's the classic zip of ties 'Chrome don't get ya home' editionsAnd at the business end?
Last edited:
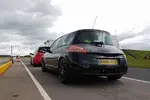
So, the fallout post Blyton. Settling back into the routine after an epic weekend away in Lincolnshire with good friends and also a good car. For how it was arriving at Blyton I just couldn't fault it out on track, everything I had done to the car all worked and worked well together. The brakes, in particular the Ferodo DS1.11 pads were on point. They worked well almost from the off, you could lean on the pedal and have a decent stopping response without the need to 'stamp' on the pedal. Once everything had warmed up and I became familiar with the track I'd then brake much later in the tighter corners confident that the brakes would work and take everything in their stride. Coupled with the Motul 600 fluid I never had any fade or pedal problems all day.
I did a few sessions in the morning, I'd do a few laps, come in for 20 minutes then go back out again. Not a problem, I then paid for the afternoon session. Again, not a problem. It did everything I wanted, if I were to pick out a 'weak' point then I'd have to say tyres and that's only because I have near new Falkens that came on the R262R wheels. I couldn't see the point in buying new rubber for what I saw as a first trackday outing for the Megane and a kind of shakedown to see how it would be. I'll scrub these out first unless they're really letting me down then i'll choose either Federal RSR or Nankangs.
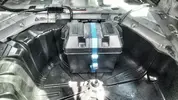
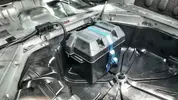
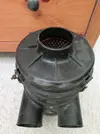
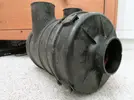
So, the supposed 'business' end, the engine bay. Not so much a secret really, something I wanted to try. Two reasons, to relocate the battery in the boot, and to ditch the restrictive OE airbox. I've had the Renault 21 airbox for a while now, the airbox shares the same base as the Clio V6. The difference is in the outlet on the lid, the 21 turbo outlet is longer and comes out at say 45 degrees, the V6 outlet is stubby and comes out straight. Anyway, in all this after having the battery moved I still wasn't sure whether the 21 airbox would even fit let alone work.
After a bit of moving about, using the OE turbo to airbox hose and a connecting sleeve it seems to hook up alright. At this time it's in but I'm not 100% with the airbox sitting on the angle. What I am happy with is now it has a 100mm outlet feed, I've also run a 70mm CAF from the plastic undertray directly to near the 100mm outlet. I didn't want to run it right into the 100mm airbox so the feed runs near to it. It certainly sounds different, blipping the throttle it sounds like it has an induction kit filter attached. At high revs there's a noticeable difference in induction noise from the old OE airbox with a K&N filter.
The next step is the angle in which the airbox sits, I'd like the airbox to sit 90 degrees to the turbo to airbox hose. Well the phase one Clio 172 also shares the same diameters as the Clio V6 and R21 Turbo airbox. The phase one Clio and V6 share the same lid, the airbox is also the same size the only difference is the V6 has a single 100mm outlet with the phase one airbox having twin outlets. So I've sourced a phase one Clio 172 airbox purely for the lid for it's straight outlet, I can now ditch the R21T lid.
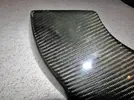
Another purchase was from @Mart at Blyton, I've finally got my hands on a carbon R26R spoiler. I'm hoping to have it fitted, swap out the airbox lids then look into booking another trackday. Most likely Brands Hatch as it's only an hour away so I can book an evening session.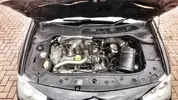
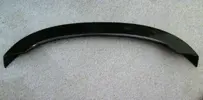


my hands on a carbon R26R spoiler.
I am assuming this is a Ktax spoiler. If it is ensure that you use a UV protective clear coat on it .
It is indeed, there's already lacquer peel on it. I might give it to a paint place to sort it but for now I'll just fit it as per the guide on here.I am assuming this is a Ktax spoiler. If it is ensure that you use a UV protective clear coat on it .
Im saving it for nowYou're forgetting the most important thing
But appreciate everything you've done at the Blyton weekender, was well worth the Bitburgers!
Hoping to get it on the rollers soon.
Soixante Neuf!!
Oh yes!!.......Words of the weekend, Soixante-neuf
Hold tight for another weekend of beers when I visit
Came across this silicone turbo outlet hose on EBay. For the price I thought it might be worth a go (in black) then I can carry on the hose run to the airbox in silicone to ditch the OE setup. At least I can work out a better run for it and have the airbox sitting just where I want it.
Is there a guide on how to remove the front bumper on here?
Gonna have a go at fitting the spoiler as well, I've read the guide. The only problem I see is trying to work out where to drill the new holes as I don't have the black spots fitted like the new spoilers.
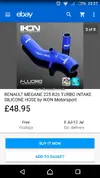
Is there a guide on how to remove the front bumper on here?
Gonna have a go at fitting the spoiler as well, I've read the guide. The only problem I see is trying to work out where to drill the new holes as I don't have the black spots fitted like the new spoilers.

Is there a guide on how to remove the front bumper on here?
No , but feel free to make one !
Its quite simple really.
End of bumpers in the wheel arch are a pair of torx scres. Undo either side.
Under the car there are 3 * 11mm ( I think ! ) captive bolts , undo those
Under the bonnet you need to remove all the plastic engine dressing. Flathead screwdriver thru 90degrees and it starts to lift. Small screwdriver under it and it will pull out. Remove the lug that is left begind.
Repeat for the 3.8 million that gold the bumper on , no forgetting the ones that are revealed after you remove the center engine dressing plate.
If you have a ph2 bumper with the water sprays for the lamps you will need to loop that together to stop it leaking gallons. Its on the the offside , I always start removing the bumper from the nearside and then I have access to the pipework to do this ( easier when you start )
When you refit remember to poke the bonnet catch pull through the grille on the bumper , you wont , and will have to remove the bumper again to do so.
You also have to align the bumper perfectly and get the clips on the bumper aligned over the clips on the front of the car or the wings of the bumper will pop off and look strange.
Hope that helps. Its not difficult, just lots of stupid bits you need to get right.
Andy
I see is trying to work out where to drill the new holes as I don't have the black spots fitted like the new spoilers.
Nail varnish ( or a dab of paint )
Put the bolts in the spoiler , paint the bolt heads with the bight paint. Offer it up in position. The paint will mark where you need to drill ...
DaveL485
Staff member
Is there a guide on how to remove the front bumper on here?
1) Attempt to remove all fasteners
2) RAGE
3) Lift bumper off, jack up on Valium.
Good call, will need to buy 4 new bolts as it didn't come with any. Really wanna get it on now, it's sitting about in the bedroom calling my name sticking a finger up to me!Nail varnish ( or a dab of paint )
Put the bolts in the spoiler , paint the bolt heads with the bight paint. Offer it up in position. The paint will mark where you need to drill ...
DaveL485
Staff member
ONLY works if all the bolts are aligned in orientation.Good call, will need to buy 4 new bolts as it didn't come with any. Really wanna get it on now, it's sitting about in the bedroom calling my name sticking a finger up to me!
Personally I would use double sided tape to stick the spoiler in place (as little as poss), once its in place then dab the painted bolts through the holes with it in place. Pull spoiler off, drill the holes.

