There is more to life with TurboRenault.co.uk

Register a free account today to become a member! Once signed in, you'll be able to participate on this site by adding your own topics and posts, as well as connect with other members through your own private inbox!

Renault 11 Turbo Phase 2 Restoration

Have just spent the last couple of days reading through this "One man's Quest for a better than new 11 Turbo" The tale certainly takes a few twists and turns along the way, glad for you it's on the home straight. Now I am also reminded why I tend to remove as much as possible from my projects and then not refit any of it.
 
Have just spent the last couple of days reading through this "One man's Quest for a better than new 11 Turbo" The tale certainly takes a few twists and turns along the way, glad for you it's on the home straight. Now I am also reminded why I tend to remove as much as possible from my projects and then not refit any of it.

Thanks for having a read @Steve Swan 👌 I find it quite therapeutic putting up details of the work I have done on this car.. but will admit I've not been through and re-read it all for a good while. At 63 pages now there's a lot of detail, but I'm sure also a lot of flannel & fluff!! :grin.gif:
 
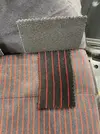
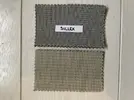
Had some sample material arrive today from the company in France that can replicate the seat material in my car.

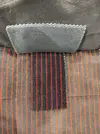
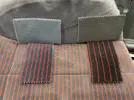
I thought they were sending me 2 versions of the plain Grey material, but they actually sent me 2 versions of the plain and striped grey.... and interestingly you can see that there are big differences between the two...!

Anthracite - Wider stripes & darker plain grey - WRONG!! 😑
0FB68CE9-89DF-4FF1-A9BD-9A40126449B3.jpeg
“Sillex” - Narrower stripes & lighter plain grey - PERFECT !! :friends.gif:
F13ACB73-1CE1-4FD6-82B2-A3CFB972B75F.jpeg
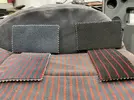
Here’s a comparison of both:
009A73AC-FECB-4B8C-9D7C-D248237C0134.jpeg
76E627A4-3AED-47FD-9EB4-908524FEEF0F.jpeg

I’ve now just 💩 a 🧱 because I’m concerned that the £200 order I’ve placed with the company, could be for the wrong striped material!!! 😱

Needless to say, the first thing I did was email the company in France to check with them what material they perhaps have already sent... 🤞

I have to say though... now I’ve received the material, I can see where the money goes... it’s super luxurious and PROPER car seat material!! It comes pre-backed with scrim foam, and then webbed:
CA086FCF-0482-44E0-8228-D22D063209B0.jpeg

Im so excited about how lush this interior will be when it’s all finished off!! 😍

Needless to say I will keep you all posted on any developments..!!

Thank you for reading ☕🍌
 
Last edited:
I need some help suggestions from all you fabrication Guru's...
I'm struggling to figure out how I can take some height out of this frame....

As I had mentioned in an earlier post on this thread, the original seating position in this car, left my knees rubbing the bottom of the steering wheel, and I’d got some greats feedback from you chaps as to how I could lower it.

The problem is basically the design of the seat frame, as it has this special “sex seat” design, so the seats SUPER recline when you need them to... you know what these Frenchies were like in the 80’s 😆😆

You can see in this picture, the reclining rail is mounted about 25mm above the reach rail:
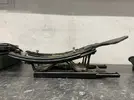
55207C1B-D6D8-4E5E-A5A5-51C31089FA70.jpeg
I had a play with the rail and my first thought was to bolt the back of the reclining rail straight to the reach rail and then cutting the rear of the existing support frame off, and just using the front section:
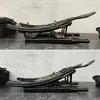
C5E05D5A-8192-46A6-B722-FE407294D198.jpeg
This lowered the rail a treat, and I thought I’d cracked it, but when I mocked up the seat frame onto the mounting assembly, I could see that this configuration made the seating position FAR too reclined to be able to drive the car safely (Yes the backrest was already adjusted all the way forwards when I took this photo):
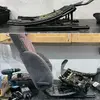
CF294876-C958-4A7E-8D6A-2E3097B2A60A.jpeg
So realising that this configuration wasn’t going to work I was back to square one and gave my head another scratch.. I then thought about replacing the “Tall” front bracket with the shorter rear part of the bracket that I’d previously discarded and then bolt the rear of the reclining frame, straight to the reach frame.

This photo helps to explain what I did:
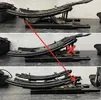
E5EA54C0-E965-43B1-B0CB-BF4EE6484D69.jpeg
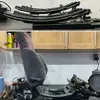
You can see that this makes the reclining rail much more horizontal whilst keeping it nice and low as well.

Again I mocked up the seat frame on and it looked a whole lot better:
94580181-3A5D-4E39-BB00-E04B85CE9FFF.jpeg
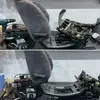
Comparing the two photos directly here, you can see the difference better:
165B9685-968A-441B-8BC5-F1E22A9986F6.jpeg

Now I’m happy with that proposal, the next thing I want to also tweak is the seat frame to allow me to move it a bit further back from the steering wheel.

On my Raider I’ve just re-drilled a hole in the reach rail, and then used a big piece of steel to extend the existing rail. What I fancy doing this time though is a more OE solution and actually get the frame rail extended.

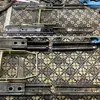
Having a couple of seat rails spare, I’ve butchered one, and plan to get a proficient welder to attach the two extra pieces to the front of the existing rail, so I can then drill a couple of new mounting holes when it comes time to fit the seats:
162899E8-85EA-4CA6-AEFE-869A2E425B51.webp

That’s the end of today’s shenanigans, thanks for reading!! 🥸
 
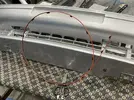
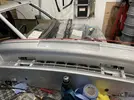
Thought I would dig out the front bumper and start to make steps to get it mounted to the car:
6FE2F1BE-7101-4BCE-ABA9-379C3FC88512.webp
B1398AEE-C985-4E34-AC2B-81535A0530C9.webp
E93C393E-3673-4F75-AEC3-B1D85D9EEF34.webp
I bought another brand new bumper insert strip many years ago and thought it will fit, it will need a good bit of fernagling to do so:
C24E8B6D-1805-4689-AB0B-C4B67324ECA1.webp
B96CCFD1-52A3-479B-A9A5-4CE14FCB4634.webp
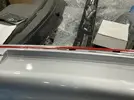
The cut-out’s in the bumper don’t seem to be in the right locations, so I’m carefully cutting out new notches in the bumper with my Dremel to accept the tangs on the strip. You can see in these two pictures below the same bit of strip that wasn’t fitting before, but then after cutting a new hole, will fit in flush:
F6A9ACCC-9C80-41C2-8BE0-161F97D52711.webp
30F0496E-DD49-4C1A-AA93-0F7B5F5861CC.webp
After I get the trim strip on, next will be the fog lights, and then on she goes!!

Thanks for reading 🎅🎄
 
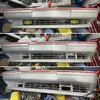
Finished fitting the bump strip to the front bumper today, and then started to fix the fog lights.
5FC2AF08-0D40-4ACE-8C2F-99B1C264463A.webp

Many of the original captive nuts had all rusted through when I removed the original fog lights, so I’ll need to get a bit creative on the fixings for the Fog lights...

In other news, the grey seat fabric has now been shipped from France so that should be with me sometime in Jan 🤞

Thanks for reading 😷
 
I Really can't wait to see this done. Last cars I was working on that were built in this way (how I like to do them) was a Low drag E type and a fiat Dino Spider. Unfortunately I didn't get to see them finished as I moved back to England from N.Ireland.

Got a pic of the Low drag though..Screenshot_20201118-201655_Facebook.webp
 
It is in the category of, If you need to ask it's too expensive
Steve, Just for the banter, add up what you have spent then add an approximation of your time at say £20.00 an hour , and see where you are at . In the first 2 years I was on the Dauph about 5 nights a week and I got to 30k very fast and stopped counting !!!!!
That is the point in doing this yourself. If you had to pay there would be no point given the maximum price the car would fetch on the open market , but that's not why we do this is it?
 
That is the point in doing this yourself. If you had to pay there would be no point given the maximum price the car would fetch on the open market , but that's not why we do this is it?

Exactly... I do this because I find it therapeutic and relaxing after sitting behind a Laptop all week. I’m not a professional or anything, and everything I do has basically been self taught.

Interestingly though I had a guy message me on Insta. Couple of days ago saying he loves what I’ve done with my cars and wishes he could find someone to detail his engine bay like I have done... 🤔
 
Finished fitting the bump strip to the front bumper today, and then started to fix the fog lights.
View attachment 152701

Many of the original captive nuts had all rusted through when I removed the original fog lights, so I’ll need to get a bit creative on the fixings for the Fog lights...

In other news, the grey seat fabric has now been shipped from France so that should be with me sometime in Jan 🤞

Thanks for reading 😷
Its looking good @Big Steve - Raider
 
Back
Top