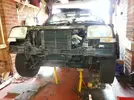
There is more to life with TurboRenault.co.uk

Register a free account today to become a member! Once signed in, you'll be able to participate on this site by adding your own topics and posts, as well as connect with other members through your own private inbox!

5 GT Turbo Fluffy

I go from two to three inch from Turbo to IC, then back to 2.5 for the plenum chamber. This means the charge moves slower across the intercooler, which I think is a good thing as it will spend longer in there and hence be cooler on exit.

Is this on the 21 Dave?
 
Also found the fuel rail has decided to spring a leak also which is bad news. Getting tat modded hopefully this week to strengthen and make good.

Hopefully by this time next week and have this all back together and ready to go again.
 
OD on the stainless and ID on the silicone jointers as far as i can remember. About equal to the compressor housing size? I would just modify your current pipework and step up at the intercooler.
 
Thanks Dave, I thought as much, but wasn't sure. Got the intercooler today and that's gonna be a bit of a challenge to fit lol. Pictures to follow.
 
Hi all,

apologies, things on the 5 are very very slow atm, me and the Mrs have a few problems which we need to concentrate on which is important right now. Things are looking up a bit and should get back to normal soon al being well. I've done some bits and got some photo's but not up loaded as yet. I'll be back soon.
 
A few photo's as discussed.

With the Cosworth cooler out of the way

lh4.googleusercontent.com__e8e5tjBeyyk_U0zKTY5x__I_AAAAAAAAI2Y6217b25152e41bd566c1d50ad20605c2.webp

I Decided that there was no way to get the I/C in with the front x-member in place.

So with a snip here

lh5.googleusercontent.com___peGdzA6_f0_U0zKgkojWEI_AAAAAAAAI202c70bedd7150f72a9f83182581e90f16.webp

And a snip there

lh5.googleusercontent.com__MCOa1CL9NEU_U0zKmbzmWII_AAAAAAAAI3E7158566fbded104221b390292807922a.webp

I thought I'd have a bit more room.

lh5.googleusercontent.com__pt8tDCCXR5k_U0zKajgX2GI_AAAAAAAAI2kd4d1fd05f308f327888ce3f8c29f6cf5.webp
As a sparky I'm familiar with a steel section which is called un-strutt which I have used a 41mmx41mm section to form a new brace / support bracket for the new I/C. I Have welded this up, and have some quadrants to insert yet, but I've mocked it up and offered it in position which looks ok.

lh4.googleusercontent.com__f30aZCmjcD0_U011Wm2Z_mI_AAAAAAAAI3we8edb4208960d6fdfda7a7a3bcb8ae2e.webp
The old Cossie cooler coming in handy - I don't think Cosworth had this in mind when designing it.

the Cooler is actually the wrong way around as it is, but I don't really have a choice about this matter, the cooling fins are flush with the front of the cooler this way around whereas the other way around they are about 4mm set back to sit behind the v-edge of the airways which probably aids cooling. I thought they where the same both sides, but it is as it is.

That's it for now, I'll get back on with this on Tuesday.

TNT Stotty over n oot
 

Attachments

  • lh4.googleusercontent.com__e8e5tjBeyyk_U0zKTY5x__I_AAAAAAAAI2Y6217b25152e41bd566c1d50ad20605c2.webp
    lh4.googleusercontent.com__e8e5tjBeyyk_U0zKTY5x__I_AAAAAAAAI2Y6217b25152e41bd566c1d50ad20605c2.webp
    88.8 KB · Views: 0
  • lh4.googleusercontent.com__f30aZCmjcD0_U011Wm2Z_mI_AAAAAAAAI3we8edb4208960d6fdfda7a7a3bcb8ae2e.webp
    lh4.googleusercontent.com__f30aZCmjcD0_U011Wm2Z_mI_AAAAAAAAI3we8edb4208960d6fdfda7a7a3bcb8ae2e.webp
    75.9 KB · Views: 0
  • lh5.googleusercontent.com__pt8tDCCXR5k_U0zKajgX2GI_AAAAAAAAI2kd4d1fd05f308f327888ce3f8c29f6cf5.webp
    lh5.googleusercontent.com__pt8tDCCXR5k_U0zKajgX2GI_AAAAAAAAI2kd4d1fd05f308f327888ce3f8c29f6cf5.webp
    76.1 KB · Views: 0
  • lh5.googleusercontent.com__MCOa1CL9NEU_U0zKmbzmWII_AAAAAAAAI3E7158566fbded104221b390292807922a.webp
    lh5.googleusercontent.com__MCOa1CL9NEU_U0zKmbzmWII_AAAAAAAAI3E7158566fbded104221b390292807922a.webp
    71.3 KB · Views: 0
  • lh5.googleusercontent.com___peGdzA6_f0_U0zKgkojWEI_AAAAAAAAI202c70bedd7150f72a9f83182581e90f16.webp
    lh5.googleusercontent.com___peGdzA6_f0_U0zKgkojWEI_AAAAAAAAI202c70bedd7150f72a9f83182581e90f16.webp
    74.7 KB · Views: 0
Man, that was funny.

I'm all for the safety specs n gloves now, I've had far too many near misses to be funny.

Three shards of steel removed from the inside of my left eyelid with a hypodermic needle, blind in that eye for 4 days, corneal ulcer.

Lesson learned the hard way.

Vision still 20/20, lucky boy.
 
Got the MoJo back.

Fuel rail sorted and back in place keeping the fuel in this time. I've plumbed in a pressure gauge but noticed that a lot of the oil in the display has leaked out. Why is there oil in there and what can I top it up with. It feels like a very light oil.

I've had a change of heart in respect to the way I'm going to be mounting the FMIC and bracing the now removed front panel. I was going for ......


lh3_googleusercontent_com_KLseuHwMDYnpY1LoKNODhUYDw5JB6Zj9q6GboAnfRzs_w216_h162_p_no_.webp

But I was struggling to find a place to put the oil cooler, so I decided on .........

lh4.googleusercontent.com__RQVd3K4_7m0_U1utvgCP0QI_AAAAAAAAI6od8d79c03b6b0f4b033871e32783c9e9f.webp

And drop the new brace directly on top of the IC - again I still have problems with the oil cooler position and I ,would be drilling a 2 inch hole in the subframe and welding a 51mm tube through it as part of my new pipe run. in this position

lh5.googleusercontent.com___2vSJdyERB4_U1uxow3VkNI_AAAAAAAAI7c7ab3fdd4f602044dbd7286b4134a788c.webp
I didn't really like this idea of this so looked a bit harder.

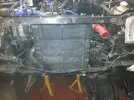
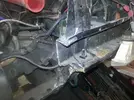
As it happens there's a fair amount of room under the headlight to get a 51mm pipe directly to the turbo outlet.

lh5.googleusercontent.com__C98f8SxDpWk_U1vES6vFNvI_AAAAAAAAI7w7416f8d1386f60df07e1ac79f6aa534f.webp

lh4.googleusercontent.com__szCtu16rZns_U1vEjrZnm4I_AAAAAAAAI78c00d81b07688005c7e3dad5f3aa8413f.webp
I'll be stripping the paint back here and treating the rust and repainting as needed.
lh4_googleusercontent_com_AeCAznurJc5_vP9zjZxAqLK_tUix26O9JasZKm91YpM_s196_p_no_.webp

This means I can achieve my 51mm pipework going into the I/C, the 60mm upto the TB and not cut any more structuaral parts about and also gives me enough room to weld 2x 25x41 directly behind where I have removed the original front panel and allowing me to tie in right across the front of the car and giving me additional strength overall. I've roughly cut the steel and stripped the paint back where I'm going to be welding this new brace in place, I need to make a few small adjustments as the front of the 5 is not as symmetrical as you might think. Pics to follow.

I will be at FCS

I'll get pics up as we go.
 
front x member now welded in place, which gives me just enough room for the oil cooler, rad and FMIC. It was pretty tricky welding the rear of the section, not pretty, but we got there. Painting and seam sealing next then re-assembly.

lh5.googleusercontent.com__Gk_iWo8_ozg_U10aT5IV0uI_AAAAAAAAI_U2d93f59f6842f431e7a8356033e225fd.webp
lh5.googleusercontent.com__MMtCex960Qk_U10aZDKG_uI_AAAAAAAAI_ofad7f5d55f151a6b6ca0b309f4011157.webp
lh5.googleusercontent.com__OHWNIRhauuk_U10ac8WjQ_I_AAAAAAAAI_A1775d20e2bd383711989569d682a2d48.webp
lh4.googleusercontent.com__ljMKpRKVKvg_U10aa_Ceg8I_AAAAAAAAI_0a0be5cbac5d1d0f79f02e335a53544f4.webp
lh5.googleusercontent.com__Rz4LTLXsaPM_U10aVjO_y_I_AAAAAAAAI_cb0d3d7b6df8e74b8b47e293293e8d87b.webp
lh4.googleusercontent.com__uLA2lC5X8v8_U10jxjyhCOI_AAAAAAAAI_Ub7bff47ca29e8729ef98f34cd298aeaf.webplh5.googleusercontent.com__5_b70JMQVRY_U10j0eXxpBI_AAAAAAAAI_gef43f17f4da809df6b925b641151904d.webp
lh6.googleusercontent.com__9HKJzt1vIjs_U10rslr5SyI_AAAAAAAAJAA13125e8ee5255e74013791eb7974a7d4.webp
lh6.googleusercontent.com__7eLABNulHLA_U10rxas6jXI_AAAAAAAAJAM6c153e103f4d98f0c1dfc65211b326d3.webp
lh6.googleusercontent.com__uSGNtfC_qTY_U10r1_7uBiI_AAAAAAAAJAY5c09482f4eab2ea46975259708e75e5f.webp
lh6.googleusercontent.com__E0dNiUZU2ws_U11BWRK0BOI_AAAAAAAAJAs815b54dcbb7dc05640825eadbc8b7ea5.webp
lh6.googleusercontent.com__LaMgGSkl3dw_U11Ba45ILJI_AAAAAAAAJA47667a645e0b911f9eefe39a787720f5f.webp
lh5.googleusercontent.com__yXlxXrnRd1I_U11Bh52XHtI_AAAAAAAAJBE3358fe808f9d8148e891bcd633b389de.webp
lh5.googleusercontent.com__kK4gEHnw0as_U11Ol2TVeTI_AAAAAAAAJBY94e16636e418ceb0d5002b3095bf7aa9.webp
lh3.googleusercontent.com__DEgSWwEij_U_U11OpTNjc8I_AAAAAAAAJBk2e588992c2114297a3f713d615096721.webp

That's it for now - all silicon ordered , coolant and oil systems to go back in this week and start looking at offering the bumper up and trimming. Best get the MOT booked.
 
Got the MoJo back.

Fuel rail sorted and back in place keeping the fuel in this time. I've plumbed in a pressure gauge but noticed that a lot of the oil in the display has leaked out. Why is there oil in there and what can I top it up with.
It's not oil, it's glycerin (or glycerol), a sugar-alcohol compound. It stops vibration which is the main killer of gauges, and helps control temperature (another gauge killer). The gauge doesnt need to be full.
 
Back
Top