There is more to life with TurboRenault.co.uk

Register a free account today to become a member! Once signed in, you'll be able to participate on this site by adding your own topics and posts, as well as connect with other members through your own private inbox!

Renault 11 Turbo Phase 2 Restoration

Heart breaking that you have to do the process again, but better safe than sorry !
I know, it sucks major ass... but it want this bloody thing to be as BOMBPROOF as possible after it's done.

Now my father has recently purchased a compressor, I think I'm going to have a bash at painting the underneath myself over coming weeks, after I've done the prep.. Now all I need is to get @Chris Smith to remind me how he made his own DIY Paint Booth..? :ag:
 
I have a heat lamp... Handy for doing small work.. wouldn't say it would be any good for a whole car... But your welcome to use it...

Painting a full car inside and out won't be easy (easier to take to haz)...

Seeing some work that people have painted outside compared to overs who have sealed of the garage, having extractor fans fitted, washing the floors before spraying to keep dust out of the air etc...

Some people get lucky spraying outside, overs get bad luck spraying indoors.

Horses for courses, your car, knowing that you will want a high standard paintwork, I doubt you will get that from a diy home job :(
 
Don't worry @Chris Smith and everyone else, I'm not thinking of painting the whole car, I'm just thinking to paint the underneath myself so I can then re-fit some brakelines and other small things whilst the car is on it's side, and then leave the final coat to the professionals..
 
Don't worry @Chris Smith and everyone else, I'm not thinking of painting the whole car, I'm just thinking to paint the underneath myself so I can then re-fit some brakelines and other small things whilst the car is on it's side, and then leave the final coat to the professionals..
Underneath nobody except you & the MOT man sees.... Go for gold, no reason why not to have a crack at it .
 
Just come inside from having a quick hour on it tonight and continued sorting out the little rust spots. Here you can see a patch I coated in the Rust Killer:
IMG_5286.webp
and when you look closer, all the little dark spots, are bits of rust it found to have a munch on...
IMG_5288.webp
Actually not as much as I expected there would be?! So I'm pleased with that!
IMG_5292.webp

Agree, crack on.
:bj::bj::bj: Funny you should say this tonight chaps... Was thinking to myself whilst painting these little bits what would actually be involved in me painting the underneath of the car myself, and when you think about it in more detail, It's not as easy as I first imagined... :ai:
  • Makeshift paint booth to be built to stop contamination running all over the rest of the garage
  • Fresh air feed & exhaust for paint booth to stop the place filling up with fumes
  • Air fed mask & PPE equipment for me at home to actually do this.. £££
  • Not really having a fecking clue how to paint a car with 2 pack paints etc..
I'm leaning back towards taking it to the bodyshop and letting them do all that work with the right gear & equipment.....
 
Did @Mart say something?
He may of done, if that's the case, that's 3 then - I need say no more.

I've never had anything done by Haz, but what I have seen has been very good.

But equally important is the bit where he says 'I will do *this*' and he does it, when he says he's going to do it. I'm sure you will get the same level of service as those not too far from him.

Well, maybe not that good.
 
As it looks like I'm going to have to re-use the original front bumper, there was a few small repairs that I wanted to try my hand at fixing.

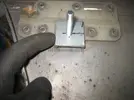
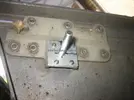
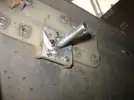
The nearside wing fixing bolt had been pulled out during the dis-assembly of the car as the nut had become siezed on the bolt:IMG_5356.webp
To re-fit the bolt, i first measured out the material I would need to remove to re-fit the bolt:
IMG_5357.webp
Next I used a Dremel to remove the material and re-fit the bolt:
IMG_5359.webp
I then made a little plate to hold the bolt back into the bumper:
IMG_5361.webp
And then used a few small screws to hold the plate in-position:
IMG_5362.webp
Next it was time to get jiggy with the welder again and tack the bolt to the place :dm:
IMG_5363.webp
Then removed it all and welded round the back of the bolt.

Next little job was to try & fix the olf R9/R11 Wavy Front Bumper edge. Apparenty its a bit of an issue with these cars and is due to the thickness of the bumper material in this area being in a close proximity to the Radiator. This was what it looked like initially:
IMG_5242.webp
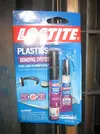
You can see that the bumper has come away from the reinforcing structure behind it, so my idea was to stick that part of the bumper back down to the reinforcing... Bought some special 2 pack glue that works with PolyOlefin resins:
IMG_5364.webp
You give the Activator pen a wipe over both sides of the area you want to glue, then wait 1 minute, then apply the glue to 1 of the sides, then stick together. I followed the procedure and used a rare collection of clamps to hold things together:
IMG_5366.webp
Left it to set for a few days, and im pleased with the results:
IMG_5373.webp
Now the Bumper looks a lot better for itself!
IMG_5375.webp

Thanks for Reading :)
 
Thought I would bring a few parts home from my "lockup garage" today to start & have a sort round which parts I will refurbish/use for the build. Was surprised when I put a few things in the boot of my car, it soon filled up! :ai: The car looked like it had some LOWZ on the way home with all the weight..:af:
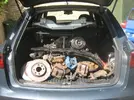
IMG_5378.webp

Once I got home I arranged all the parts to compare what I had:
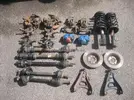
IMG_5380.webp
I've amassed a few parts from various different cars over the years, so the parts come from R5GTT/ R11 Turbo/ R19 16v/ Clio 172 and perhaps a few more inbetween..

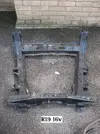
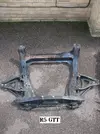
I have 3 x Subframes I could use for this project, an 11T, a R5GTT and a 19 16v. I already got the R11T subframe zinc plated and powercoated so I'll be using that one as it's the straightest one. There didn't seem to be much difference with the 11T and 19 16v ones:
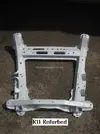
IMG_5383.webp
IMG_5385.webp
IMG_5384.webp

My hope is to try & widen the track of the front of the 11T (like I have done at the rear of the car by using an R19 16v Beam) by using a mix & match of other Renault parts. The Clio 172 Driveshafts measure 15mm longer than the R11T ones so perhaps I'm onto a winner with that..? To make sure I continued to compare all the parts I had:
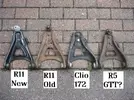
IMG_5388.webp
  • The R5GTT Wishbones are the smalles (Note they have the smallest hole in the centre)
  • The R11 and Clio 172 Wishbones are ~15mm Longer
  • The Clio 172 wishbones have a much fatter Bush on the back of them so I was thinking to use them.. but when I compared them to the R11T wishbones I found that they move the wheel further towards the front of the car by approx 15mm. (If you look at the picture above, you can see that the Clio 172 Wishbone is leaning more to the left than the others)
So the Clio 172 wishbones could not be used because it would make the wheel sit out of centre of the wheelarch. So I'll be using the R11T wishbones.

Next I started to look at the hubs, and remembered that my Clio 172 Hubs were dropped off at an Engineering shop in Peterborough around a year ago to get the shock mount thinned out.... Wonder if they're still their?? :ah:

So without them I carried on looking at the Hubs I had:
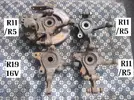
IMG_5390.webp

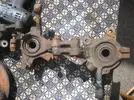
Very quickly I noticed that the R19 16V hubs have a larger wheel bearing compared to the R11/R5 ones:
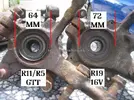
IMG_5391.webp
Given the R5 Wheel bearings can be a little delecate at times, I figure a larger wheel bearing isn't a bad thing to have. I compared the other dimensions and they all look good:
IMG_5394.webp
As I will want to fit the OE 14" wheels to this car for concours shows, I'm pretty sure the Clio 172 Hubs would be too large to use, so I think I'm going to ditch that idea.

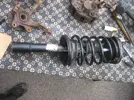
Last thing was to dismantle a pair of (what look like) new Renault Motrio dampers held within the R19 16V Shock legs I had. Figure they may come in handy for the future, So rescued them.
IMG_5395.webp

The R19 16V springs that were fitted to the shocks are WAAAAY too long to be used on the R11T, so the shocks are now surplus to requirements for me now. I will advertise them on the R19 board if anyone wants some??

Thanks for reading :)
 
Back
Top