There is more to life with TurboRenault.co.uk
You are using an out of date browser. It may not display this or other websites correctly.
You should upgrade or use an alternative browser.
You should upgrade or use an alternative browser.
DaveL485
Staff member
ph1 16v alloys like @Sparkysparks has on his clio would look awesome. 16s might be too big, we will see 
DaveL485
Staff member
So - engine bay - what do I do?
Clean it up, 2pk prime & paint
Clean it up, gravitex, 2pk prime & paint
...do I laquer it?
When I say clean it up, obv I need to remove loose paint and rust but what sore of prep do I need to do for the primer?
I've only ever sprayed my (new) roll cage in the 21 successfully really which was bare metal and was just wiped down with thinners. Can anyone advise on what to do with this engine bay?
Turbell
Well-Known Member
De grease it thoughly, bare metal any rust spots and etch them, rattle a bit of primer on these areas, mask it all off/sheet everywhere up, one dry coat of base, soon as it's tacky a wet coat of base, when it's touch dry same with lacquer, one tack one wet.
That'd do for me in a bay, it'll look bob on when everything is re fitted.
If you're using two pack remember it's naughty stuff and you should be on an air fed mask, if you not, use a good cartridge filter, get a coat on and get the fuck out of the the garage.
Mix it outside, limit your exposure to the min.
DaveL485
Staff member
Whats a
Dry coat/wet coat? You are speaking in riddles man. I need a bullet pointed step by step idiots guide lolone dry coat of base, soon as it's tacky a wet coat of base, when it's touch dry same with lacquer, one tack one wet.
Turbell
Well-Known Member
Wet coat looks wet, dry coat looks dry....Whats a
Dry coat/wet coat? You are speaking in riddles man. I need a bullet pointed step by step idiots guide lol
Point a rattle can about two inch from a panel and spray it, it'll look wet.
Pull can a foot away and do same, it'll be dry looking and grainy.
When you do first 'dry' coat with your gun just flash round the area so you get a grainy tacky coat, then let it dry enough to stay tacky, then take your time, go slower so next coat looks wet.
Less thinner for a dry coat, more for second wet, different pressure, loads to learn, I know a tiny bit, ain't my trade just a fool with a clue.
DaveL485
Staff member
Gearbox is back, completely rebuilt, new bearings and seals, vapour blasted etc. Hefty price tag though, £450 
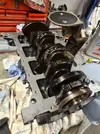
Decided to reassemble the engine now the bearing shell shenanigans you may recall from xmas were resolved. Or so I thought. I fitted the pistons/rods and did up the big ends, remember std, unground crank and bearings, and when I torqued the caps it locked up the bottom end AGAIN. Bit of experimentation led me to one cylinder, with the other three torqued up it turned lovely and smooth.
I take that piston out and check that the bearings are fitted right, that the locating tabs are on the same side as the other cylinders and that the tabs are facing each other in the cap/rod. They are.
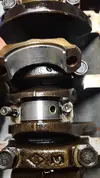
Retorque it down, its binding again.
Take it out, and the one next to it, swap them over in the cylinders and the fault follows the rod/piston. Take them both back out and measure the ID of the bearing in the assembly, both identical to the 0.1mm. I've had them in and out a few times by this time even trying the cap the other way around (didnt work) and it's hugely frustrating. What I did notice though is this: The problem cap seems to orient differently
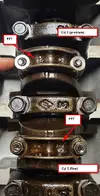
This suggests the cap is on backwards, but all the bearing tabs are on the right side for both the rod and cap as you look at the pic on all cylinders - I am 100% sure of this. The three good cylinders are all the same way up, the problem one is the other way around. The rods are the original rods from this engine. I havent changed caps between rods, unless thats happened while at the machine shop - I don't know.
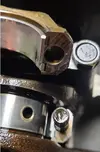
I am most confused by this. I was starting to lose my rag and then while I was torquing the cap up for the - I dunno - fifth or sixth time (only 50nm) this happened which properly fucked me over so I sacked it off in a mardy.
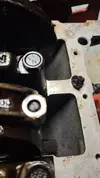
It seems like the fix is obvious, orient the cap the other way like the others, but then the bearing tabs are on opposite sides which is wrong (and it locks it up anyway).
I have new studs on the way, but I genuinely don't get whats happened here, and I have wasted another few hours twatting about with this damn thing. Wish i'd just bought a whole, running replacement engine now.
Decided to reassemble the engine now the bearing shell shenanigans you may recall from xmas were resolved. Or so I thought. I fitted the pistons/rods and did up the big ends, remember std, unground crank and bearings, and when I torqued the caps it locked up the bottom end AGAIN. Bit of experimentation led me to one cylinder, with the other three torqued up it turned lovely and smooth.
I take that piston out and check that the bearings are fitted right, that the locating tabs are on the same side as the other cylinders and that the tabs are facing each other in the cap/rod. They are.

Retorque it down, its binding again.
Take it out, and the one next to it, swap them over in the cylinders and the fault follows the rod/piston. Take them both back out and measure the ID of the bearing in the assembly, both identical to the 0.1mm. I've had them in and out a few times by this time even trying the cap the other way around (didnt work) and it's hugely frustrating. What I did notice though is this: The problem cap seems to orient differently

This suggests the cap is on backwards, but all the bearing tabs are on the right side for both the rod and cap as you look at the pic on all cylinders - I am 100% sure of this. The three good cylinders are all the same way up, the problem one is the other way around. The rods are the original rods from this engine. I havent changed caps between rods, unless thats happened while at the machine shop - I don't know.

I am most confused by this. I was starting to lose my rag and then while I was torquing the cap up for the - I dunno - fifth or sixth time (only 50nm) this happened which properly fucked me over so I sacked it off in a mardy.

It seems like the fix is obvious, orient the cap the other way like the others, but then the bearing tabs are on opposite sides which is wrong (and it locks it up anyway).
I have new studs on the way, but I genuinely don't get whats happened here, and I have wasted another few hours twatting about with this damn thing. Wish i'd just bought a whole, running replacement engine now.
DaveL485
Staff member
Two have, and have new pistons on. Two havent, and the problem one is one of these.Have the pistons been off the rods?
Would that matter though?
gordini stu
Well-Known Member
I’ve had an odd bearing in a pack before, you probably have , but have you swap those around ,
DaveL485
Staff member
No not yet, I guess thats the next step, but the broken studs have left me stuck until I get some more. I was about to try the rod/cap with the old bearings that I still have here somewhere.I’ve had an odd bearing in a pack before, you probably have , but have you swap those around ,
gordini stu
Well-Known Member
I have a couple of rods somewhere I’m in the yard I take a look or are you going to use arp bolts or similar?
Mark_L
Well-Known Member
I'd be trying bearings from one of the three you know are ok.
I think the issue with the bolt is the repetition of torquing, they will stretch each time.
Maybe use old bolts to find the problem with that rod/bearings.
Probably worth it fitting the new set of bolts. Better now than on full boost!
Maybe the pic but that bearing looks like it's picking up already. I wouldn't be too concerned about the casting marks, it's the way they've been machined that matters.
You'll get it sorted.
Feel your pain though!!
DaveL485
Staff member
I have 2 replacements on the way for the 2 that broke but I wouldnt mind spares - drop me a PM if you find someI have a couple of rods somewhere I’m in the yard I take a look or are you going to use arp bolts or similar?
Must be, but havent got much choice!I think the issue with the bolt is the repetition of torquing, they will stretch each time.
Don't have any others these were the original ones. Best get some spares I think. I might try the old shells, that will give me a definite answer on if it's a dodgy shell when I get the new studs.Maybe use old bolts to find the problem with that rod/bearings.
gordini stu
Well-Known Member
Found a pair of rods from a diesel clio I think . No good on the 5 stuff yet , god I’ve got shit everywhere.
DaveL485
Staff member
Got some replacement studs and swapped in a pair of old big end shells. Still the same issue. WTF.
Took it back out again, took the shells out, gave the cap and rod a super hard clean/polish with a dremel and fine wet & dry, fitted the new shells again and reassembled. This time I can turn it but it's definitley stiffer with that one cap torqued up than it is with it finger tight. Ive left it bolted up while I decide whether to just leave it or whether I take it apart...again.
How can the big end rod/cap be tight when this is the same rod/cap that came out of the engine?
I also established that 100% definite the locators for the bearings are machined in the other way on this one cap when compared to the others, and the casting prints.

Turbell
Well-Known Member
Only definite answer is to get the crank measured and the rods internally measured.
Or swap them about and check running clearances with some plastigage, try all combos, and you'll pin it down to the crankpin or rod.
Building engines is ace, but when they throw a wobbler in and doubt sets in.....pants
Or swap them about and check running clearances with some plastigage, try all combos, and you'll pin it down to the crankpin or rod.
Building engines is ace, but when they throw a wobbler in and doubt sets in.....pants
Similar threads
- Featured
- Replies
- 82
- Views
- 2K
- Question
5 GT Turbo
Silver phase 1 Turbo - Bodykit colour ??
- Replies
- 12
- Views
- 132
- Question
5 GT Turbo
Gear selector Rebuild kit
- Replies
- 7
- Views
- 143

