There is more to life with TurboRenault.co.uk
You are using an out of date browser. It may not display this or other websites correctly.
You should upgrade or use an alternative browser.
You should upgrade or use an alternative browser.
How (not) to make your Dauphine Handle
- Thread starter Steve Swan
- Start date
Steve Swan
Well-Known Member
Been Quiet on here Since Paul's car went away, now Liz is on Holiday, so I need to keep workshop activities under control for a couple of weeks. The 5 speed refresh went away and I had a Cut,n,Shut Mainshaft to do. It has all been covered before in the 8gordiniworkshop thread. Basically the car was a Lotus Europa in Canada which had a 365 5 speed with 4 close ratios and a long 5th (this was how Lotus did it) Thing is most owners who have modified their motors now have more power and torque than originally, making the gearing seem short overall. The brief on this one was that the owner had a 1600 4 speed mainshaft , these had a 3.54:1 diff in rather than the 3.77:1 of the 5 speed , the plan was to make a 5 speed 3.54 shaft, to give the car longer legs. It is done and dusted and I got a picture of the modified shaft and the original 5 speed from the owner today as it has just arrived, hope he is happy with it.
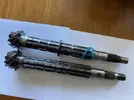
My Chop shop shaft on the top and the original underneath .....

My Chop shop shaft on the top and the original underneath .....
Steve Swan
Well-Known Member
Next up is the Dauph. All the bits have arrived (last today) So the fun begins.

Grp bits arrived today. hiding in the background is the front panel and spare wheel door. I was never delighted about how the front of the Dauph looked when I did it. I intend to make it better this time around, by keeping the panels seperate (bolted together) and different brake cooling apertures. It's always nerve-wracking setting about new panels with cutting tools, but hey - ho, no pain - no gain as they say
Next job is to get it on the Dozer and pull it
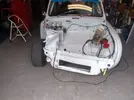
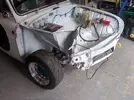
I'll be happier once this part of the operation is complete.............

Grp bits arrived today. hiding in the background is the front panel and spare wheel door. I was never delighted about how the front of the Dauph looked when I did it. I intend to make it better this time around, by keeping the panels seperate (bolted together) and different brake cooling apertures. It's always nerve-wracking setting about new panels with cutting tools, but hey - ho, no pain - no gain as they say
Next job is to get it on the Dozer and pull it


I'll be happier once this part of the operation is complete.............
Steve Swan
Well-Known Member
Yeah it has kinked just in front of the turret box I put in to clear the R8 front end. Hopefully fairly straightforward
Steve Swan
Well-Known Member
This just in. The motor survived the Dyno (honestly the way my luck's been lately I'm surprised it didn't throw a rod) The brief is it lifts out of nowhere and likes a rev. I'm slightly disappointed with the headline HP, but I'll reserve judgement til I've seen the sheet for the whole story.
Steve Swan
Well-Known Member
Picked my engine up From an old friend Who has tested all my engines in the last 30 years (about 9 in total) There are pictures and some videos which I'll try to get sorted. The good news is that it has exceptional oil pressure (amazing what a proper oil pump does) Iain's opinion is, that it pulls out of nowhere and is keen to rev, he feels that by the way it spins up the Dyno it will fly in the car. Ultimate power was a bit shy of what I was hoping for, but the motor has not topped out at 7500, and holding for a full pull at 8000 is pretty crazy on this motor (given the big stroke) This means it is probably just shy of 180 BHP total which from a near 50 year old 2 valve at 1689cc isn't too bad.
We are very old fashioned here no printouts
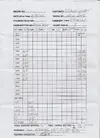
From this I get a bit of graph paper and draw the curves

That sums it up better. Looks like it will be fun Takeoff will begin about 3500 rpm and the Rods will be out of the block before its totally over the top about 8500rpm. Maybe I should design a couple of camboxes to fit on top of the head and find out....................
We are very old fashioned here no printouts

From this I get a bit of graph paper and draw the curves

That sums it up better. Looks like it will be fun Takeoff will begin about 3500 rpm and the Rods will be out of the block before its totally over the top about 8500rpm. Maybe I should design a couple of camboxes to fit on top of the head and find out....................
Steve Swan
Well-Known Member
Simple enough BHP =TORQUE X RPM/5250
This is why the plots always cross at 5250 as HP =Torque @ 5250
This is why the plots always cross at 5250 as HP =Torque @ 5250
Steve Swan
Well-Known Member
The other good thing about the Dyno is the capability to run engines in on it. It's not easy to run a race engine in as at half throttle it will be at terminal rpm probably inside a minute and you have to lift off. The brake gives you the opportunity to hitch an Artic Trailer to your engine or make it climb a never ending steep hill. This gets the rings properly bedded in. If it survives the Dyno it's good to go. Just need to warm it up and you're away...
Steve Swan
Well-Known Member
It is road legal Dave. Problem is trying to load it up. It's away like a rocket and you need to lift, you can't sustain load, if you could attach a large caravan maybe that would work. These motors will pull to the redline on1/4 throttle. Once you have had an engine tested (run in and set up) you'll never go back to the old way you have also got all the jetting and timing sorted, once installed, if you are really picky a quick run on a rolling road to make sure your installation isn't causing problems and you are done. The timing is at 31degrees max. If you moved the dizzy to give 34-36 it will blow through the head gasket in seconds, it's that fussy. Don't ask me how I know by the way.....
Steve Swan
Well-Known Member
It was done on a Heenan Froude Water Brake. its like a variable pitch propeller. The load is infinitely adjustable Then the throttle is pulled. This gets varied in 15min steps during the running in phase. For power the load is adjusted and it gets full throttle, various adjustments may or may not be made then you are off to the next step. It relies heavily on the operators experience. This is why I use the Guy I do, he has been building and testing engines for one of Scotland's better known race engine builders since about 1973. He retired 7 years ago now, but his reputation followed him and he is very much in demand. The engine in before me was a 2.8 Hart with nothing below 7200rpm but made an impressive 365Bhp. Proper race engines.......
Steve Swan
Well-Known Member
He has got some Pics and videos. We (that's me and him just need to figure out how to transfer them ) are stuck in the last century , when it comes to stuff like this . I will go and see him and take Malcolm with me. He'll sort it ...........Thought it would be water braked. Cool though and agree it does rely on operetor knowledge and experience. Get some pics next time you have one in for dyno, i love stuff like this
Steve Swan
Well-Known Member
Time to start repairing the Dauph. Mainly because there are no jobs in the workshop and I have all the parts to start. I welded the spare wheel door into the front panel on the original car and was never very happy with the outcome see avatar left.. It just seemed heavy to me, so a new approach is to be taken.
This involves fitting the door into the front panel with spacers and bolting it in, so it is fixed, but doesn't look fixed....(just humour me ok)
I welded up the bumper iron holes which then made fitting a towing eye a bit of a problem and the cooler group fitted behind it all was a bit of a muddle. This time I am keeping the bumper iron holes and also cutting cooling slots going the opposite direction from the original. The cooler group is going to be it's own module held in by 2 or 4 bolts only for easy maintenance.
I hate taking a grinder to new panels that you have no hope of replacing, but needs must, so I marked out the various bits and got my better half to cut me some sticky vinyl templates on her CNC card cutting machine (which is also a whizz for gearbox gaskets) slapped them on and set to.
If you use Qmax sheet metal punches this little tip saves some sweat See below. Basically you fit a flat thrust race between the anvil and bolt head. This removes the friction when the punch is tightened and it flies through the metal.
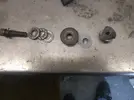
Exploded view

Assembled.. 2 bearing sizes cover most of the range an 8mm ID and a 10mm ID
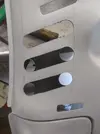
With the ends punched the slots are cut by hand with snips as it requires minimal finishing you can see the black vinyl masks between the holes
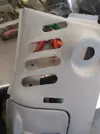
Just needs a lick of the die grinder and a flap wheel to finish off
Then the number plate aperture is cut out more or less by the same method.
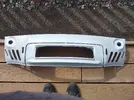
Then mark out and punch for the indicators. Next it will require someone with more skill than me to finish it off. It really is Horrible old French tin and I want to keep the welding to the absolute minimum
Next job is to trim the bonnet and cut out the Headlamp apertures. Wish me luck no margin for error...............
This involves fitting the door into the front panel with spacers and bolting it in, so it is fixed, but doesn't look fixed....(just humour me ok)
I welded up the bumper iron holes which then made fitting a towing eye a bit of a problem and the cooler group fitted behind it all was a bit of a muddle. This time I am keeping the bumper iron holes and also cutting cooling slots going the opposite direction from the original. The cooler group is going to be it's own module held in by 2 or 4 bolts only for easy maintenance.
I hate taking a grinder to new panels that you have no hope of replacing, but needs must, so I marked out the various bits and got my better half to cut me some sticky vinyl templates on her CNC card cutting machine (which is also a whizz for gearbox gaskets) slapped them on and set to.
If you use Qmax sheet metal punches this little tip saves some sweat See below. Basically you fit a flat thrust race between the anvil and bolt head. This removes the friction when the punch is tightened and it flies through the metal.

Exploded view

Assembled.. 2 bearing sizes cover most of the range an 8mm ID and a 10mm ID

With the ends punched the slots are cut by hand with snips as it requires minimal finishing you can see the black vinyl masks between the holes

Just needs a lick of the die grinder and a flap wheel to finish off
Then the number plate aperture is cut out more or less by the same method.

Then mark out and punch for the indicators. Next it will require someone with more skill than me to finish it off. It really is Horrible old French tin and I want to keep the welding to the absolute minimum
Next job is to trim the bonnet and cut out the Headlamp apertures. Wish me luck no margin for error...............
Steve Swan
Well-Known Member
I am not going to go into the process for fitting lights, as it was all done on Paul's 8 thread , needless to say it's done
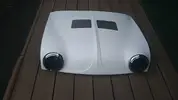
I've got a vented bonnet this time around as the Guy who made my last one is either Retired or no longer walks among us , shame I liked the plain bonnet. I have kept all the shrapnel maybe one day I'll do something with it, if I get Bored!!!!!!!!!!!!

I've got a vented bonnet this time around as the Guy who made my last one is either Retired or no longer walks among us , shame I liked the plain bonnet. I have kept all the shrapnel maybe one day I'll do something with it, if I get Bored!!!!!!!!!!!!
Steve Swan
Well-Known Member
Now I know I have got this wrong again, but it was a spur of the moment thing. I have purchased the following HAWK 1.5T 1.5 TON 1500KG PORTABLE MINI SCISSOR CAR VAN LIFT JACK RAMP STAND | eBay I know I should have put the link here first and bought from there, but I was only looking and discovered that with a coupon thing on e-bay it suddenly got £107.00 cheaper. Unable to believe my luck I went ahead with it, then thought about this later... Sorry.
I started looking at one which was £1150.00 then I found a Sealey one which i got down to £600 All in. Then I found the Hawk one for £499.00. Then on their e-bay shop £429.00 Then with the coupon it came down to £380 inc vat and delivery.. Who is going to be the first to tell me that they bought one and it is awfull..................
The deal thing seems like it expires in 3-4 days.
Similar threads
- Replies
- 8
- Views
- 191
- Replies
- 3
- Views
- 93

