Bosch jobbey
There is more to life with TurboRenault.co.uk
You are using an out of date browser. It may not display this or other websites correctly.
You should upgrade or use an alternative browser.
You should upgrade or use an alternative browser.
5 GT Turbo Deadline 9th June 2018
- Thread starter j8tro
- Start date
-
- Tags
- renault 5 gt turbo
j8tro
Well-Known Member
Things are moving at a pace this week. Ryan came round Saturday and put in a good shift. The old engine and box were removed, assessments were made on the car ahead of an MOT (Ryan is a tester) and final bits like tappets being set and other odds and sods were undertaken on the new engine.
Due to time running out, the plan was to whip out the old and get then new straight back in, but OCD took over and with Ryan offering more time this coming Saturday afternoon and then the following Saturday, i'm on a mission this week to get the bay as clean and prepared as it can be to keep me happy.
I like to think my car is a clean example, but always knew the previous owner had only masked up the engine bay and done work to the "seen" parts. Hence removing everything has uncovered parts i'm not happy with. Over spray, original tired paint, a few light rust spots etc. Therefore that is all being addressed so I know with the engine going back in its all been sorted. Rather annoyingly, there was either bad prepwork, or at some point brake fluid has leaked from the reservoir and essentially got under the seem sealer on the front drivers side arch. I doug, doug some more and then stripped a load off. The panel only had surface rust which is good to know, but i'm now about to take on proper paint for the first time. I've done all my research so ill see how it all goes. Its an engine bay at the end of the day and i'm confident i can do a decent job and it will be 10 times better than it currently sits.
Sunday was spent, cleaning, degreasing and stripping parts from the car. Damn you cant believe where the dirt gets! All hubs are removed, its having new track rods and ball joints, everything below bodywork will be painted (although the subframe is in very good condition). Any other engine brackets are being painted. The inter cooler will get a new flash of paint, the drive shafts cleaned up, all new engine mounts, new master cylinder, refurbish servo, i'll be knocking the rust off the discs, but they should be fine. The 4 pots will get new Pads and i have Motul 600 fluid to go in etc etc.
I'm enjoying it at the minute, I work better under pressure and my whole week is mapped out with tasks each night. Ill share some photos below of the "before", with an aim of updating early next week with the "after"............wish me luck!
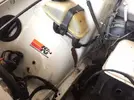
Early pocking around of the seam sealer. Also notice the over spray on the pipework etc and master cylinder and servo.
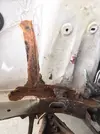
That then led to this..................... It looks worse than it is to be honest. Its been treated with a rust remover and is all solid. I'm just glad i've caught it.


Servo and bulkhead to give you an idea of why i'm not just chucking the lump back in.
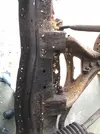
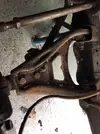
State of the subframe and arms. The subframe is actually in great shape, the crap has protected it in one respect. The arms and other tie bars/rods etc will all be refurbished.
I have less than 6 weeks to get this car running, MOT'd and reliable..................oh..........scratch that last one.........its a Renault
Due to time running out, the plan was to whip out the old and get then new straight back in, but OCD took over and with Ryan offering more time this coming Saturday afternoon and then the following Saturday, i'm on a mission this week to get the bay as clean and prepared as it can be to keep me happy.
I like to think my car is a clean example, but always knew the previous owner had only masked up the engine bay and done work to the "seen" parts. Hence removing everything has uncovered parts i'm not happy with. Over spray, original tired paint, a few light rust spots etc. Therefore that is all being addressed so I know with the engine going back in its all been sorted. Rather annoyingly, there was either bad prepwork, or at some point brake fluid has leaked from the reservoir and essentially got under the seem sealer on the front drivers side arch. I doug, doug some more and then stripped a load off. The panel only had surface rust which is good to know, but i'm now about to take on proper paint for the first time. I've done all my research so ill see how it all goes. Its an engine bay at the end of the day and i'm confident i can do a decent job and it will be 10 times better than it currently sits.
Sunday was spent, cleaning, degreasing and stripping parts from the car. Damn you cant believe where the dirt gets! All hubs are removed, its having new track rods and ball joints, everything below bodywork will be painted (although the subframe is in very good condition). Any other engine brackets are being painted. The inter cooler will get a new flash of paint, the drive shafts cleaned up, all new engine mounts, new master cylinder, refurbish servo, i'll be knocking the rust off the discs, but they should be fine. The 4 pots will get new Pads and i have Motul 600 fluid to go in etc etc.
I'm enjoying it at the minute, I work better under pressure and my whole week is mapped out with tasks each night. Ill share some photos below of the "before", with an aim of updating early next week with the "after"............wish me luck!

Early pocking around of the seam sealer. Also notice the over spray on the pipework etc and master cylinder and servo.

That then led to this..................... It looks worse than it is to be honest. Its been treated with a rust remover and is all solid. I'm just glad i've caught it.


Servo and bulkhead to give you an idea of why i'm not just chucking the lump back in.


State of the subframe and arms. The subframe is actually in great shape, the crap has protected it in one respect. The arms and other tie bars/rods etc will all be refurbished.
I have less than 6 weeks to get this car running, MOT'd and reliable..................oh..........scratch that last one.........its a Renault
Keep the faith!
Norwich Nick
Well-Known Member
It’s a bugger how it goes, while I’m here i’ll Just, might as well just and might as well do it right!
Been there and still haven’t finished, maybe I should have set a deadline

Been there and still haven’t finished, maybe I should have set a deadline
j8tro
Well-Known Member
It’s a bugger how it goes, while I’m here i’ll Just, might as well just and might as well do it right!
Been there and still haven’t finished, maybe I should have set a deadline
This will be finished! I'm determined. The only thing to stop me will be bad luck.
j8tro
Well-Known Member
Due to seam sealer drying times and me trying to get things to a certain point for Saturday, an alarm went off this morning at 2am and I was in the garage laying primer! Ha the things we do..........its coming along nicely mind!
Oh and if anyone works in a body shop and has to mask up engine bays.................I applaud you....................what a total fu*ker of a job!
Oh and if anyone works in a body shop and has to mask up engine bays.................I applaud you....................what a total fu*ker of a job!
j8tro
Well-Known Member
Right, bit of a delayed update. Last week was busy, but Saturday was a good day. Ill detail below how things went with some photos
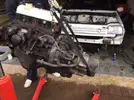
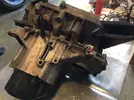
Old (faulty) lump was removed along with the gearbox, they were separated and the engine put to one side. The gearbox was fully degreaced and cleaned as best as possible with time constraints, i wasnt happy with the result (above right) so additional time was spent painting.
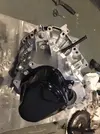
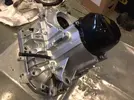
I'm very happy with how this came out to be honest, the paint is just hammerite smooth silver and black from a rattle can. The whole lot was primed first with etch just to help with adhesion.
With the bay being stripped, it was obvious plenty more brackets needed "tarting up". Without the time to get some of them plated, i went about with more smooth black. They have come up great too.
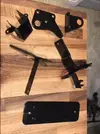
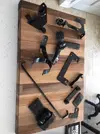
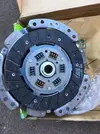
Besides the brackets, my new loom turned up from Juracingparts just in time for the install on Saturday. Ive swapped the connectors and wire tidy's over to the loom following this photo. The old loom was looking quite tatty in places so this was for peace of mind. My Valeo Volvo clutch also saw the light of day after 6 years of being in the boot.
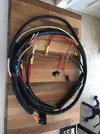
Onto the engine bay. The bay was removed of anything that could be easily removed, the two large clips on the bulkhead that clip the passenger side brake line too and various other bits, i didnt want to damage trying to remove, they were also quite tatty looking so i was happy to paint these in. The rest of the bay that wasnt in bad condition was masked up and protected, annoyingly, i had to get plenty of overspray from the previous owner from various clips, pipes, wires etc which took hours, i now only have one brake line which still has hints of white, i was about to loose the will to live and didnt have the time to waste.
The panels were all scotched back and keyed, the seam sealer that was removed to leave surface rust was all rubbed back, rust treated and then etch primed to the bare metal only. I then applied the seam sealer, before primer and paint. In hindsight i have put the seam sealer on too thin, but its a much better solution knowing the potential rust issue has been resolved. Being the inner drivers side, it can be fairly easily done again (if needed) down the line. This is how it progressed:
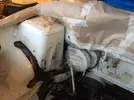

Rust treatment applied and all panels scotched.
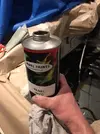
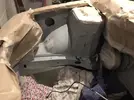
All panels cleaned down with Panel Wipe before the first layer of primer (forgot to take a photo of just the seam sealer)
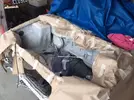
Following morning (as the primer was sprayed on at 2am due to the seam sealer going off) a quick photo taken before work of the primer coat.
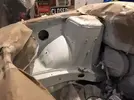
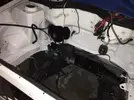
It took about 5 coats to cover, the photo above is just one coat, which i could hardly tell was going on. The right photo was taken after removal of the protection. The light shows how the original paint in the bay has tarnished, but a t-cut has made it a lot closer...........see below.
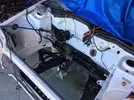
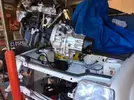
I haven't taken photos of the sub frame and bottom arms etc, but all of these have been cleaned and painted black for protection. Just because everything else was looking better, the driveshafts were also painted and the servo which now looks a lot better with a new master cylinder. My Avo shocks are now the only thing looking worn and i'm looking to replace those too. The engine was in around mid morning, the rest of the afternoon was spent bolting bits back on and reassembling the suspension and brakes. The car has had new track rods and ball joints, and my Hi-Spec's are getting new pads.
A total pain in the ass was finding out my rebuilt engine was from a phase 1 car, hence some of the oil pipes and breather pipes etc are slightly different. Pipes mark had plated for me wouldn't fit so the old ones taken out last weekend were quickly prep'd and painted too.
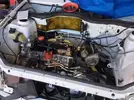

The engine is now in, turbo on, carb on, last night i spent a few hours cleaning all my silicone hoses ready to head scratch about that tonight. Ryan Price has been a great help with the engine removal and educating me. Once i've watched someone do something, i'm quite happy to give it a go myself so i'm really grateful for his help.
We are aiming to start up this weekend and then providing we have no issues i'll be putting it in for MOT!!! get in!
Edit.................yes yes yes the gold tape is not everyones cup of tea! i wasnt happy with holes left in the bulkhead following removal of some brackets. I like it, i'll wait for it to fall off..............


Old (faulty) lump was removed along with the gearbox, they were separated and the engine put to one side. The gearbox was fully degreaced and cleaned as best as possible with time constraints, i wasnt happy with the result (above right) so additional time was spent painting.


I'm very happy with how this came out to be honest, the paint is just hammerite smooth silver and black from a rattle can. The whole lot was primed first with etch just to help with adhesion.
With the bay being stripped, it was obvious plenty more brackets needed "tarting up". Without the time to get some of them plated, i went about with more smooth black. They have come up great too.


Besides the brackets, my new loom turned up from Juracingparts just in time for the install on Saturday. Ive swapped the connectors and wire tidy's over to the loom following this photo. The old loom was looking quite tatty in places so this was for peace of mind. My Valeo Volvo clutch also saw the light of day after 6 years of being in the boot.


Onto the engine bay. The bay was removed of anything that could be easily removed, the two large clips on the bulkhead that clip the passenger side brake line too and various other bits, i didnt want to damage trying to remove, they were also quite tatty looking so i was happy to paint these in. The rest of the bay that wasnt in bad condition was masked up and protected, annoyingly, i had to get plenty of overspray from the previous owner from various clips, pipes, wires etc which took hours, i now only have one brake line which still has hints of white, i was about to loose the will to live and didnt have the time to waste.
The panels were all scotched back and keyed, the seam sealer that was removed to leave surface rust was all rubbed back, rust treated and then etch primed to the bare metal only. I then applied the seam sealer, before primer and paint. In hindsight i have put the seam sealer on too thin, but its a much better solution knowing the potential rust issue has been resolved. Being the inner drivers side, it can be fairly easily done again (if needed) down the line. This is how it progressed:


Rust treatment applied and all panels scotched.


All panels cleaned down with Panel Wipe before the first layer of primer (forgot to take a photo of just the seam sealer)

Following morning (as the primer was sprayed on at 2am due to the seam sealer going off) a quick photo taken before work of the primer coat.


It took about 5 coats to cover, the photo above is just one coat, which i could hardly tell was going on. The right photo was taken after removal of the protection. The light shows how the original paint in the bay has tarnished, but a t-cut has made it a lot closer...........see below.


I haven't taken photos of the sub frame and bottom arms etc, but all of these have been cleaned and painted black for protection. Just because everything else was looking better, the driveshafts were also painted and the servo which now looks a lot better with a new master cylinder. My Avo shocks are now the only thing looking worn and i'm looking to replace those too. The engine was in around mid morning, the rest of the afternoon was spent bolting bits back on and reassembling the suspension and brakes. The car has had new track rods and ball joints, and my Hi-Spec's are getting new pads.
A total pain in the ass was finding out my rebuilt engine was from a phase 1 car, hence some of the oil pipes and breather pipes etc are slightly different. Pipes mark had plated for me wouldn't fit so the old ones taken out last weekend were quickly prep'd and painted too.


The engine is now in, turbo on, carb on, last night i spent a few hours cleaning all my silicone hoses ready to head scratch about that tonight. Ryan Price has been a great help with the engine removal and educating me. Once i've watched someone do something, i'm quite happy to give it a go myself so i'm really grateful for his help.
We are aiming to start up this weekend and then providing we have no issues i'll be putting it in for MOT!!! get in!
Edit.................yes yes yes the gold tape is not everyones cup of tea! i wasnt happy with holes left in the bulkhead following removal of some brackets. I like it, i'll wait for it to fall off..............
Last edited:
j8tro
Well-Known Member
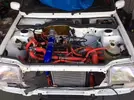
So great weekend on the car! She lives!
Fired up Saturday afternoon. Fought us in the morning with annoying little problems, ball joint had to be cut off and knocked out the hub, the Hi-spec brakes (still to be convinced they are any good TBH) the pins that hold the pads in have seized so couldn't get the old pads out + other trivial issues.
Started up fairly easily, didn't really want to idle but Sunday i had a little mess around and now ticks over OK...........ish but i think ill take the carb off and clean it, it was rebuilt a year before it came off the road so shouldnt need servicing. On start up we had a few little leaks from items not quite tight, but nothing major. First oil has been changed after running in the cam for 20 minutes.
Biggest pain in the ass is currently the clutch cable seems to have grown. Once connected to the box there is up to 2" of play in the cable. Messing with the ratchet on the peddle still doesnt give enough tension, i'll have another look tonight and a maybe do a hack to get it moving.
I really do need to get it sorted and an MOT booked in so i can take her on some shakedown runs...........
Im also after a turbo top to water pump hose, if anyone has one for sale. Also the original loom plug for the rad fan switch (green jobbie)

j8tro
Well-Known Member
Teething issues last night. Paranoia is making sure the fan wiring is kicking in when it should etc but that's all sorted.
Cant get my head round the clutch cable issue, something not right but the ratchet on the peddle is fully adjusted and still has slack. I've already called renault to order a new OE one but the local dealer parts guy is useless.........I'm waiting for the call back.
Car is idling like a bitch, hunts up and down and just isnt happy. Simple carb adjustments do nothing so i'm cleaning the carb tonight and Ryan has suggested checking for any leaks.
No Shit!9th June is fast approaching!!
Simple carb adjustments do nothing so i'm cleaning the carb tonight
I assume you did the whole idle jet screw all the way in then two full screws out thing and tweak from there?
j8tro
Well-Known Member
Tinkered again last night, after assuming the idle issues were carb related.......... they were not. A few quick texts with Mark and he asked if i had the 1.7mm restrictor in the breather to the back of the manifold.........errr nope.
I don't remember ever having it either, so I'm unsure how it must have been plumbed in before. Anyhow, blocked it up and now its running spot on.
Clutch cable is now the only issue, new one ordered so i'm hoping it turns up quickly and resolves the issue.
I don't remember ever having it either, so I'm unsure how it must have been plumbed in before. Anyhow, blocked it up and now its running spot on.
Clutch cable is now the only issue, new one ordered so i'm hoping it turns up quickly and resolves the issue.
j8tro
Well-Known Member
Proper pissed off this evening. Taken the cable off and it’s exactly the same length as the new one. Put it on anyway. No difference.
Tried adding a slotted nut for more leverage, nothing......
I’m now thinking it’s something on the clutch/arm/pivot stud etc in the housing.
I don’t have the time/energy to take that all back off. I’d booked an MOT for Saturday, think I’ll have to scrap that.
Where are the matches
Tried adding a slotted nut for more leverage, nothing......
I’m now thinking it’s something on the clutch/arm/pivot stud etc in the housing.
I don’t have the time/energy to take that all back off. I’d booked an MOT for Saturday, think I’ll have to scrap that.
Where are the matches

Similar threads
- Replies
- 4
- Views
- 342
- Featured
- Replies
- 74
- Views
- 2K

