Just a little bit more useful stuff:
Re-assembly!
- if you're going to do it, do it right!
- The top bearings should be examined. Being roller bearings you can turn them via the inner race separately. They should move freely and without excessive play. Check for damage around the seals and the races themselves. The same goes for the pin that goes through them that the bolt fastens too. Keep them clean (mine were spotless when they came apart) and try and prevent any dirt/dust ingress whilst you fit the new bearing to the lower part of the hub.
- clean the hub of loose corrosion and again prevent any ingress to bearings. Lots of flakey rusty old paint came off mine. Cleaning up the back of the wheel bearing and the ABS wheel speed sensor pick up is also worthwhile.
- bottom bearing: clean the hub where the bearing sits. Remove any loose rust around the edge where you are going to pass the bearing. I removed my old one by knocking through into the hub. I refitted in the same direction but from the other side. You'll need to remove the new bearing from its protective bag when you drive it into the hub and it will be open to dirt ingress. I used the old bearing to drift the new one into position. I packed the new bearing with rag/ clean paper towel and placed the old bearing in a plastic bag to prevent any rust from contaminating the new one. I had lightly greased the the hub ready to receive the new bearing. It drives in fairly easily and naturally goes in at a very slight angle to the eye which is normal for the camber of the hub to upright. Witness marks on the hub help show where the old bearing sat. I used a block of wood over the old bearing to facilitate some mallet action. If you have INA bearings with an impression at the bottom, you will need drive the bearing about 2mm further than the original. The bearing is countersunk to the bottom of the hub anyway. I repeatedly tested its depth by using the turret it rotates on. The turret should sit home in the bearing with its bottom flush to the bottom of the hub. If the turret protrudes, the hub will not go back into the upright. I kept checking mine and tapping it in a little further until I was happy. It's possible to drive the bearing too far. This would mean that the bearing wouldn't completely sit against the turret and id say it would cause the needles in the bearing to fail prematurely if fitted like that. Even being careful I got some small bits of rust and dust in my new bearing. Obviously this isn't great. I removed as much as I could with a small magnet and then with a cloth. Finally I poured in some new engine oil and flushed the bearing out. Once happy you'll need to pack the bearing with grease. It's difficult to say how much but as the bearing is not really doing any rpm I'd say you can't overpack it! I then fitted a new seal and ensured it fitted flat down to the bearing and sat flush to the hub. Finally I inserted the cleaned turret and twisted it slightly. It should pop in fine.
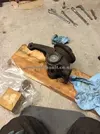
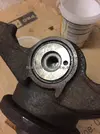
- top bearing inner race was cleaned and lightly greased to take the top pin.
- bush/spacer at bottom of upright: a bush goes through the bottom of the hub and picks up with the turret. This ensures the turret sits in exactly the right place. If this ain't fitted correctly the turret and lower part of the hub will move regardless of how tight the lower bolt is. I measured the depth it was set to by the factory (2.5mm countersunk from the bottom). When you remove the hub by knocking the bearing inwards you can lift the hub over this bush. However with the new bearing fitted correctly it will never allow the hub back into the upright unless the bush is pushed down flush with the surface.
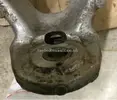
It requires some force. I left plus gas around it over night and this had little affect so I had to use the mallet on it. If you mangle this the lower turret and bearing will not locate correctly to the upright. So I used two copper washers and the 24mm bolt and drove it down flush. This then pushes it through the bottom of the hub:
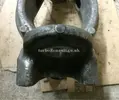
You can then place the built up hub into the upright. I fitted the top pin first. It's a tight fit through the bearing and you'll probably use the top bolt to draw the last parts through. I tightened up hand tight. This will help locate the hub correctly.
Now you need to drive that bush back into the lower turret. I wasn't going to drift it in because it's difficult to locate it into the turret anyway when you can see it so doing it blind is risky and it will easily damage. I knew the bolt would pass through and into the turret to sufficiently engage. I felt confident to use it to press the bush into its home position. I used the copper washers again. Using a ratchet you can feel if the bush isn't going in correctly as it stiffens up. So at this point you need to back off the bolt, move the hub a bit a try again. I put some grease around the bush to aid it going back in. It winds in easily once it finds its alignment. It should be 2.5mm countersunk as originally fitted, this ensures that the turret is supported radially to the right extent. So I used two copper washers of 2.5mm total thickness. It will bottom out when home.
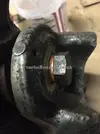
Remove the bolt and check its correct. Everything should stay aligned as the bush is a press fit
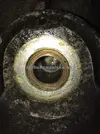
Refit the bottom bolt, this time with the washer and nip it up.
- tightening torque: most guides say FT. Well I needed the impact gun to break mine loose but I didn't have a vice.
However it's an M16 bolt with an 8.8 rating. Specs for this bolt is a maximum torque of 215Nm. I managed to get 140Nm on it before the whole assembly started dancing around my garage floor. At this I used the impact gun to add a couple of blows. At worse these bolts can be tightened in situ with the wheel off. Some people have reported lower bearing issues and found they can tighten the lower bolt. This will only happen if the bearing seizes and starts turning the turret which undoes the bolts. I can't see mine coming loose as everything is super slick!!
After that it's a case fitting it all up to the car. I've noticed my axial steering joint on that side is worn after just 5k miles. I suspect the extra force required to move the seized swivel bearing has places extra tension and compression into these parts. Worth going over your steering system for play afterwards.
RS 175 Lux


