briera2
Member
R11 The never ending story...
Well here's my R11. It's a 1984 TL so it's pretty much poverty spec which I was not used to at all before. Until the purchase I took central locking and fuel injection for granted...
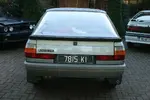
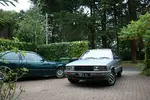
I'll upload interior shots tomorrow.
It currently has 70,000 miles and had 63,000 (I think) when I bought it in July.
The previous owner was from a renault garage so he never drove it but bought it off the last owner who was getting rid of it. The body work is quite good with about two tiny dings only visible in low light and the paint is still in decent shape. Also it has a 5 speed so that is definitely a plus for the motorway.
When I bought it, the last owner replaced the windscreen and put on mudflaps which were old stock and put on seat covers as the back seats had disintegrated. It has 13" alloys from what I'm guessing might be an R18 unless the 11 had these alloys in a 13" size.
It was quite a change driving a car with no power steering and 80s brakes after E30 BMWs and an R19. Also being a C1J with 60hp, performance isn't something to tell your friends about.
I intend this to be a commuting car until the BMW is finished but that's a long way off. The shocks are in the worst condition I have ever seen. With four or five people in the car I get flashed when I have the headlights on sometimes and the mudflaps grind into the ground around bends unless I nearly stop. Until I have the money for shocks I dipped the lights down a bit further.
I had a few plans for this when I bought it and I have completed some. Firstly was the addition of rear seat belts. Front seat belts from a 1990 BMW 316i work ok. All the bolt hole sizes match. I need to put some sort of spacer or angle on the retensioner (don't know what to call it) as sometimes they don't retract well.
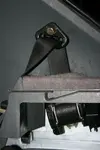
Luckily there was no drilling necessary as all the holes were there. Only the plastic sides of the boot interior had to be cut to fit the belt tensioner. But the fabric goes over it and the lump isn't too noticeable from afar.
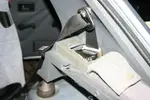
Don't know if this was the best way to go about it but I had the parts already.
Now for a daily driver the original 1 speaker and radio (can't use the word stereo) were abysmal. It sounded like a telephone under water. I don't need anything spectacular so a Sony head unit is fine and it looks good in 80s cars with black interiors. I used some cheapish alpine 50w speakers from halfords which I forced in. Unfortunately the gap between the door and the speaker is so small that the bass is gone the second you screw them in. So I installed a mid/bass 6 or 7" under the stereo in the centre (I'll put up a pic tomorrow). So I have a bit of bass and a totally stock look.
Also the lack of a clock was annoying and without hacking up the dash I put a 19 phase 2 clock below the stereo. Some may say it's in an illogical place but then again so is the stereo.
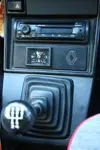
Honestly I've never seen a worse place for a stereo before. It actually promotes the driver to take their eyes off the road.
I would love to know the statistics of how many R5s, R9s and R11s were written off with the excuse of "I was just trying to change the station when Wham! came on the radio".
Back to the clock... I wired it to the radio memory 12V and ground. The illumination is from the white wire on the hazards switch.
Now for my next bigish project for it. A full instrument cluster. When I bought it the fuel gauge rarely worked and when it did it would bounce from empty and back up. Also the illogical 0 - 10 - 20 - 47 placing of the line stepping annoyed me. At least the empty light worked so I knew it was the gauge and I wouldn't run out. Also the lack of rev counter and especially temperature gauge was a bit annoying with a manual choke. If someone else had taken the car, I wouldn't know how hot it was and could and would easily flood it. The carb problems are for later.....
I was looking for a back axle for my 19 and was having no luck as there are none in the scrap yards anymore. This was dragging on for months. I saw one on the back of a truck heading southbound and rang the local yard. They were going to crush it as nobody wants parts for them. I could buy the back axle for €100 and after I stated that nobody else would come for any parts they let me take what ever I wanted as well for the same price. So the dash and clock were for the 11.
Comparison of the two clusters open.
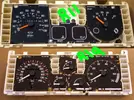
On closer inspection they were actually a very different shape but the connectors at the back were identical.
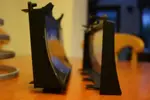
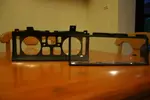
You can see the 19 behind on both pics. The 19's cluster has the black plastic cut out surround molded to the casing while the 11's doesn't. Not a problem! I cut out carefully the 11s surround for the rev counter and fuel gauge.
Another problem was that the choke light and pre-heat light are swapped. I removed the diode on the 19s cluster beside the pre-heat light and ran a wire to where the light is supposed to be on the 11. The brake wear light stays on so I removed the bulb. I didn't want to spend time figuring it out when I wouldn't be stupid enough to let the pads go down that far anyway.
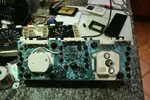
Exciting I know!
So I then put the clear casing from the 11 onto the 19s cluster and it fit no bother.
Anyway here is what I have now...
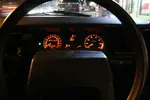
I know it isn't original but I prefer the orange glow and it matches the clock. The temperature gauge doesn't work but that is for the tech section I suppose so I'll post my troubles there. The fuel gauge is accurate even with the 8 litre difference. Also, I had no idea how easy it was to match the mileage. Just pop the bar behind the numbers and twirl. Has anyone attempted this change before because I haven't found anything about it?
So I will post more pictures tomorrow and would love to hear from any other member from Ireland because I haven't seen any other 9 or 11s in recent years.
[BREAK=R11 Energy]
So I have decided it's the end of the road for the 19. The body is rusted and battered. The 11's carb is always giving me trouble so fuel injection, better economy and 80hp vs 60hp seems like a better deal in the form of an E7J from the 19.
I've read about the Renault 5 with the energy engine but that was done with a carb setup so it looks like I may be on my own with this one. I have some details I hope can be verified.
1: The mounts. I presume that since that R5 got an E6J, I can just use the mounts from the current C1J.
2: Electrics. I've read a few reports on 16v engines being put in R5s and the loom to body connectors need to be spliced but there are so few sensors I don't think it should be much of a problem. A few hours ripping apart the 19's dash and a multimeter will be my best friend.
3: I'm going to use the R11's gearbox. It already has the correct mount, it is a 5-speed and it has half the mileage of the box in the 19.
4: I have newish driveshafts with the 19 as the 11's are both wobbly (easily moved by hand) and starting to knock on corners. I intend to use these if they fit.
5: Exhaust. Even though the exhaust comes out the opposite end, it looks like the joining to the pipe under the car is in the same place so this could just bolt on.
6: Fueling. I have 2 options that I have come up with.
The first is to run the 19's high pressure lines from the tank to the bulk head and then use an out-of-tank electric pump strapped to the bulk head connected to the injector. Also as the 11's tank isn't sealed, (it leaks out the filler when I turn corners on a full tank and then the car stinks. Horrible!!!) I can try to adapt the filler line and cap from the 19 to fit the 11.
The second and probably way easier option is to use the original line that goes to the mechanical pump and the carb return line on a swirl pot on the bulkhead with a low pressure electric pump and linked to an out-of-tank electric pump with high pressure lines to the injector. I still will try adapt the filler from the 19 as the leaking petrol is horrendous and I hate filling over half a tank.
7: Will it fit? This is my biggest problem. I know it fits in a 19, 5 and clio but I measured it (not that accurately) and it looks to be slightly longer (possibly an inch) than the c-type. I'm afraid that even after I remove the power steering pulley from the crank that it may still not clear the 11s body. Cut and weld I hope not. It will be a very tight fit if it fits.
The E7J is just about ready to be lifted. Only the driveshafts and gear linkage to go. We're down to one car at home (my 11) so we're waiting on the 480 to come back from the garage, then I can really start the work.
Other than the engine, I hope that I can get the RSi seats from the 19 cut and re-welded with the bases from the 11's seats. As for the back bench I doubt the 19s will fit but I'll try tomorrow. Otherwise I'll remove the covering and re-cover the 11's bench. Did this with a BMW. Not too difficult just a lot of tedious work.
Pics tomorrow.
EDIT FEB13: Apologies for the year wait for the photos and further info!
[BREAK=The Swap]
After a long hiatus from posting it's time for an update. It's been about a year so between work and college I've done a lot.
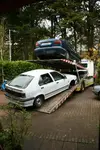
The engine came out as did the fuel tank and various other bits. Time to go sadly!
I quickly changed my mind about making the 11 fuel injected. Too much work I thought at the time. I found a 1990 19 Chamade not running for scrap value so I bought it to get the carb, intake manifold, fuel pump and air box etc.
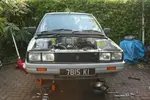
Getting ready to pull out the C1J.
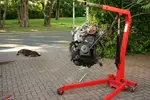
I dumped it in the back of the 19 Chamade to add to the scrap weight. Also, I had to cut the exhaust as the bolts were totally seized.
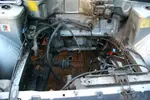
Empty engine bay! It sat like this for about three or four months... When I lowered the energy engine in it was stopped by the alternator and the brake master cylinder occupying the same space in the engine bay. I thought I may as well just swap the cylinder and booster from the 19.
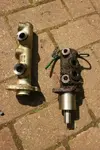
R11 on the left and R19 on the right. The 19 one is a good bit shorter.
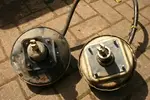
Bolt pattern is different so the swap wasn't happening.
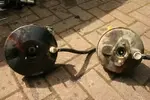
Notice the 11's booster on the left has clear signs of leaking fluid from the master cylinder. Now I had two problems. I needed a new cylinder and to move the alternator!!!
I decided to use spare bolt holes at the front of the engine and get a bracket made to extend the alternator away from hitting the exhaust manifold.
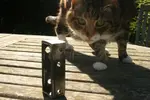
I made a mess of the hole sizes and had to re-drill a few times. It works fine though and the steel is thick enough to avoid bending under belt tension. Also excuse the nosy cat but the internet does love cats.
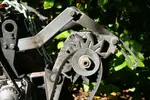
There is also another piece on top with the bend in it that I had made. I used the alternator and swinging arm from the cleon engine.
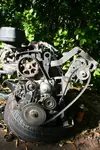
Finally the complete engine. Carb and manifold on too. I changed the timing belt and water pump as there were both overdue. I changed the v-belt to a much shorter one when I put the engine in the car.
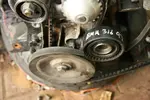
I used a belt tensioner here to avoid hitting the water pump. I had to hack apart the timing case cover a bit to avoid the new setup.
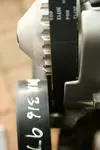
I hope the timing belt doesn't move as it's really close here!!!
[BREAK=The Engine is in]
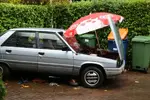
My all weather garage!
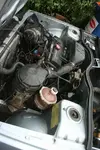
Engine is in! Also I forgot to mention earlier that in order to clear the frame I had to also remove the double crank pulley for the alternator and power steering and replace it with a single for no power steering. It didn't matter as the 11 doesn't have power steering. I haven't taken a picture yet but the exhaust pipe had to be shortened where it connects on the underside of the car to match the 11s exhaust system. The local exhaust centre did it for me.
EDIT: Something I forgot to mention earlier. The JB101 gearbox from the C1J fit the E7J but didn't match up on the bottom side for the bolt holes. I had to use the JB1025 from the 19. The 19 or 11 driveshafts both seem to work but I used the 19 ones as the originals were starting to knock.
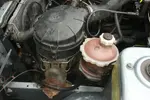
I drilled holes and bolted the expansion tank and air box in the standard places.
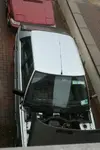
I moved house a couple of months ago so that also slowed things down. New house with a small driveway is not fun. I changed the antenna to the black one from the 19. I didn't really like the massive silver one it came with.
Now getting it to run was a task and a half! It would fuel but not spark. I changed the coil, the spark plugs and the leads but no joy. I got an ignition module from the scrap yard with the Bendix part no. 456439. It's from an early Volvo 440/460 with the F-type 1.7l engine. They said it would be fine even though the part numbers were completely different. Sure enough it fired up after a few tries but it runs like crap. I don't know if it's the carb or not but I'm having major cooling problems so I can't adjust it. It's very difficult to start. Full choke while cranking while also slowly pushing the choke in until it starts. It then stays at 2000rpm with the choke half in and even after ten minutes if you push the choke in it dies! I don't know if the ignition module is really compatible but I have nothing else to test it with.
I finally figured out the temp sender and realised it's one wire for the warning light and the other for the resistance value. I ran a new wire straight to the back of the dash from the sender in the cylinder head. I initially tried using the 11's radiator with the pipes connecting at the opposite side and by bunging up it's expansion pipe at the top as the 19 has a weird setup with three pipes into the tank. I hacked and joined the pipes with copper pipping. When the engine reaches three quarters the fan doesn't cut in (the fan, the wiring and the fan switch all work. I tested each) and then the top hose pipe bursts off at the thermostat from pressure.
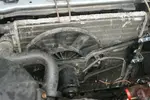
After scrapping two 19s and their good radiators I have to pay the scrap yard for this radiator of pure quality! I also had to buy more hose pipes as I hacked up the old ones. They only arrived today and the best I got was from a megane with the same engine but they are actually different. Oh Renault!
The top hose doesn't have a bleed screw and the bottom hose has another pipe branching off it where the 19 doesn't. I'll have to modify these over the next few days.
I hope the excessive pressure problem will be solved. It could be the fact that my hacked up pipes had no bleed screw, crankcase ventilation because I plugged in the hoses around the carb and top of engine wrong, incompatible radiator from the 11 or the head gasket... I hope not! No oil or coolant mixing though.
EDIT: I forgot to mention that I had to use the 11s fan for the 19s rad as I was not bothered to buy one from the scrap yard. I used some brackets I had lying around to extend the fan housing to fit the bolt holes on the radiator. Easy job though.
[BREAK=More engine and other bits]
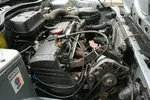
Another shot of the engine showing the new alternator setup with a tensioned belt in place.
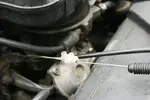
Throttle cable snapped!! Bike brake cable will have to do. I couldn't find anywhere to get an original R19 E6J cable.
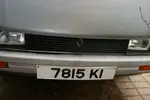
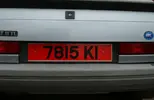
Another thing that was bothering me. The black reg plates are for classics. I love the 11 but it's not really a classic yet. Pre 1987 and before boring unified European reg plate standards you used to have a choice of black and silver plates or white front and red back with black plastic riveted digits. I'm certain Renault used to issue this colour scheme so it's more standard now. The previous owner confirmed it used to have these but some digits were falling off so he changed them to black. Red plates are very rare these days on the roads!!!
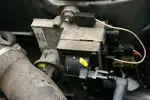
This is the Volvo ignition module of questionable compatibility.
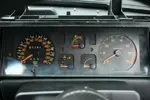
Yeah I preferred the phase 1 dash from the Chamade I had for scrap. I replaced the warning light icons with the invisible before lit phase 2 type. You can't see the white lined ones during the day and there was just too much yellow before. Temp gauge finally working!
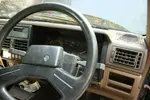
This is the only photo I have of the 19 I bought for scrap value. You can sort of see the original layout with yellow everywhere. I have to say I really like the brown interior. You get bored of black or grey.
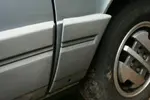
Shortly before the swap I encountered a high kerbed driveway with a pot hole immediately preceding it. Stupid mud flaps have been a nightmare this way and the only reason I'll fix them and keep them is that the car looks too high up without them.
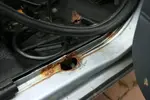
RUST!!! It's on the doorsill of both the driver's door and driver's side rear door. I'll have to get it welded as soon as it's driving.
Over the summer I accidentally came across a generic cheap (30EUR maybe) remote central locking retrofit kit. I honestly thought it would be impossible but it was very easy and only requires a bit of imagination on where to line everything up. It comes with a control module which I left under the steering wheel and drawing 12V from the radio. From here all the wires to the actuators go through existing but unused holes to the doors in the door jams. The actuators come with various lengths and bends of metal rods that you strap to rod connecting the door lock mechanism to the knob on the door.
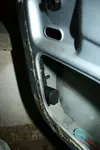
On the front doors I bolted the actuators here.
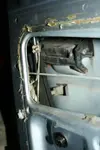
You can see where it attaches to the existing silver-ish rod.
An easy upgrade that took a few hours but totally worth it for any car without central locking. All the wires fit under the plastic trim/carpet etc. so you can't even see it's there.
Also I changed the boot struts over the summer which did nothing except cause the hatch to drop without warning causing concussions. Last weekend I changed the rear shocks. Another very quick and easy job. Hopefully I'll get the front done this weekend. It was overdue... The handling was like driving a large paddling pool on springs. It would nose dive under heavy braking. The buses on the rear were dried out and cracked. There was no resistance in the shock travel and the plastic covers were broken and knocking all over the place.
Next cosmetic job is the R19 RSi interior I salvaged at the scrap yard a couple of months ago... Already done the back so I'll upload some photos soon.
[BREAK=R19 RSi Interior]
I mentioned before that I found an interior from an R19 RSi that was in great shape. The front seats were what I think are 16V style with high bolsters. The pattern is a little different too. Black with green in the middle. I soon found out (and expected) that nothing from the 19 or 11 match front or back.
I started with the rear bench.
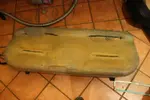
I began by tearing off the fabric from the old bench. This is the base. Mmmm deliciously clean! There was a weird red dust like rust powder and it stank. Unfortunately the mounts and clips were built into the cushion so I had to reuse it.
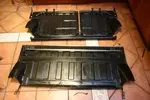
The metal back plate was totally different and there was no way to mount head rests on the 11's plate without extensive modifications and welding. It wouldn't be safe anyway.
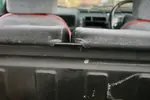
So I reused the 11's back plate with the 19's split cushions and covering and with some sewing etc. I got them on quite tight. I matched the places where it was supposed to pull down on the cover to get a perfect fit.
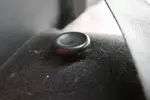
I cut holes where the button to fold down the seat goes. The 19 has a lever beside the seat.
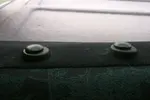
I didn't want holes where the head rests went so I capped them off and used elastic to pull them down. That way they don't wobble everywhere. Hopefully the NCT testers won't mind. Who am I kidding, they fail old cars on anything they can in Deansgrange.
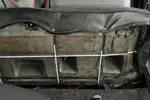
I used the original base cushion and the new covering. Many trips to upholstery and fabric shops later it worked. The white cord is that stuff that's very tightly sprung for hanging net curtains. I punched holes and pressed those metal ring thingies with s hooks (can't remember the name!) so the fabric doesn't tear.
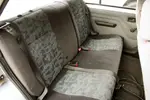
Et voila!
19 rear bench in an 11. They don't split in the middle but it has a pseudo effect and you can't notice any signs of chords etc. and the fabric is held down in all the right places. It took about three hours to put millions of pins and s hooks through the base cushion and around it on the bottom. Now I need to re-dye the parcel shelf at the back and the door cards to match! Definitely worth it I think.
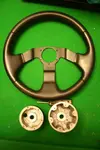
I took the steering wheel too which is the same as a 16V but of course it didn't fit. I took a chance and bought a steering wheel boss from a 5GT wheel and thankfully it fit both the wheel, the steering column and hit the indicator stalk too.
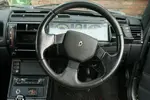
Much better than the horrible old plastic wheel. All I need now is the centre from an old model with the ribbed badge... Someday... The hood part of the dash is missing because it was all wobbly and broken. I'm going to reinforce it with metal maybe mechano or something to make up for all the broken plastic screw holes.
The front seats are nowhere close to fitting and the inner tracks hit the curve in the middle of the floor that would be a transmission tunnel in a RWD car. No idea why it's on the 11??? Exhaust probably.
I decided to make an adapter to match the 19 seats to the base plate of the tracks on the 11's seats. It means I'll lose the height adjustment but it wasn't there on the 11 seats so it'll be fine. At least the seats will move forward and back.
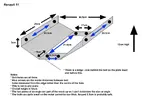
Well if it turns out I measured distance anything like the alternator bracket then they won't work. Time will tell.
EDIT: I forgot to mention that the spare seat cushions when covered made excellent luxury beds for the pooches.

[BREAK=Cooling attempt #2]
Well seeing as the attempt to use the C1J's radiator and hacked up hose pipes was a dismal failure I decided to use an actual R19 E7J radiator (shown previously) and to get the original hose pipes. I could only find radiator pipes from a '96 megane and I had to get them from England. I phoned up all the scrap yards for miles and none had any 19s or energy engined meganes or clios being broken!
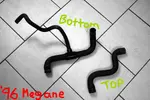
The original megane hoses. Of course they are different to the 19. The bottom hose shouldn't have the extra part sticking out so that will be cut and replaced with straight through copper pipe.
The top hose needs a bleed screw in it so I cut it and put in a piece of copper pipe and got a bleed screw put in and sealed with silicone.
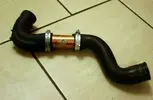
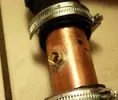
Fingers crossed there are no leaks! The bleed screw is quite small but should be enough. It took a very long time to force both ends around the pipe. It felt like my wrist was going to snap a few times. Something I don't intend to do again soon.
I'll hack up the bottom pipe tomorrow and test both.
[BREAK=Two years later it runs!]
So I moved to New York two years ago and I'm only home once or twice a year for short periods. Sadly the Renault is a bit neglected. With the bizarrely good weather here this summer at the most convenient time of my arrival back in the country, I decided to get the car running once and for all.
I decided to just start pulling things apart. I discovered some really stupid amateur mistakes. Oh the things you learn in a few years.
Well I managed to put the thermostat in backwards. I drilled a tiny hole too to make it easier to bleed. I also had no gaskets on both parts of the thermostat housing. I did it the old fashioned way and stamped the metal (with marker) and cut my own gaskets with gasket paper. I also had forgotten that I had snapped a bolt ages ago. Three new bolts as well.
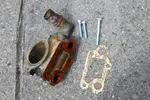
Not mentioned earlier (I think) but in the past two years I put in a brand new radiator and new radiator pipes ordered in from France. The rad is cable-tied on top for now.
The alternator was also not working and after noticing both terminals were at 0V I started stripping back all the plastic and tape protection off the wires. I had also managed to ground both sides!
I brought it to an old timer mechanic to get the carb running. The tank, fuel filter and carb were water logged from sitting and the idle jet (maybe low speed jet?) was blocked and had to have the dried in gunk poked out.
https://youtu.be/XS6_k8bgtJg
Just a short video of it finally running well.
Now when I'm back at Christmas I want to finish the interior and maybe tackle some of the little rust holes on the body.
[BREAK=Getting a move on]
Back home for a while so back at the Renault. I've done a lot over the past few weeks. Still loads to do.
First things first, it is looking very sorry. Two rotted tyres now. I finally got around to fitting the new front shocks I bought years ago. I initially tried to separate the shocks and springs but after fearing caving in my face with spring compressors and slipping the vice grips a couple of times, I decided it was air gun time. I parted with a whopping €20 to have them swapped at the local garage.
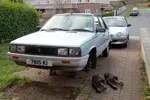
Old and new shocks/struts.
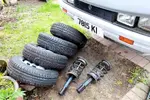
New shocks and tyres ready to go in. I got a good deal on four barely used tyres. There's a nice dead patch on the grass where the car was for the past year.
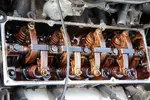
Decided it was about time I adjusted the valve clearances. I've never done it before so it was a pain to do. Very fiddly. The exhaust valves were all perfect and most of the intake ones were slightly off.
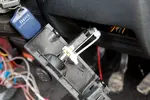
Choke cable got jammed whenever you tried to pull it out and would nearly pull off the dash panel. I took it off to adjust the pressure from the pin that activates the light. Of course, the 30-something year old plastic is so brittle the cable mount broke immediately. Nothing three cable ties can't sort. I now have a free moving cable again but the light on the dash only works if you push up on the lever. I'll get back to that when I'm bothered...
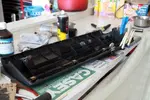
Finally got around to properly repairing the hood over the dash. It's been broken since the day I bought the car. I used some JB Weld epoxy (I bring it back from the states when I come home) with some washers over the snapped plastic holes. It took me a while to find bolts that worked too. It holds perfectly now. I also glued the vinyl that had shrunk and started peeling.
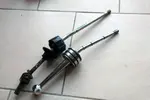
Next up was repairing the world's sloppiest shifter. It had actually started going into reverse or first. You had no choice in the matter. It also moved about two inches either way when it was in gear. Sort of like stirring soup. I bought the only thing I thought would work on ebay. A short shift kit for an R5 turbo off ebay (from the UK). It came with a nasty aluminium reverse lock sleeve and knob. I didn't bother take any photos. My goal was to rework the original sleeve and knob on. As you can see, the new one is much shorter. I didn't even want a short shift but as it's the only thing online, I suppose it's better than sloppy shift!
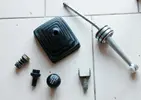
Parts to be re-used.
I didn't take too many photos of the job as it was messy and involved a giant circlip and lots of grease. I cut a large portion out of the reverse lock sleeve, used a copper plumbing fitment, some JB Weld epoxy and drilled a hole in the same place as on the original shifter for the spring lock pin. I also had to bore out the bottom of the original sleeve to fit around the bottom of the new rod. I also had to use an angle grinder to break of the old rivet/bolt holding the bottom on. The new shifter was actually too narrow at the end so I had to use a couple of nylon washers to stop it wobbling. It took a couple of days and lots of trial and error but in the end, I got an OEM look. Oh and I used some TEK7 to keep the knob on.
Next up was at the gearbox end. This little bush is what causes all the play while it's in gear. Changing this and the circlip holding it in was hands down the worst thing I have ever done on a car (although the impossible rear engine mount on an E110 Corolla comes very very close). I'm now convinced that circlips were created by the devil himself. I had to drill, pry and hack the old bush out.
I decided it was best not to use the short shift rod included at the gearbox end. Renault make their boxes out of butter so I thought better of it.
Of course after spending forever under the car (literally hours) getting it back in, I then spent even more time aligning the shifter rod. I either had fifth/ no reverse or reverse and first without lifting the lock. All in all, the shifting is a bit stiff (probably the metal ball joint vs original rubber/plastic combo) but it's incredibly precise now. Never seen an old Renault like it.
I then take the car for a test drive... Down to the local shop at the end of my estate (nothing in date so can't go on public roads yet), I drive towards the underground car park, it's closed, one way road... Try to reverse back out then I hear a pop. No more reverse, only forward gear that engages is third. I am now blocking the main entrance while having to open the door and do a three point turn scooting the car with my right leg on the ground, then burn the clutch and drive home in third! Embarrassing to say the least. Turns out I hadn't put in the cirplip properly and now it was gone!!!
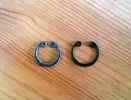
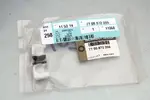
Decided to buy two of these deplorable items only to spend roughly four hours getting it in. As you can see I ruined the first. Good job I bought two! As it also turned out, I had put the bush in the wrong way... Seriously, I copied the colour cap end of the original bush. The new one had a black top not black bottom like the original! Typical Renault!
Next was the mess that is the interior and stereo wiring. Bought some screw block connectors and cleaned everything up. I decided to do a little something about the terrible sound quality while I was at it. Whatever way they designed the speaker mounts in the foot wells (or they didn't bother design it), there was a serious lack of anything resembling bass even with decent speakers. I had this old crappy underseat "sub" that was in some old BMW when we bought it. I had pulled it apart years ago. I decided to try my hand at making a speaker enclosure. My goal for this was to spen little or no money seeing as the sub wasn't even good to begin with. At 6" it's more of a woofer than sub-woofer. It also has no markings or model number on it. I used MDF and copious amounts of TEK7 to seal it up. The back is shaped to fit around the gear shifter. I didn't bother clean it up or paint it as it's mounted between the stereo and gear shifter under the centre console.
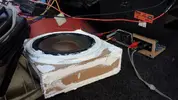
Looks like poo! That's half a Socket 5 Pentium (1994) heatsink for those nerds interested.
Surprisingly it sounds better than when it was in it's original bulky plastic casing. I used a tiny 20W 12V power amp I had kept from some old college project. I mounted both the amp and speaker case by bolting on a couple of old hard drive magnets, and carving a few squares out of the carpet. They aren't moving anywhere.
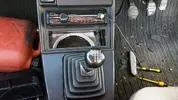
It (just) fits! Note the stock looking new shifter.
Now when the key is in ACC position it works great but when the ignition is switched it buzzes. More bizarrely, the buzzing stops with the headlights on but starts again with the high beams. Ground loop isolation cables it is then!
Back to the engine!
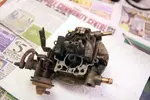
Car was tough to start. It would immediately stumble and misfire unless the choke was pushed 3/4 of the way in then it would clear up. There was also a horrible hesitation when you hit the throttle once it was warmed up. After trying again and again to tune it, I caved in and bought a rebuild kit off ebay from Croatia.
Turned out to be a great idea. No idea why I held off for so long.
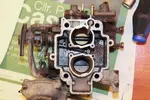
Look at all that crud in there.
Crusty float
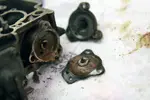
That diaphragm has definitely failed.
It was filthy inside. Everything was filled with sand/dirt or gunk. Nozzles and pumps were blocked. Both vacuum diaphragms were ruined and leaking. The only thing the kit didn't come with was the diaphragm for the power valve. I didn't dare open it up in case.
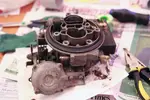
All back together.
No more stumbling or hesitations on acceleration. I can push the choke in all the way much sooner now too. There are still huge problems though. You have to have the choke fully out to start when cold (normal) but if you don't immediately push it over 3/4 way in it will stumble and die. I also, have the idle mix screw turned out way too far. Once the coolant is up to temp, if you pump the brakes the idle raises up about 500rpm or so. Then more confusingly, once the car is well warm (a half an hour or so of being driven), the brakes drop the engine speed. It even stalls under heavy braking. I'm suspecting a big vacuum leak somewhere. The booster itself is fine. I can come out to the car six hours after it's been running and there's still power in the brakes. More investigation needed before I take it for a real tune up.
Well here's my R11. It's a 1984 TL so it's pretty much poverty spec which I was not used to at all before. Until the purchase I took central locking and fuel injection for granted...


I'll upload interior shots tomorrow.
It currently has 70,000 miles and had 63,000 (I think) when I bought it in July.
The previous owner was from a renault garage so he never drove it but bought it off the last owner who was getting rid of it. The body work is quite good with about two tiny dings only visible in low light and the paint is still in decent shape. Also it has a 5 speed so that is definitely a plus for the motorway.
When I bought it, the last owner replaced the windscreen and put on mudflaps which were old stock and put on seat covers as the back seats had disintegrated. It has 13" alloys from what I'm guessing might be an R18 unless the 11 had these alloys in a 13" size.
It was quite a change driving a car with no power steering and 80s brakes after E30 BMWs and an R19. Also being a C1J with 60hp, performance isn't something to tell your friends about.
I intend this to be a commuting car until the BMW is finished but that's a long way off. The shocks are in the worst condition I have ever seen. With four or five people in the car I get flashed when I have the headlights on sometimes and the mudflaps grind into the ground around bends unless I nearly stop. Until I have the money for shocks I dipped the lights down a bit further.
I had a few plans for this when I bought it and I have completed some. Firstly was the addition of rear seat belts. Front seat belts from a 1990 BMW 316i work ok. All the bolt hole sizes match. I need to put some sort of spacer or angle on the retensioner (don't know what to call it) as sometimes they don't retract well.

Luckily there was no drilling necessary as all the holes were there. Only the plastic sides of the boot interior had to be cut to fit the belt tensioner. But the fabric goes over it and the lump isn't too noticeable from afar.

Don't know if this was the best way to go about it but I had the parts already.
Now for a daily driver the original 1 speaker and radio (can't use the word stereo) were abysmal. It sounded like a telephone under water. I don't need anything spectacular so a Sony head unit is fine and it looks good in 80s cars with black interiors. I used some cheapish alpine 50w speakers from halfords which I forced in. Unfortunately the gap between the door and the speaker is so small that the bass is gone the second you screw them in. So I installed a mid/bass 6 or 7" under the stereo in the centre (I'll put up a pic tomorrow). So I have a bit of bass and a totally stock look.
Also the lack of a clock was annoying and without hacking up the dash I put a 19 phase 2 clock below the stereo. Some may say it's in an illogical place but then again so is the stereo.

Honestly I've never seen a worse place for a stereo before. It actually promotes the driver to take their eyes off the road.
I would love to know the statistics of how many R5s, R9s and R11s were written off with the excuse of "I was just trying to change the station when Wham! came on the radio".
Back to the clock... I wired it to the radio memory 12V and ground. The illumination is from the white wire on the hazards switch.
Now for my next bigish project for it. A full instrument cluster. When I bought it the fuel gauge rarely worked and when it did it would bounce from empty and back up. Also the illogical 0 - 10 - 20 - 47 placing of the line stepping annoyed me. At least the empty light worked so I knew it was the gauge and I wouldn't run out. Also the lack of rev counter and especially temperature gauge was a bit annoying with a manual choke. If someone else had taken the car, I wouldn't know how hot it was and could and would easily flood it. The carb problems are for later.....
I was looking for a back axle for my 19 and was having no luck as there are none in the scrap yards anymore. This was dragging on for months. I saw one on the back of a truck heading southbound and rang the local yard. They were going to crush it as nobody wants parts for them. I could buy the back axle for €100 and after I stated that nobody else would come for any parts they let me take what ever I wanted as well for the same price. So the dash and clock were for the 11.
Comparison of the two clusters open.

On closer inspection they were actually a very different shape but the connectors at the back were identical.


You can see the 19 behind on both pics. The 19's cluster has the black plastic cut out surround molded to the casing while the 11's doesn't. Not a problem! I cut out carefully the 11s surround for the rev counter and fuel gauge.
Another problem was that the choke light and pre-heat light are swapped. I removed the diode on the 19s cluster beside the pre-heat light and ran a wire to where the light is supposed to be on the 11. The brake wear light stays on so I removed the bulb. I didn't want to spend time figuring it out when I wouldn't be stupid enough to let the pads go down that far anyway.

Exciting I know!
So I then put the clear casing from the 11 onto the 19s cluster and it fit no bother.
Anyway here is what I have now...

I know it isn't original but I prefer the orange glow and it matches the clock. The temperature gauge doesn't work but that is for the tech section I suppose so I'll post my troubles there. The fuel gauge is accurate even with the 8 litre difference. Also, I had no idea how easy it was to match the mileage. Just pop the bar behind the numbers and twirl. Has anyone attempted this change before because I haven't found anything about it?
So I will post more pictures tomorrow and would love to hear from any other member from Ireland because I haven't seen any other 9 or 11s in recent years.
[BREAK=R11 Energy]
So I have decided it's the end of the road for the 19. The body is rusted and battered. The 11's carb is always giving me trouble so fuel injection, better economy and 80hp vs 60hp seems like a better deal in the form of an E7J from the 19.
I've read about the Renault 5 with the energy engine but that was done with a carb setup so it looks like I may be on my own with this one. I have some details I hope can be verified.
1: The mounts. I presume that since that R5 got an E6J, I can just use the mounts from the current C1J.
2: Electrics. I've read a few reports on 16v engines being put in R5s and the loom to body connectors need to be spliced but there are so few sensors I don't think it should be much of a problem. A few hours ripping apart the 19's dash and a multimeter will be my best friend.
3: I'm going to use the R11's gearbox. It already has the correct mount, it is a 5-speed and it has half the mileage of the box in the 19.
4: I have newish driveshafts with the 19 as the 11's are both wobbly (easily moved by hand) and starting to knock on corners. I intend to use these if they fit.
5: Exhaust. Even though the exhaust comes out the opposite end, it looks like the joining to the pipe under the car is in the same place so this could just bolt on.
6: Fueling. I have 2 options that I have come up with.
The first is to run the 19's high pressure lines from the tank to the bulk head and then use an out-of-tank electric pump strapped to the bulk head connected to the injector. Also as the 11's tank isn't sealed, (it leaks out the filler when I turn corners on a full tank and then the car stinks. Horrible!!!) I can try to adapt the filler line and cap from the 19 to fit the 11.
The second and probably way easier option is to use the original line that goes to the mechanical pump and the carb return line on a swirl pot on the bulkhead with a low pressure electric pump and linked to an out-of-tank electric pump with high pressure lines to the injector. I still will try adapt the filler from the 19 as the leaking petrol is horrendous and I hate filling over half a tank.
7: Will it fit? This is my biggest problem. I know it fits in a 19, 5 and clio but I measured it (not that accurately) and it looks to be slightly longer (possibly an inch) than the c-type. I'm afraid that even after I remove the power steering pulley from the crank that it may still not clear the 11s body. Cut and weld I hope not. It will be a very tight fit if it fits.
The E7J is just about ready to be lifted. Only the driveshafts and gear linkage to go. We're down to one car at home (my 11) so we're waiting on the 480 to come back from the garage, then I can really start the work.
Other than the engine, I hope that I can get the RSi seats from the 19 cut and re-welded with the bases from the 11's seats. As for the back bench I doubt the 19s will fit but I'll try tomorrow. Otherwise I'll remove the covering and re-cover the 11's bench. Did this with a BMW. Not too difficult just a lot of tedious work.
Pics tomorrow.
EDIT FEB13: Apologies for the year wait for the photos and further info!
[BREAK=The Swap]
After a long hiatus from posting it's time for an update. It's been about a year so between work and college I've done a lot.

The engine came out as did the fuel tank and various other bits. Time to go sadly!
I quickly changed my mind about making the 11 fuel injected. Too much work I thought at the time. I found a 1990 19 Chamade not running for scrap value so I bought it to get the carb, intake manifold, fuel pump and air box etc.

Getting ready to pull out the C1J.

I dumped it in the back of the 19 Chamade to add to the scrap weight. Also, I had to cut the exhaust as the bolts were totally seized.

Empty engine bay! It sat like this for about three or four months... When I lowered the energy engine in it was stopped by the alternator and the brake master cylinder occupying the same space in the engine bay. I thought I may as well just swap the cylinder and booster from the 19.

R11 on the left and R19 on the right. The 19 one is a good bit shorter.

Bolt pattern is different so the swap wasn't happening.

Notice the 11's booster on the left has clear signs of leaking fluid from the master cylinder. Now I had two problems. I needed a new cylinder and to move the alternator!!!
I decided to use spare bolt holes at the front of the engine and get a bracket made to extend the alternator away from hitting the exhaust manifold.

I made a mess of the hole sizes and had to re-drill a few times. It works fine though and the steel is thick enough to avoid bending under belt tension. Also excuse the nosy cat but the internet does love cats.

There is also another piece on top with the bend in it that I had made. I used the alternator and swinging arm from the cleon engine.

Finally the complete engine. Carb and manifold on too. I changed the timing belt and water pump as there were both overdue. I changed the v-belt to a much shorter one when I put the engine in the car.

I used a belt tensioner here to avoid hitting the water pump. I had to hack apart the timing case cover a bit to avoid the new setup.

I hope the timing belt doesn't move as it's really close here!!!
[BREAK=The Engine is in]

My all weather garage!

Engine is in! Also I forgot to mention earlier that in order to clear the frame I had to also remove the double crank pulley for the alternator and power steering and replace it with a single for no power steering. It didn't matter as the 11 doesn't have power steering. I haven't taken a picture yet but the exhaust pipe had to be shortened where it connects on the underside of the car to match the 11s exhaust system. The local exhaust centre did it for me.
EDIT: Something I forgot to mention earlier. The JB101 gearbox from the C1J fit the E7J but didn't match up on the bottom side for the bolt holes. I had to use the JB1025 from the 19. The 19 or 11 driveshafts both seem to work but I used the 19 ones as the originals were starting to knock.

I drilled holes and bolted the expansion tank and air box in the standard places.

I moved house a couple of months ago so that also slowed things down. New house with a small driveway is not fun. I changed the antenna to the black one from the 19. I didn't really like the massive silver one it came with.
Now getting it to run was a task and a half! It would fuel but not spark. I changed the coil, the spark plugs and the leads but no joy. I got an ignition module from the scrap yard with the Bendix part no. 456439. It's from an early Volvo 440/460 with the F-type 1.7l engine. They said it would be fine even though the part numbers were completely different. Sure enough it fired up after a few tries but it runs like crap. I don't know if it's the carb or not but I'm having major cooling problems so I can't adjust it. It's very difficult to start. Full choke while cranking while also slowly pushing the choke in until it starts. It then stays at 2000rpm with the choke half in and even after ten minutes if you push the choke in it dies! I don't know if the ignition module is really compatible but I have nothing else to test it with.
I finally figured out the temp sender and realised it's one wire for the warning light and the other for the resistance value. I ran a new wire straight to the back of the dash from the sender in the cylinder head. I initially tried using the 11's radiator with the pipes connecting at the opposite side and by bunging up it's expansion pipe at the top as the 19 has a weird setup with three pipes into the tank. I hacked and joined the pipes with copper pipping. When the engine reaches three quarters the fan doesn't cut in (the fan, the wiring and the fan switch all work. I tested each) and then the top hose pipe bursts off at the thermostat from pressure.

After scrapping two 19s and their good radiators I have to pay the scrap yard for this radiator of pure quality! I also had to buy more hose pipes as I hacked up the old ones. They only arrived today and the best I got was from a megane with the same engine but they are actually different. Oh Renault!
The top hose doesn't have a bleed screw and the bottom hose has another pipe branching off it where the 19 doesn't. I'll have to modify these over the next few days.
I hope the excessive pressure problem will be solved. It could be the fact that my hacked up pipes had no bleed screw, crankcase ventilation because I plugged in the hoses around the carb and top of engine wrong, incompatible radiator from the 11 or the head gasket... I hope not! No oil or coolant mixing though.
EDIT: I forgot to mention that I had to use the 11s fan for the 19s rad as I was not bothered to buy one from the scrap yard. I used some brackets I had lying around to extend the fan housing to fit the bolt holes on the radiator. Easy job though.
[BREAK=More engine and other bits]

Another shot of the engine showing the new alternator setup with a tensioned belt in place.

Throttle cable snapped!! Bike brake cable will have to do. I couldn't find anywhere to get an original R19 E6J cable.


Another thing that was bothering me. The black reg plates are for classics. I love the 11 but it's not really a classic yet. Pre 1987 and before boring unified European reg plate standards you used to have a choice of black and silver plates or white front and red back with black plastic riveted digits. I'm certain Renault used to issue this colour scheme so it's more standard now. The previous owner confirmed it used to have these but some digits were falling off so he changed them to black. Red plates are very rare these days on the roads!!!

This is the Volvo ignition module of questionable compatibility.

Yeah I preferred the phase 1 dash from the Chamade I had for scrap. I replaced the warning light icons with the invisible before lit phase 2 type. You can't see the white lined ones during the day and there was just too much yellow before. Temp gauge finally working!

This is the only photo I have of the 19 I bought for scrap value. You can sort of see the original layout with yellow everywhere. I have to say I really like the brown interior. You get bored of black or grey.

Shortly before the swap I encountered a high kerbed driveway with a pot hole immediately preceding it. Stupid mud flaps have been a nightmare this way and the only reason I'll fix them and keep them is that the car looks too high up without them.

RUST!!! It's on the doorsill of both the driver's door and driver's side rear door. I'll have to get it welded as soon as it's driving.
Over the summer I accidentally came across a generic cheap (30EUR maybe) remote central locking retrofit kit. I honestly thought it would be impossible but it was very easy and only requires a bit of imagination on where to line everything up. It comes with a control module which I left under the steering wheel and drawing 12V from the radio. From here all the wires to the actuators go through existing but unused holes to the doors in the door jams. The actuators come with various lengths and bends of metal rods that you strap to rod connecting the door lock mechanism to the knob on the door.

On the front doors I bolted the actuators here.

You can see where it attaches to the existing silver-ish rod.
An easy upgrade that took a few hours but totally worth it for any car without central locking. All the wires fit under the plastic trim/carpet etc. so you can't even see it's there.
Also I changed the boot struts over the summer which did nothing except cause the hatch to drop without warning causing concussions. Last weekend I changed the rear shocks. Another very quick and easy job. Hopefully I'll get the front done this weekend. It was overdue... The handling was like driving a large paddling pool on springs. It would nose dive under heavy braking. The buses on the rear were dried out and cracked. There was no resistance in the shock travel and the plastic covers were broken and knocking all over the place.
Next cosmetic job is the R19 RSi interior I salvaged at the scrap yard a couple of months ago... Already done the back so I'll upload some photos soon.
[BREAK=R19 RSi Interior]
I mentioned before that I found an interior from an R19 RSi that was in great shape. The front seats were what I think are 16V style with high bolsters. The pattern is a little different too. Black with green in the middle. I soon found out (and expected) that nothing from the 19 or 11 match front or back.
I started with the rear bench.

I began by tearing off the fabric from the old bench. This is the base. Mmmm deliciously clean! There was a weird red dust like rust powder and it stank. Unfortunately the mounts and clips were built into the cushion so I had to reuse it.

The metal back plate was totally different and there was no way to mount head rests on the 11's plate without extensive modifications and welding. It wouldn't be safe anyway.

So I reused the 11's back plate with the 19's split cushions and covering and with some sewing etc. I got them on quite tight. I matched the places where it was supposed to pull down on the cover to get a perfect fit.

I cut holes where the button to fold down the seat goes. The 19 has a lever beside the seat.

I didn't want holes where the head rests went so I capped them off and used elastic to pull them down. That way they don't wobble everywhere. Hopefully the NCT testers won't mind. Who am I kidding, they fail old cars on anything they can in Deansgrange.

I used the original base cushion and the new covering. Many trips to upholstery and fabric shops later it worked. The white cord is that stuff that's very tightly sprung for hanging net curtains. I punched holes and pressed those metal ring thingies with s hooks (can't remember the name!) so the fabric doesn't tear.

Et voila!
19 rear bench in an 11. They don't split in the middle but it has a pseudo effect and you can't notice any signs of chords etc. and the fabric is held down in all the right places. It took about three hours to put millions of pins and s hooks through the base cushion and around it on the bottom. Now I need to re-dye the parcel shelf at the back and the door cards to match! Definitely worth it I think.

I took the steering wheel too which is the same as a 16V but of course it didn't fit. I took a chance and bought a steering wheel boss from a 5GT wheel and thankfully it fit both the wheel, the steering column and hit the indicator stalk too.

Much better than the horrible old plastic wheel. All I need now is the centre from an old model with the ribbed badge... Someday... The hood part of the dash is missing because it was all wobbly and broken. I'm going to reinforce it with metal maybe mechano or something to make up for all the broken plastic screw holes.
The front seats are nowhere close to fitting and the inner tracks hit the curve in the middle of the floor that would be a transmission tunnel in a RWD car. No idea why it's on the 11??? Exhaust probably.
I decided to make an adapter to match the 19 seats to the base plate of the tracks on the 11's seats. It means I'll lose the height adjustment but it wasn't there on the 11 seats so it'll be fine. At least the seats will move forward and back.

Well if it turns out I measured distance anything like the alternator bracket then they won't work. Time will tell.
EDIT: I forgot to mention that the spare seat cushions when covered made excellent luxury beds for the pooches.

[BREAK=Cooling attempt #2]
Well seeing as the attempt to use the C1J's radiator and hacked up hose pipes was a dismal failure I decided to use an actual R19 E7J radiator (shown previously) and to get the original hose pipes. I could only find radiator pipes from a '96 megane and I had to get them from England. I phoned up all the scrap yards for miles and none had any 19s or energy engined meganes or clios being broken!

The original megane hoses. Of course they are different to the 19. The bottom hose shouldn't have the extra part sticking out so that will be cut and replaced with straight through copper pipe.
The top hose needs a bleed screw in it so I cut it and put in a piece of copper pipe and got a bleed screw put in and sealed with silicone.


Fingers crossed there are no leaks! The bleed screw is quite small but should be enough. It took a very long time to force both ends around the pipe. It felt like my wrist was going to snap a few times. Something I don't intend to do again soon.
I'll hack up the bottom pipe tomorrow and test both.
[BREAK=Two years later it runs!]
So I moved to New York two years ago and I'm only home once or twice a year for short periods. Sadly the Renault is a bit neglected. With the bizarrely good weather here this summer at the most convenient time of my arrival back in the country, I decided to get the car running once and for all.
I decided to just start pulling things apart. I discovered some really stupid amateur mistakes. Oh the things you learn in a few years.
Well I managed to put the thermostat in backwards. I drilled a tiny hole too to make it easier to bleed. I also had no gaskets on both parts of the thermostat housing. I did it the old fashioned way and stamped the metal (with marker) and cut my own gaskets with gasket paper. I also had forgotten that I had snapped a bolt ages ago. Three new bolts as well.

Not mentioned earlier (I think) but in the past two years I put in a brand new radiator and new radiator pipes ordered in from France. The rad is cable-tied on top for now.
The alternator was also not working and after noticing both terminals were at 0V I started stripping back all the plastic and tape protection off the wires. I had also managed to ground both sides!
I brought it to an old timer mechanic to get the carb running. The tank, fuel filter and carb were water logged from sitting and the idle jet (maybe low speed jet?) was blocked and had to have the dried in gunk poked out.
https://youtu.be/XS6_k8bgtJg
Just a short video of it finally running well.
Now when I'm back at Christmas I want to finish the interior and maybe tackle some of the little rust holes on the body.
[BREAK=Getting a move on]
Back home for a while so back at the Renault. I've done a lot over the past few weeks. Still loads to do.
First things first, it is looking very sorry. Two rotted tyres now. I finally got around to fitting the new front shocks I bought years ago. I initially tried to separate the shocks and springs but after fearing caving in my face with spring compressors and slipping the vice grips a couple of times, I decided it was air gun time. I parted with a whopping €20 to have them swapped at the local garage.

Old and new shocks/struts.

New shocks and tyres ready to go in. I got a good deal on four barely used tyres. There's a nice dead patch on the grass where the car was for the past year.

Decided it was about time I adjusted the valve clearances. I've never done it before so it was a pain to do. Very fiddly. The exhaust valves were all perfect and most of the intake ones were slightly off.

Choke cable got jammed whenever you tried to pull it out and would nearly pull off the dash panel. I took it off to adjust the pressure from the pin that activates the light. Of course, the 30-something year old plastic is so brittle the cable mount broke immediately. Nothing three cable ties can't sort. I now have a free moving cable again but the light on the dash only works if you push up on the lever. I'll get back to that when I'm bothered...

Finally got around to properly repairing the hood over the dash. It's been broken since the day I bought the car. I used some JB Weld epoxy (I bring it back from the states when I come home) with some washers over the snapped plastic holes. It took me a while to find bolts that worked too. It holds perfectly now. I also glued the vinyl that had shrunk and started peeling.

Next up was repairing the world's sloppiest shifter. It had actually started going into reverse or first. You had no choice in the matter. It also moved about two inches either way when it was in gear. Sort of like stirring soup. I bought the only thing I thought would work on ebay. A short shift kit for an R5 turbo off ebay (from the UK). It came with a nasty aluminium reverse lock sleeve and knob. I didn't bother take any photos. My goal was to rework the original sleeve and knob on. As you can see, the new one is much shorter. I didn't even want a short shift but as it's the only thing online, I suppose it's better than sloppy shift!

Parts to be re-used.
I didn't take too many photos of the job as it was messy and involved a giant circlip and lots of grease. I cut a large portion out of the reverse lock sleeve, used a copper plumbing fitment, some JB Weld epoxy and drilled a hole in the same place as on the original shifter for the spring lock pin. I also had to bore out the bottom of the original sleeve to fit around the bottom of the new rod. I also had to use an angle grinder to break of the old rivet/bolt holding the bottom on. The new shifter was actually too narrow at the end so I had to use a couple of nylon washers to stop it wobbling. It took a couple of days and lots of trial and error but in the end, I got an OEM look. Oh and I used some TEK7 to keep the knob on.

Next up was at the gearbox end. This little bush is what causes all the play while it's in gear. Changing this and the circlip holding it in was hands down the worst thing I have ever done on a car (although the impossible rear engine mount on an E110 Corolla comes very very close). I'm now convinced that circlips were created by the devil himself. I had to drill, pry and hack the old bush out.
I decided it was best not to use the short shift rod included at the gearbox end. Renault make their boxes out of butter so I thought better of it.
Of course after spending forever under the car (literally hours) getting it back in, I then spent even more time aligning the shifter rod. I either had fifth/ no reverse or reverse and first without lifting the lock. All in all, the shifting is a bit stiff (probably the metal ball joint vs original rubber/plastic combo) but it's incredibly precise now. Never seen an old Renault like it.
I then take the car for a test drive... Down to the local shop at the end of my estate (nothing in date so can't go on public roads yet), I drive towards the underground car park, it's closed, one way road... Try to reverse back out then I hear a pop. No more reverse, only forward gear that engages is third. I am now blocking the main entrance while having to open the door and do a three point turn scooting the car with my right leg on the ground, then burn the clutch and drive home in third! Embarrassing to say the least. Turns out I hadn't put in the cirplip properly and now it was gone!!!

Decided to buy two of these deplorable items only to spend roughly four hours getting it in. As you can see I ruined the first. Good job I bought two! As it also turned out, I had put the bush in the wrong way... Seriously, I copied the colour cap end of the original bush. The new one had a black top not black bottom like the original! Typical Renault!
Next was the mess that is the interior and stereo wiring. Bought some screw block connectors and cleaned everything up. I decided to do a little something about the terrible sound quality while I was at it. Whatever way they designed the speaker mounts in the foot wells (or they didn't bother design it), there was a serious lack of anything resembling bass even with decent speakers. I had this old crappy underseat "sub" that was in some old BMW when we bought it. I had pulled it apart years ago. I decided to try my hand at making a speaker enclosure. My goal for this was to spen little or no money seeing as the sub wasn't even good to begin with. At 6" it's more of a woofer than sub-woofer. It also has no markings or model number on it. I used MDF and copious amounts of TEK7 to seal it up. The back is shaped to fit around the gear shifter. I didn't bother clean it up or paint it as it's mounted between the stereo and gear shifter under the centre console.

Looks like poo! That's half a Socket 5 Pentium (1994) heatsink for those nerds interested.
Surprisingly it sounds better than when it was in it's original bulky plastic casing. I used a tiny 20W 12V power amp I had kept from some old college project. I mounted both the amp and speaker case by bolting on a couple of old hard drive magnets, and carving a few squares out of the carpet. They aren't moving anywhere.

It (just) fits! Note the stock looking new shifter.
Now when the key is in ACC position it works great but when the ignition is switched it buzzes. More bizarrely, the buzzing stops with the headlights on but starts again with the high beams. Ground loop isolation cables it is then!
Back to the engine!
Car was tough to start. It would immediately stumble and misfire unless the choke was pushed 3/4 of the way in then it would clear up. There was also a horrible hesitation when you hit the throttle once it was warmed up. After trying again and again to tune it, I caved in and bought a rebuild kit off ebay from Croatia.
Turned out to be a great idea. No idea why I held off for so long.

Look at all that crud in there.

Crusty float

That diaphragm has definitely failed.
It was filthy inside. Everything was filled with sand/dirt or gunk. Nozzles and pumps were blocked. Both vacuum diaphragms were ruined and leaking. The only thing the kit didn't come with was the diaphragm for the power valve. I didn't dare open it up in case.

All back together.
No more stumbling or hesitations on acceleration. I can push the choke in all the way much sooner now too. There are still huge problems though. You have to have the choke fully out to start when cold (normal) but if you don't immediately push it over 3/4 way in it will stumble and die. I also, have the idle mix screw turned out way too far. Once the coolant is up to temp, if you pump the brakes the idle raises up about 500rpm or so. Then more confusingly, once the car is well warm (a half an hour or so of being driven), the brakes drop the engine speed. It even stalls under heavy braking. I'm suspecting a big vacuum leak somewhere. The booster itself is fine. I can come out to the car six hours after it's been running and there's still power in the brakes. More investigation needed before I take it for a real tune up.
Last edited by a moderator:

