There is more to life with TurboRenault.co.uk

Register a free account today to become a member! Once signed in, you'll be able to participate on this site by adding your own topics and posts, as well as connect with other members through your own private inbox!

The Renault painting thread

DaveL485

Staff member
Along the same lines of Duncan's welding thread, lets have some painting tips (not from me, i'm shit, I need the tips lol)

I haven't used a paint gun for 20 years or more, when my first go was pretty disastrous. However, I recently bought her a new Clio on the cheap with a busted bumper so I though't i'd save a few pennies and repair it. I've stripped it out, bonded and reinforced the crack across the fog light and filled/sanded it (badly, but good enough so she won't notice it). I also ran over the rest of the bumper with 400-grit wet n dry.

I went to a paint mixing place and the guys there were really nice, sorted me out with primer, colour and lacquer and mixing instructions. I also fitted a water trap to my compressor output too. I have a gravity fed gun from Machine Mart (lol)

Primer - 4 parts paint, 1 part hardener, 10% thinners, started at 40psi but had to crank it up as it was quite thick
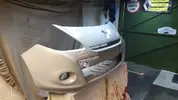
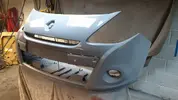
x20200216_142950_RS.webp

x20200216_142957_RS.webp

2 coats of that, then a coat of TEKNG Technical grey (love this colour). 50/50 colour/thinners.
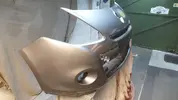
x20200216_162041_RS.webp

x20200216_162048_RS.webp

As you can see i'm painting in my garage, I swept and blew as much crap from around the bumper as I could but it's no paint booth so there are a few bits in the paint. Can I do anything about this?

x20200216_162055_RS.webp

I believe this is a bit orange-peel-ey. What causes this?

x20200216_162105_RS.webp

After 2 coats of colour on went the clear coat, 4:1 clear to hardener +10% thinners

x20200216_183946_RS.webp

x20200216_183953_RS.webp

I remember thinking when mixing the clear was thinner than the paints, but my brain didnt translate this to action until it was too late. I think I should have dropped the air line pressure down, as I ended up with a couple of small runs. One is around the NS fog light hole and this one you can make out on the leading edge

x20200216_192101_RS.webp

What can I do about this? I don't really want to have to do any more painting, can it be flatted out? How?

Do you adjust your gun for clear coat and if so, how? Whats the best way of avoiding runs?


Overall, first go, in a not ideal environment i'm pretty pleased with it. Will have to see what it looks like on the car and if the colour matches. it looks OK, but it was dark and wet when i finished last night so i didnt take it outside to compare....
 
Your orange peel can have been caused by a few things but normally its applying too much paint too quickly.

You are going to have to flat it ( sand it ) carefully and apply a very thin layer of paint again.
 
Looks like you applied the primer too thick. How long did you leave it after primer? Primer coat looks super shiny, I hope the paint will stick and not flake off..
Also not a painter but I have my own bad experiences...
 
Looks like you applied the primer too thick. How long did you leave it after primer?
I applied enough to coat it, tried not to put too much on cos I didn't want runs. The primer was very thick after mixing, almost syrup-like.

About an hour between coats, always touch dry, save the 2 clear coats which was maybe 40 mins, as it was getting late and I was impatient. The first coat of clear was slightly tacky when the 2nd went on.
 
Along the same lines of Duncan's welding thread, lets have some painting tips (not from me, i'm shit, I need the tips lol)

I haven't used a paint gun for 20 years or more, when my first go was pretty disastrous. However, I recently bought her a new Clio on the cheap with a busted bumper so I though't i'd save a few pennies and repair it. I've stripped it out, bonded and reinforced the crack across the fog light and filled/sanded it (badly, but good enough so she won't notice it). I also ran over the rest of the bumper with 400-grit wet n dry.

I went to a paint mixing place and the guys there were really nice, sorted me out with primer, colour and lacquer and mixing instructions. I also fitted a water trap to my compressor output too. I have a gravity fed gun from Machine Mart (lol)

Primer - 4 parts paint, 1 part hardener, 10% thinners, started at 40psi but had to crank it up as it was quite thick

View attachment 147014

View attachment 147015

2 coats of that, then a coat of TEKNG Technical grey (love this colour). 50/50 colour/thinners.
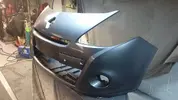
View attachment 147016

View attachment 147017

As you can see i'm painting in my garage, I swept and blew as much crap from around the bumper as I could but it's no paint booth so there are a few bits in the paint. Can I do anything about this?

View attachment 147018

I believe this is a bit orange-peel-ey. What causes this?
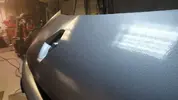
View attachment 147019

After 2 coats of colour on went the clear coat, 4:1 clear to hardener +10% thinners
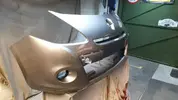
View attachment 147020

View attachment 147021

I remember thinking when mixing the clear was thinner than the paints, but my brain didnt translate this to action until it was too late. I think I should have dropped the air line pressure down, as I ended up with a couple of small runs. One is around the NS fog light hole and this one you can make out on the leading edge
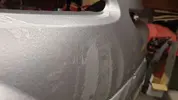
View attachment 147022

What can I do about this? I don't really want to have to do any more painting, can it be flatted out? How?

Do you adjust your gun for clear coat and if so, how? Whats the best way of avoiding runs?


Overall, first go, in a not ideal environment i'm pretty pleased with it. Will have to see what it looks like on the car and if the colour matches. it looks OK, but it was dark and wet when i finished last night so i didnt take it outside to compare....
Place water on the floor to keep the dust down, also my experience is to give it a light coating first little more than a dust coat, don't leave it too long when you can just see your fingerprint hold shape in somewhere you cant see, it will give you sufficient tack in the base layer to lay the second coat on thicker preventing runs
 
Too thick , therefore too heavy, use plastic to sheet up, fibres in sheets will be floating around.
Painting at home is always a gamble, H&S aside, I would only prime the repairs, not whole panel unless you were changing colour perhaps from a very different shade.
I'm certainly no expert, but have mates from training in the trade right down to one man paint shop, so I've picked up what I can.
I guess at viscosity, aim for pissy as I can get away with, with a repair on a panel like that my tact on it would have been...
Physical repair, scuff however much of the panel I would have decided to do( whether I'm gonna try and blend it in ) then prime the repair, guide coat. flat until guide gone, reprime and guide if req'd, flat if so, light tack coat where prime is, another wisp over repair and however mush else I thought i needed to go, wet coat on same, then when it;s dry, but same day tack coat of lacquer , then a wet coat to shine.
All gonna vary as to how good a wanted final panel to look, if there was an area I thought I could lose a blend like an end of a panel, or a curve ? Or blend basecoat and lacquer full panel ?
As I must stress, I'm just an ejiot, same as anything that's not your primary skill, you have a go, seek advice , learn from your mistakes.
If it's a cheap, not fussy job I can turn out a reasonable job for little money, something nicer, I'd do it to prime, get paint and get mate to do paint and lacquer.
Prep is where a good chunk of the time and therefore cost comes into it.
People knock paintshops, people moan about time scales, cost etc, but so many things can go wrong, even if it rolls out looking right, colour, finish etc etc it's gotta last, not sag, not dull.....not flake off first time it gets a knock..
If just lacquer had orange you could flat and buff it, but looks like paint is too rough for it to look right.
That's my two pennies.
Right or way way way off....
 
after the primer was applied you should have let it dry and then guidecoat and flat back down, the primer has the orange peel effect due to the nature of it(being thick) unless you change the ratio for a wet on wet application, after that you would be good to go with the basecoat, application pressure and a final drop coat can change the colour of the finish, lacquers can be a mindfield these days, there are some really crap ones out there and some really good ones as well, it also depends if its an MS or HS lacquer, most these days are of a grip and rip technology which is just a medium but not full coverage first coat then a final full coverage finish coat, pressure needs to be higher for putting lacquer on than it does for the base, but if youre using the same gun you will have to play with the amount of product coming out as well, but this will also cause more overspray/cloud inside the garage,
the bits of shit youve got on the bumper may be flattable and polished but it depends at what stage they got on there coz if it was around the primer layer you will flat it all off on that spot and the undercolour will be instantly visible

painting is a nightmare to say the least as there are so many variables to deal with when painting at home, in fact even in a booth i can still fuck it up sometimes 😄
 
From my experience ( which isn’t much ) two pack primer needs a good 24 hours to go off if not baked on in an oven , then flat it off , if you are in a hurry the I use a air drying primer and get the finish as good as you can so minimal prep, De nib the bits of debris and base coat and so on . To be fair if you had rubbed the primer down I think you would of made a tidy job . I had a old school chap point me in the right direction. His words ring in my head to this day when I paint any thing, Failure to prepare, Prepare to fail , how bloody true this is ,especially with paint . So next time you get trigger happy just run that through your head it just makes you think .
All the good painters I know always seam to have a vice , they are either like a drink or something stronger, gamble or can’t keep it in there trousers, or have no mechanical knowledge at all , So if one or more of the above fits then I think you have a fitting chance .
 
KNG is one of the shitest colours for an edge to edge match as well
Explain please? Elaborate if you can.

unless you change the ratio for a wet on wet application
Whats a wet on wet application?
a final drop coat can change the colour of the finish
Whats a drop coat?

MS or HS lacquer
MS? HS?
but not full coverage first coat then a final full coverage finish coat
Elaborate please - do you mean you just, like, dust it over first time around?
but if youre using the same gun you will have to play with the amount of product coming out as well, but this will also cause more overspray/cloud inside the garage,
Higher pressure, right, but more or less product delivery?
 
So you'd prime it (2 coats?) then wait a day (only oven I have is in the kitchen lol) flat it with wet n dry and then colour directly on top once it's cleaned off?

De nib the bits of debris
How?

All the good painters I know always seam to have a vice , they are either like a drink or something stronger, gamble or can’t keep it in there trousers, or have no mechanical knowledge at all , So if one or more of the above fits then I think you have a fitting chance
rofl.gifrofl.gifrofl.gif
Sadly, I don't drink really, I don't smoke or do drugs, i've never cheated on a partner in my life and i'm reasonably good on the spanners. Guess i'm doomed to be crap at bodywork then LOL
 
as previously said, you should of let the primer dry for 24 hours, spray a black guide coat and flatted it with 400 and then 800 wet or dry

i was a painter for 15 years, but now a insurance assessor in the same industry
 
The de nib , I think there might even be a proper tool for it , but basically I use 800-1000 grit paper on a small bit of sanding block to rub down the small bits of shit in the paint / primer before you top coat / lacquer.
It sounds like you don’t have any of the vices I mentioned above so , Your right your screwed.
 
so dave here goes ;)

an edge to edge match will be the freshly painted edge of a panel to the old unpainted panel, in your case bumper to wing, a panel can look the same colour until fitted but then you can sometimes see a massive colour difference, most modern metallics and pearls should be blended into the next panel to achieve an accurate colour.

a wet on wet application is where you prime a panel and then paint straight over it before it has fully cured and been re-prepped, you carried out a wet on wet by priming the bumper then after it had flashed off you hit it with basecoat, if you go for a wet on wet you need to adjust the mixing ratio of the primer to make it thinner and flow better and sit flatter on the panel (so if your primer is a 4-1-10% mix then change it to a 2-1-10%, primer is designed to cover filler repairs and bare metal so is inherently thick and heavy so it csn be reworked smooth when dry

a drop coat is the final coat of basecoat applied to a panel before lacquer, this is a dryish dust coat done to remove any patchyness especially in silvers and you can use this coat sometimes to alter the shade of the panel, if you drop the pressure it will be darker and if you up the pressure it will lighten the colour

MS medium solid, HS high solids this is aimed at lacquers and 2k direct gloss paints, basically its down to the environmental impact and the amount of VOC'S (volatile organic content in the final mixed product) but basically ms has more activator and thiners in the ratio hs has less activator and virtually no thinners, the ms flows a bit better for home use but needs more product on the panel and hs is harder to flow and needs less on the panel but can sometimes be harder to get a gun finish on the job. and most lacquers are designed for a grip and rip technology which means a wetish dust coat (GRIP)(if that makes sense?) first then a good wet finish coat for the final finish (RIP)

when lacquering i up the pressure and the amount of product coming out and have a slightly wider fan as well, you will use more product as it will end up as overspray/fog every where but too low of a pressure can result in an orange peel effect finish and you have more chance of it running.

hope that makes sense and makes it a bit clearer???? it does in my head but ive been painting nearly 20years now, and you still have to adjust things to suit the job at hand

😬😬
 
and thats a screen grab of the number of shades and varations of renault KNG and every one of those is different
Oh....shitballs. Is there any way of knowing which variant I have? It's a 60-plate Clio i-Music.

Fancy painting a 60-plate Clio i-Music in Cassiopee grey for me? rofl.gif
 
variants are just the paint manufacture tinting the original to suit any differences

each paint manufacture (not car manufacture) will have different variants. We use a spectrometer here to save the hassle
 
Back
Top