Author: MossyV6
Credits:
Date: 25/4/2010
Associated Forum Post URLs:
http://v6clio.net/forum/viewtopic.php?f=10&t=12491
Contents
- Materials Needed
- Spraying Front Bumper
- Tips
Materials Needed
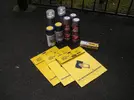
See 'Stage 2' picture
Spraying Front Bumper
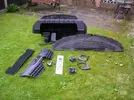
Stage 1: Strip the front end and remove the bumper – do the job right, no masking off here.
Stage 2: Nip to Halfords/Poundland and £45 later:
Stage 3: Sand the bumper down with 120-grade wet & dry, working down to 400-grade wet & dry to remove most of the stone chips.
Stage 4: Spray the bumper with grey primer, building up coats and sanding with 600-grade wet & dry between coats. Leave at least 15 minutes between coats and use a heat gun to speed up drying. This stage helps build coats and fills any small chips left.
This process can be repeated as many times as necessary to get the finish you want before applying the colour coat.
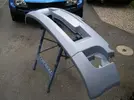
Stage 5: Once the bumper is smooth with no chips, it's time to add the colour and clear coat. Wipe the bumper over with a tack cloth to remove all dirt and dust, then begin spraying the colour coat. I used two cans to cover the bumper.
Allow the colour coat to dry for at least 30 minutes, using a heat gun to speed up drying.
Stage 6: Once the colour has dried, apply the clear coat. This is the tricky part, as lacquer attracts dust and particles. To minimize this, lock yourself in a garage and wet the floor with water to keep dust down.
Begin spraying lacquer onto the bumper—don’t apply too much at once, as this creates runs. Hold a heat gun in one hand and a spray can in the other, warming the paint as it’s applied, but don’t set the heat too high, as this can cause the lacquer to "ghost," turning it white.
Once lacquer is applied, go over the entire bumper with the heat gun for about 15 minutes to dry the lacquer.
Stage 7: Leave the bumper in the sun or a warm place for as long as possible before refitting it.
Stage 8: The clear coat may have an "orange peel" texture, especially when using rattle cans. To fix this, leave the bumper for 24–48 hours before polishing.
Wet sand with 2000-grade wet & dry paper, then polish with a mild rubbing compound.
Results:
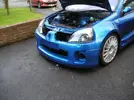
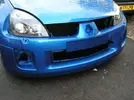
As you can see, the bumper came out great—total cost was £45, and it took me a Sunday to do.
It will still need polishing, which I’ll do at the end of the week once the paint has fully cured.
TIPS:
- Never rush the paint coats—too much will create runs and look bad.
- Use a heat gun on low heat while spraying and after to prevent paint from running. This is especially important for clear lacquer, as it takes longer to dry. The faster it dries, the less debris will stick!
- Construct a framed workbench to secure the bumper, making it easier to paint without moving it.
- Always use tack cloths to ensure a perfectly clean surface before painting.
- Only use 1500-grade wet & dry paper to create a key for the paint to stick to. Using rougher paper will leave deep scratches and ruin the finish.
Credits:
Date: 25/4/2010
Associated Forum Post URLs:
http://v6clio.net/forum/viewtopic.php?f=10&t=12491
Contents
- Materials Needed
- Spraying Front Bumper
- Tips
Materials Needed
See 'Stage 2' picture
Spraying Front Bumper
Stage 1: Strip the front end and remove the bumper – do the job right, no masking off here.

Stage 2: Nip to Halfords/Poundland and £45 later:

Stage 3: Sand the bumper down with 120-grade wet & dry, working down to 400-grade wet & dry to remove most of the stone chips.
Stage 4: Spray the bumper with grey primer, building up coats and sanding with 600-grade wet & dry between coats. Leave at least 15 minutes between coats and use a heat gun to speed up drying. This stage helps build coats and fills any small chips left.
This process can be repeated as many times as necessary to get the finish you want before applying the colour coat.

Stage 5: Once the bumper is smooth with no chips, it's time to add the colour and clear coat. Wipe the bumper over with a tack cloth to remove all dirt and dust, then begin spraying the colour coat. I used two cans to cover the bumper.
Allow the colour coat to dry for at least 30 minutes, using a heat gun to speed up drying.
Stage 6: Once the colour has dried, apply the clear coat. This is the tricky part, as lacquer attracts dust and particles. To minimize this, lock yourself in a garage and wet the floor with water to keep dust down.
Begin spraying lacquer onto the bumper—don’t apply too much at once, as this creates runs. Hold a heat gun in one hand and a spray can in the other, warming the paint as it’s applied, but don’t set the heat too high, as this can cause the lacquer to "ghost," turning it white.
Once lacquer is applied, go over the entire bumper with the heat gun for about 15 minutes to dry the lacquer.
Stage 7: Leave the bumper in the sun or a warm place for as long as possible before refitting it.


Stage 8: The clear coat may have an "orange peel" texture, especially when using rattle cans. To fix this, leave the bumper for 24–48 hours before polishing.
Wet sand with 2000-grade wet & dry paper, then polish with a mild rubbing compound.
Results:
As you can see, the bumper came out great—total cost was £45, and it took me a Sunday to do.
It will still need polishing, which I’ll do at the end of the week once the paint has fully cured.
TIPS:
- Never rush the paint coats—too much will create runs and look bad.
- Use a heat gun on low heat while spraying and after to prevent paint from running. This is especially important for clear lacquer, as it takes longer to dry. The faster it dries, the less debris will stick!
- Construct a framed workbench to secure the bumper, making it easier to paint without moving it.
- Always use tack cloths to ensure a perfectly clean surface before painting.
- Only use 1500-grade wet & dry paper to create a key for the paint to stick to. Using rougher paper will leave deep scratches and ruin the finish.
Last edited:

