Diagnosing and Replacing Faulty Coils
Background
Coil failure is pretty common on the Phase 1 and Phase 2 V6. Some regard the issue as a design fault; however, Renault has never acknowledged this. There is no real explanation of why coil failure seems to be so frequent. It may be that due to the exclusivity of the Vee and the relatively small numbers, the statistics get skewed due to many owners congregating in one place. It may also be that environmental and operational scenarios affect coil failure. Whatever the reason, a coil failure is a likely fault during Vee ownership, so it's best to be prepared.
NOTE: For the purpose of this article, the FRONT bank of cylinders is at the front of the car, and the REAR bank of cylinders is at the rear of the car.
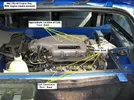
Here are some options to be prepared:
1 Ensure you have breakdown cover for recovery to a Renault dealer.
2 Carry a spare coil and fitting tools, and if you're a Mk1 owner, hope your failure is on the front cylinder bank.
3 Carry a spare coil and have breakdown cover so the breakdown fella can fit your coil.
Diagnosing A Failed Coil
Diagnosis of a failed coil, or at least confirming one has failed, should usually be fairly obvious. The engine note will sound much different from normal, the idle will be lumpy, and the smoothness of the V6 will be lost. Some have likened the sound to that of a tractor. The engine will also be noticeably down on power.
Beware that due to the coil preventing firing of the spark plug, unburnt fuel can make its way into the catalytic converter, potentially causing damage. The details of how soon damage will occur are unclear, but you should try to drive the car as little as possible or get the car recovered. Even better, carry spare coils and replace the coil roadside or have the breakdown fella fit the replacement.
You may want to try using the diagnostic method below to find the failed coil and cylinder, then remove the fuel injector connector. This has not been tried or tested, so it would be at your own risk.
Identifying The Failed Coil
Identifying the coil is done by a process of elimination, and once you've done it once, you will be able to do it more easily next time or advise fellow owners should they need your assistance. The basic preparation and diagnosis steps are...
Getting the Access Required
If you have a Phase 2, congratulations, as access to both banks of cylinders is possible without removing the plenum, so don't worry about the rest of this section.
On the Phase 1, however, you'll need to remove the inlet plenum to access the REAR bank. Front bank access is fine without this.
To remove the Phase 1 plenum, most of the necessary parts are visible. There are some pipes and clips to disconnect from the bulkhead, but the majority lies with the main bolts of various lengths going through the inlet manifold. Be very careful with the corrugated plastic breather pipework near the throttle body, as these can be quite fragile and easily snap. You can convert these to rubber hoses to avoid the problem and make future coil changes easier.
The inlet won't pull directly upwards. There's a small rubber bush that adds support to it. You have to slide it about half an inch to one side, and then it can be moved upwards.
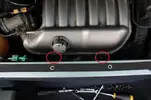
Here are the two 10mm bolts that can be hard to find. They are accessible with engine covers in place but easier without.
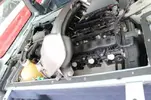
And here's an image showing the inlet plenum moved carefully to one side, providing access to both banks:
Before You Start - Familiarization
Now Finding The Failed Coil
Where To Buy Coils
If you plan to replace or carry spare coils, you will need to purchase them. Here are some options from forum posts:
Tools Required
Simple tools are needed to fit a coil, especially on the Mk2, where they are all easily accessible:
Coil Replacement Kit
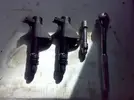
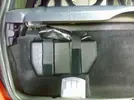
If you intend to carry spare coils, consider making up a kit and keeping it in your car. Here’s an example of a kit the author has put together...
Kit components:
Handy holder:

Ready for use:

Stowed:
Replacing Coils - Using OEM & Pattern Parts
Once you have determined which coil(s) need replacing, it's straightforward to replace them with OEM or pattern replacement parts (especially on the Mk2):
NOTE: The engine light may or may not come on when a coil is faulty. (What needs to be done to turn it off if it does?)
The light should go off by itself within about 50 miles. If not, a dealer can turn it off using the Renault "Clip" diagnostic tool. If the light doesn't turn off, it may indicate other issues.
Other Options
A more permanent solution to replacing coils with OEM units is available. This is more costly but is regarded as the best and most sensible solution. The option is to fit 'Trophy' coils. These are not simple replacements and require soldering and tapping threads. However, once fitted, they should provide reliable coils for the life of the Vee.
Where can Trophy coils be bought and how much do they cost?
Call SG Motorsport: +44 (0) 1666 511191
How can they be fitted?
Tapping the engine block is required, and some changes to the loom are necessary, as the connectors on the Trophy coils are different. SG Motorsport has the most experience with this, and no one has yet completed a DIY fit.
Background
Coil failure is pretty common on the Phase 1 and Phase 2 V6. Some regard the issue as a design fault; however, Renault has never acknowledged this. There is no real explanation of why coil failure seems to be so frequent. It may be that due to the exclusivity of the Vee and the relatively small numbers, the statistics get skewed due to many owners congregating in one place. It may also be that environmental and operational scenarios affect coil failure. Whatever the reason, a coil failure is a likely fault during Vee ownership, so it's best to be prepared.
NOTE: For the purpose of this article, the FRONT bank of cylinders is at the front of the car, and the REAR bank of cylinders is at the rear of the car.

Here are some options to be prepared:
1 Ensure you have breakdown cover for recovery to a Renault dealer.
2 Carry a spare coil and fitting tools, and if you're a Mk1 owner, hope your failure is on the front cylinder bank.
3 Carry a spare coil and have breakdown cover so the breakdown fella can fit your coil.
Diagnosing A Failed Coil
Diagnosis of a failed coil, or at least confirming one has failed, should usually be fairly obvious. The engine note will sound much different from normal, the idle will be lumpy, and the smoothness of the V6 will be lost. Some have likened the sound to that of a tractor. The engine will also be noticeably down on power.
Beware that due to the coil preventing firing of the spark plug, unburnt fuel can make its way into the catalytic converter, potentially causing damage. The details of how soon damage will occur are unclear, but you should try to drive the car as little as possible or get the car recovered. Even better, carry spare coils and replace the coil roadside or have the breakdown fella fit the replacement.
You may want to try using the diagnostic method below to find the failed coil and cylinder, then remove the fuel injector connector. This has not been tried or tested, so it would be at your own risk.
Identifying The Failed Coil
Identifying the coil is done by a process of elimination, and once you've done it once, you will be able to do it more easily next time or advise fellow owners should they need your assistance. The basic preparation and diagnosis steps are...
Getting the Access Required
If you have a Phase 2, congratulations, as access to both banks of cylinders is possible without removing the plenum, so don't worry about the rest of this section.
On the Phase 1, however, you'll need to remove the inlet plenum to access the REAR bank. Front bank access is fine without this.
To remove the Phase 1 plenum, most of the necessary parts are visible. There are some pipes and clips to disconnect from the bulkhead, but the majority lies with the main bolts of various lengths going through the inlet manifold. Be very careful with the corrugated plastic breather pipework near the throttle body, as these can be quite fragile and easily snap. You can convert these to rubber hoses to avoid the problem and make future coil changes easier.
The inlet won't pull directly upwards. There's a small rubber bush that adds support to it. You have to slide it about half an inch to one side, and then it can be moved upwards.
Here are the two 10mm bolts that can be hard to find. They are accessible with engine covers in place but easier without.

And here's an image showing the inlet plenum moved carefully to one side, providing access to both banks:

Before You Start - Familiarization
[]First, with the engine off, experiment with removing a coil connector to familiarize yourself with how to disconnect one. There's a small plastic tab on the connector that can be lifted slightly, allowing the connector to slide off the coil easily. Make a note of each coil and connector position.
[]With a faulty coil, the engine will run on less than 6 cylinders, causing a lumpy idle. If one coil has failed, 5 cylinders will be working to keep the engine running, and the idle will sound rough. Disconnecting a working coil during diagnosis will result in the engine running on only 4 cylinders, and the idle will sound even lumpier. Reconnecting the working coil will restore smooth idle, and the revs should rise slightly. If you disconnect a faulty coil, the engine will still run on 5 cylinders, so the idle tone and revs won't change. By repeatedly disconnecting and reconnecting coils, you should be able to identify which coil is faulty.- With this in mind, it will be necessary to remove coil connectors one at a time with the engine running to detect which coil is faulty.
Now Finding The Failed Coil
[]With the top engine cover removed, start the engine, bearing in mind that we want to identify the failed coil quickly to prevent prolonged engine running with a faulty coil.
[]Starting at the rear bank of cylinders (nearest to you), remove the connector from the leftmost coil and carry out the above diagnosis. Repeat this process for the middle and rightmost coils on the rear bank. If the failed coil isn't detected yet, move on to the front bank, repeating the process. Hopefully, the failed coil will be identified quickly, but it could always be the last one.- Once the failed coil is detected, it’s time to replace it, either immediately or with help from someone else. Diagnosing the failed coil and finding out which one it is will still be useful, even if you don’t have a spare, as it will at least help you identify the problem and decide what to do next.
Where To Buy Coils
If you plan to replace or carry spare coils, you will need to purchase them. Here are some options from forum posts:
[]Coils can be purchased from Renault, part number 9633001580, priced at £34.84+VAT, though some owners report prices of £50+.
[]Premier Automotive Parts and Andrew Page Ltd sell Peugeot coils for £24.84+VAT, part number 597094, made by SAGEM. Valeo ones cost around £27, part number 597097. There is some debate on the latest part number, but both fit the Mk1 and Mk2 Vees.- GSFcarparts sell coils for £21.40+VAT, part number 925PC0200 (formerly 925PE0000). These fit several cars with a V6, including Citroen, Renault, and Peugeot. They offer free delivery and have branches and an online shop here: GSFcarparts Online Shop.
Tools Required
Simple tools are needed to fit a coil, especially on the Mk2, where they are all easily accessible:
[]8mm socket (3/8 drive recommended; a spanner won’t do).
[]A socket extension.- A ratchet or T-bar.
Coil Replacement Kit
If you intend to carry spare coils, consider making up a kit and keeping it in your car. Here’s an example of a kit the author has put together...
Kit components:

Handy holder:

Ready for use:

Stowed:

Replacing Coils - Using OEM & Pattern Parts
Once you have determined which coil(s) need replacing, it's straightforward to replace them with OEM or pattern replacement parts (especially on the Mk2):
[]Remove the coil connector.
[]Using an 8mm socket, undo the retaining bolt. Be careful not to drop or lose it.
[]Pull the coil vertically upwards, being careful not to twist it. It should pop off easily.
[]Push the new coil vertically down onto the plug, ensuring the bolt hole lines up with the threaded hole in the cylinder head.
[]Replace the retaining bolt and carefully tighten it (need torque figure).
[]Reconnect the coil connector, ensuring it clicks into place.- Remove any tools or items from the engine top, start the engine, and check if it runs smoothly.
NOTE: The engine light may or may not come on when a coil is faulty. (What needs to be done to turn it off if it does?)
The light should go off by itself within about 50 miles. If not, a dealer can turn it off using the Renault "Clip" diagnostic tool. If the light doesn't turn off, it may indicate other issues.
Other Options
A more permanent solution to replacing coils with OEM units is available. This is more costly but is regarded as the best and most sensible solution. The option is to fit 'Trophy' coils. These are not simple replacements and require soldering and tapping threads. However, once fitted, they should provide reliable coils for the life of the Vee.
Where can Trophy coils be bought and how much do they cost?
Call SG Motorsport: +44 (0) 1666 511191
How can they be fitted?
Tapping the engine block is required, and some changes to the loom are necessary, as the connectors on the Trophy coils are different. SG Motorsport has the most experience with this, and no one has yet completed a DIY fit.
Last edited:

