
There is more to life with TurboRenault.co.uk
You are using an out of date browser. It may not display this or other websites correctly.
You should upgrade or use an alternative browser.
You should upgrade or use an alternative browser.
Guides.
Old and new . Guides will appear here.
Filters
Show only:
Loading…
Alpine 5
turborenault.co.uk/upload/canule_devil.pdf
turborenault.co.uk/upload/catalogue_monte_carlose470_5_alpine.pdf
turborenault.co.uk/upload/DC_R5_GR203f1_alpine_turbo.pdf
turborenault.co.uk/upload/Homologation_5_alpine.pdf
turborenault.co.uk/upload/Instruments_Jaeger.pdf
turborenault.co.uk/upload/livret_utilisateur0faf_5_alpine.pdf
turborenault.co.uk/upload/mr_122b_coupe_alpine_turbo.pdf
turborenault.co.uk/upload/pr1223_gr2bb9b_5_alpine.pdf
turborenault.co.uk/upload/pr_1223_coupe_5_alpine.pdf
turborenault.co.uk/upload/pr_r122b_coupe_5_alpine.pdf
turborenault.co.uk/upload/pub_r1223_19761ffa_5_alpine.pdf
turborenault.co.uk/upload/mr193.pdf
turborenault.co.uk/upload/pr_1125.pdf <-- 106mb PDF : warning
- Locked
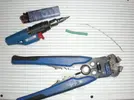
We all have a slight problem, we all love a cars that have a notorious electrical system
with any electrical work disconnect the battery
We'll start with the tools
a gas soldering iron great for doing repairs in the car just watch where you put it
the auto wire stripper is better than the pull type you get in sets.
solder and some heatshrink.
and a lighter for heat shrink!
Repairing a broken wire
first thing before you go at fixing it find out why it broke! (twisted wires, too short got caught) and solve that or it will happen again.
strip off about 15-20 mm on both sides
dont forget to put the heatshrink tube on
next twist twist wires from the center.
Now if you push them together and then twist them together not loose...
- Locked
DaveL485 submitted a new resource:
Rebuild your own Turbo (T3 / T34) - Rebuild your own Turbo (T3 / T34)
Read more about this resource...
- Locked
DaveL485 submitted a new resource:
Renault 5 GT Turbo guide (Retro car mag feature) - Renault 5 GT Turbo guide (Retro car mag feature)
Read more about this resource...
- Locked
Featured my cars, and I wrote most of the buying info in the article.
Also available as a PDF download here: http://www.turborenault.co.uk/microdownloads/29/viewfile
- Locked
roddy21t submitted a new resource:
21 Turbo Headlamp Dismantle ... - 21 Turbo Headlamp Dismantle ...
Read more about this resource...
- Locked
andybond submitted a new resource:
RenaultSport Megane Sales figures - RenaultSport Megane Sales figures
Read more about this resource...
- Locked
These are freely available from Renault website. Link is here
- Locked
Adeyspec submitted a new resource:
Clio Cruise Control and Aftermarket Steering Wheels - Clio Cruise Control and Aftermarket Steering Wheels
Read more about this resource...
- Locked
a really useful link to Renaults own page. Displays models and variations.
http://www.renaultsport.co.uk/roadcars/heritage
- Locked
andybond submitted a new resource:
Megane R26 Rear disc and pads guide - Megane R26 Rear disc and pads guide
Read more about this resource...
- Locked
Adeyspec submitted a new resource:
How to build a genuine 300+bhp turbo clio - How to build a genuine 300+bhp turbo clio
Read more about this resource...
- Locked
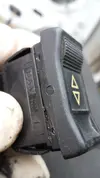
My passenger window was acting up- turned out both the switches has bad contact points.
Prise this rocker off carefully to remove the top of the switch
Remove this yellow bulb holder. It pulls out. You can replace the little bulb in here if the switch lighting doesnt work.
Prise out the white things CAREFULLY, making a note of orientation and where the lugs at the side clip in
Lift out the metal springs on the outside of the switch. These pull out with a little bit of a tug.
See those copper plates at the bottom? Make a note of how they sit/orientation and then fish them out. Theyre not fastened in they'll come out, if a bit fiddly. Clean the small contact points on both sides, one is square and one is rounded...
andybond submitted a new resource:
Adding EFI to your Five GT Turbo - Adding EFI to your Five GT Turbo
Read more about this resource...
- Locked
Authors: Mart & Big Steve – Raider
May 2014
*Note this Carb has had the choke-flap assembly removed. If the choke-flap is still in situ, it’s fairly obvious which components of the choke assembly will need to be disconnected/removed/re-fitted whilst stripping & re-building the carb.
1. Disconnect all carb hoses, choke cable, accelerator cable, and throttle-return spring. Remove carb elbow (3 x 10mm nuts). Lift off the large o-ring & triangular retaining plate. Remove the carb from the inlet manifold (2 x 13mm nuts).
2. Remove carb top by undoing 6 x flat headed screws.
3. Carefully remove carb top taking care to remove gasket and float. You will find fuel in the float chamber that you need to empty into a jerry can...
- Locked
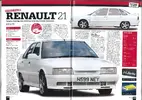
DaveL485 submitted a new resource:
Renault 21 Turbo head gasket change - Renault 21 Turbo head gasket change
Read more about this resource...
- Locked
andybond submitted a new resource:
Megane 225/R26 basic modification guide - Megane 225/R26 basic modification guide
Read more about this resource...
- Locked